





Quick Answer: Open Safari, tap the Tabs button in the bottom-right corner, tap Private, then choose the tab-count button (it’ll show something like “4 Tabs”) or tap Start Page.
Your address bar switches from black back to white, and you’re out of Private Browsing instantly.
Want it gone for good — for a kid’s iPhone or a shared device? Go to Settings → Screen Time → Content & Privacy Restrictions → Web Content → Limit Adult Websites, and the Private option disappears from Safari entirely.
Your Safari address bar turned black, and now you can’t figure out how to make it white again.
Or maybe you just found out your teenager has been using Private Browsing to dodge the family content filter.
Either way, you’re not alone. We tested every available method on an iPhone 17 Pro running iOS 26.5.1, and below is exactly which one fits your situation.
Why Turning Off Private Browsing Actually Matters
Private Browsing isn’t just a toggle you forget about.
While it’s on, Safari won’t save your history, search terms, or AutoFill data, and it strips tracking identifiers from the websites you visit.
That’s great for privacy, but it also means your bookmarks bar, recently closed tabs, and saved logins behave differently than you expect.
Most people want to turn it off for one of three reasons: they’re done browsing privately and want their normal tabs back, they share a device and need history to start recording again, or they’re a parent who discovered Private Browsing is how their kid hides what they’re doing online.

Each scenario needs a slightly different fix, which is why a single “tap this one button” answer doesn’t actually solve the problem for most readers.
It also matters because Apple changed how this works.
Safari’s tab system was rebuilt for iOS 26’s Liquid Glass redesign, and a few guides still floating around the web describe menu steps that no longer exist in their original form.
Here’s what we confirmed actually works right now.
Method 1: The Tab Switcher (Works on Every iOS 26 iPhone)
This is the most reliable method because it works the same way whether you have one private tab open or twenty.
Step 1: Open Safari on your iPhone.
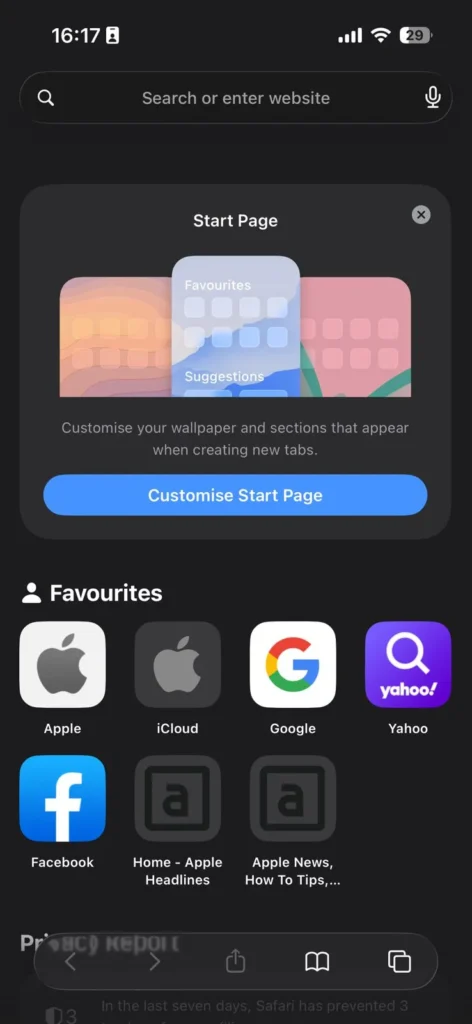
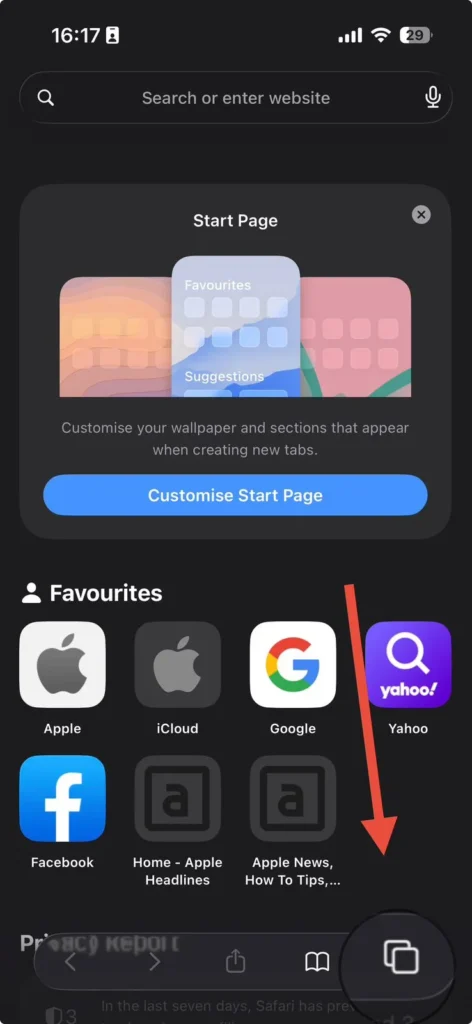
Step 2: Tap the Tabs button in the bottom-right corner.
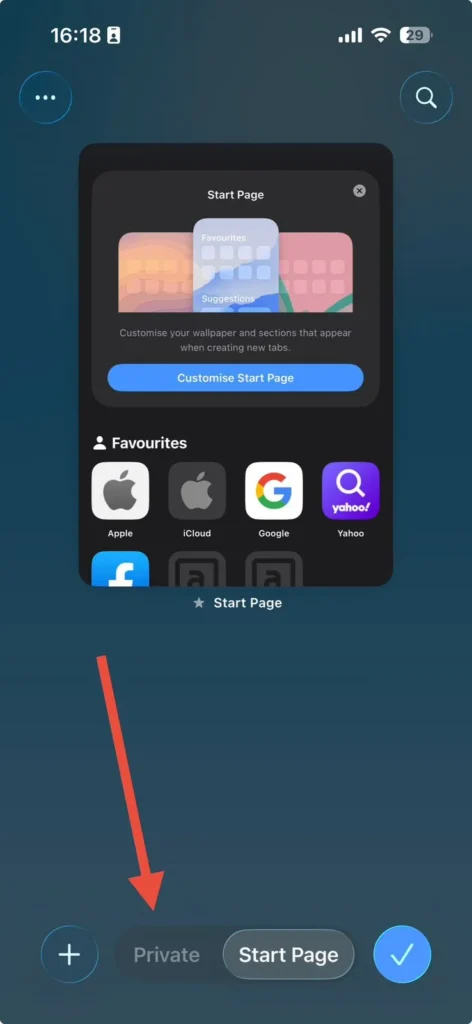
Step 3: Tap Private at the bottom-left of the screen.
Step 4: Tap the tab-count button (for example, “4 Tabs”) or tap Start Page.
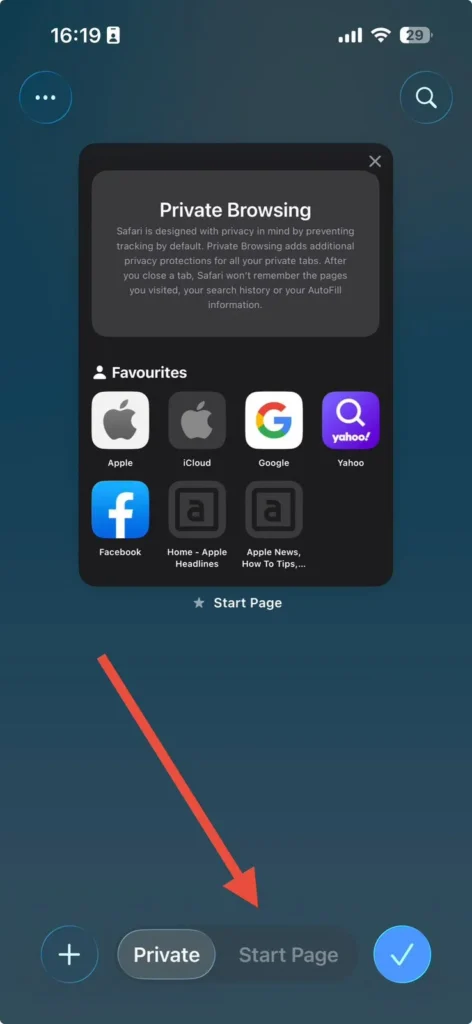
Step 5: Tap Done to confirm.
Your screen background lightens from black to white. That color shift is your visual confirmation that regular browsing mode is active again.
If your private tabs are locked behind Face ID, you’ll need to authenticate first. Look at your iPhone or place a finger on the Touch ID sensor, then proceed with the steps above once your private tabs unlock.
If Face ID itself is misbehaving beyond this one screen, that’s usually a separate hardware or software issue worth troubleshooting on its own.
Method 2: The One-Tap Shortcut Apple Quietly Added
When we tested this on our iPhone 17 Pro running iOS 26.5.1, we found Apple had simplified the process even further. Most competing guides still describe only the tab-switcher method above, but there’s now a faster route built directly into Safari’s toolbar.
Step 1: Open Safari.
Step 2: Tap the More button (three dots) in the toolbar.
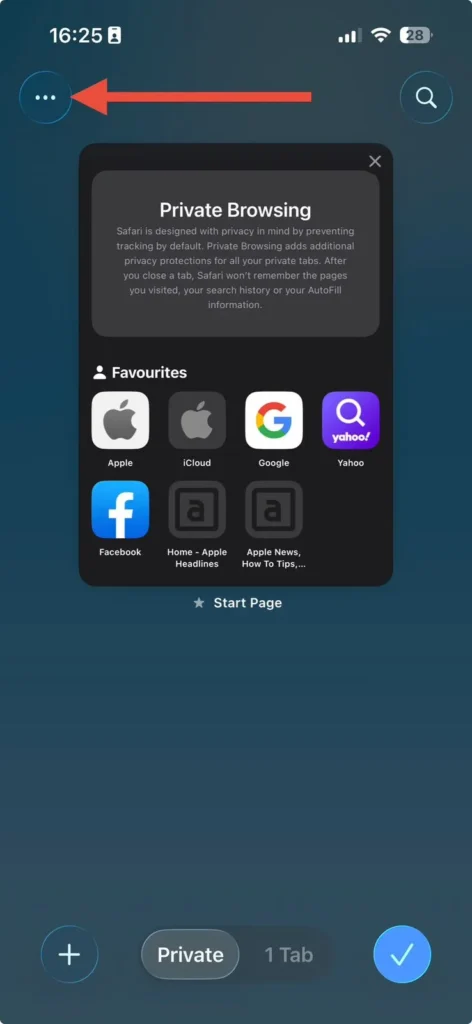
Step 3: Choose Select Tab.

That’s it. The address bar instantly flips from dark to light, confirming a standard browsing tab has opened. This shortcut is handy when you’re already mid-task and don’t want to dig through the full tab-grid view.
Pro Tip: Switching Off Isn’t the Same as Closing
Expert Insight: Here’s something almost every guide glosses over. Exiting Private Browsing doesn’t delete your private tabs — it just moves you to a different view.
Those tabs stay open, fully loaded, and recoverable by anyone who picks up your unlocked phone, until you manually close them.
If privacy is the actual goal (not just switching views), open the Private tab group, tap the three dots in the top-left corner, choose Select Tabs, pick the ones you want gone, and tap Close. Only then is that session truly finished.
A Simple Way to Think About It
Picture Safari’s tabs as two separate decks of cards sitting side by side on a table: a “Private” deck and a “Regular” deck.
Turning off Private Browsing doesn’t shuffle those cards away or burn them — it just turns your attention to the other deck.
The private cards are still sitting right there, face up, until you physically pick them up and put them away.
That’s exactly how Safari’s tab groups behave, and it’s why locking or closing private tabs matters if someone else ever borrows your phone.
Method 3: Permanently Disable Private Browsing (Screen Time)
Manually switching tabs only works if the other person doesn’t know how to switch them back. For parental controls or a fully shared family device, you need to remove the option altogether.
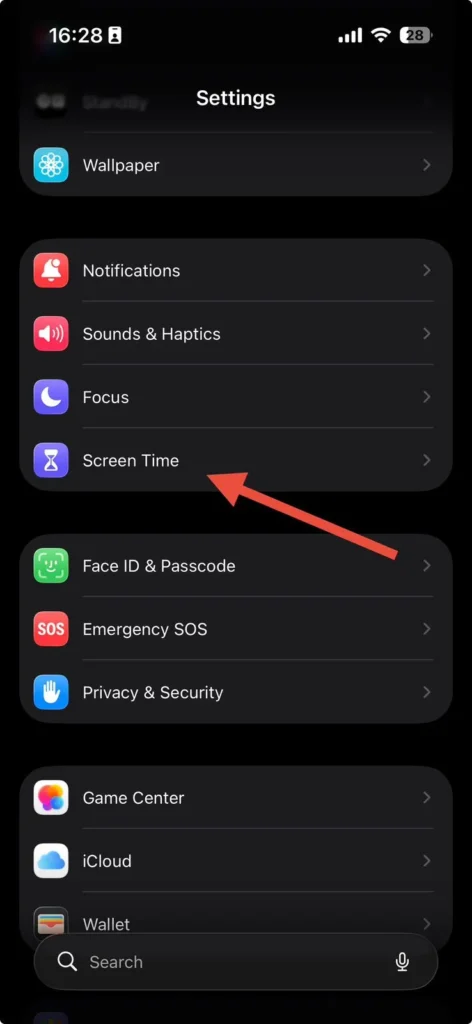
Step 1: Open Settings and tap Screen Time.
Step 2: Tap Content & Privacy Restrictions, then toggle it on.
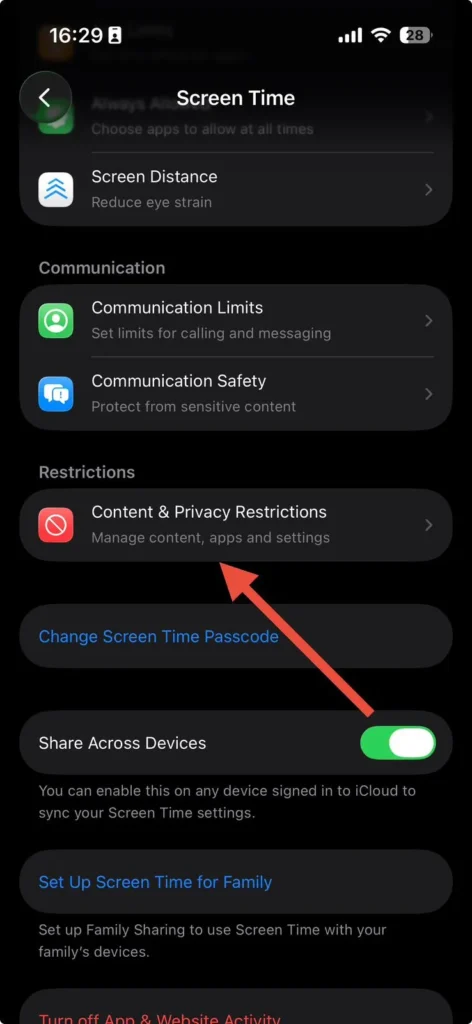
Step 3: Tap Content Restrictions.
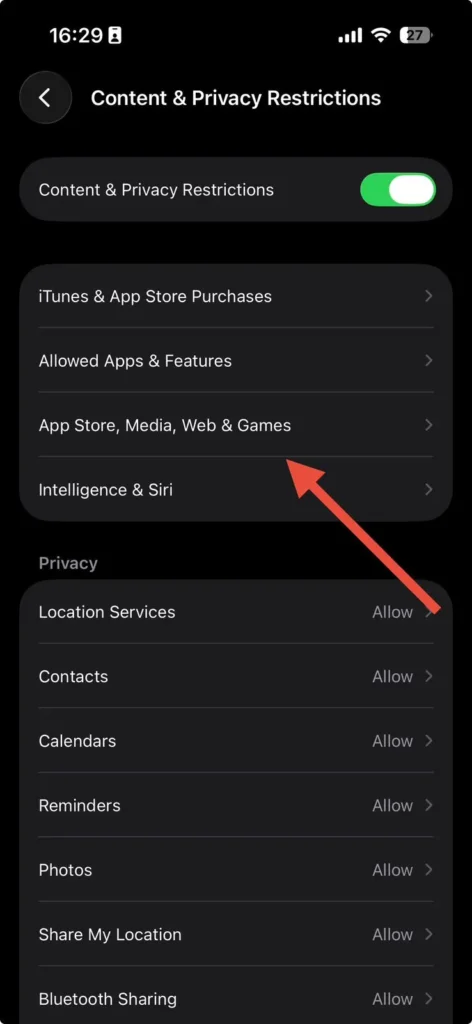
Step 4: Tap App Store, Media, Web & Games
Step 5: Tap Web Content.
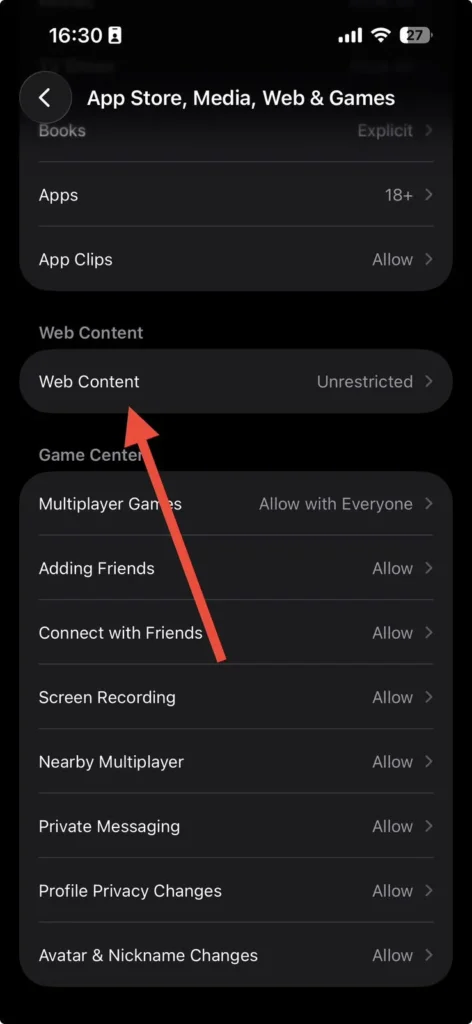
Step 6: Select Limit Adult Websites.
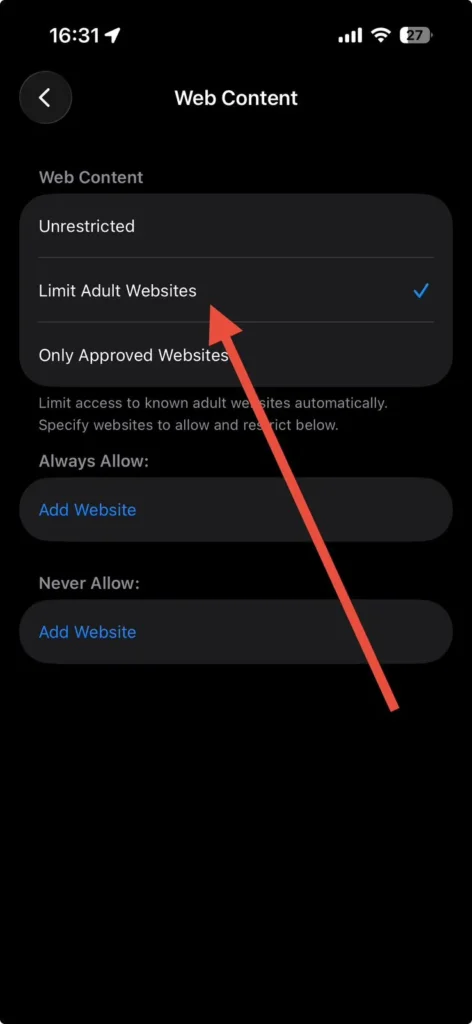
Once that’s set, open Safari and check the tab switcher again. The Private option is gone completely, not just hidden.
This is genuinely a permanent disable, not a workaround, and it requires a separate Screen Time passcode to reverse — different from the device’s unlock passcode.
Real-World Example: What This Actually Looks Like
A reader in Columbus, Ohio, wrote to us after noticing her 13-year-old’s search history had unusual gaps.
It turned out he’d learned to tap Private before opening anything he didn’t want her to see, then switch right back when he heard her coming.
Closing the tabs manually each time wasn’t realistic for her – he’d just reopen Private Browsing the next day.
The fix wasn’t a stricter conversation. It was Method 3 above.
Once Content & Privacy Restrictions removed the Private option from Safari entirely, the workaround stopped existing. That’s the difference between temporarily switching off Private Browsing and permanently disabling it.
Bonus: Turning Off Private Browsing on iPad
The keyword “turn off private browsing on iPad” sends a lot of people here too, and the good news is the process is nearly identical to iPhone.
- Open Safari on your iPad.
- Touch and hold the Tabs button.
- Tap the tab-count button or tap Start Page.
The Screen Time method for permanently disabling it is identical on iPad — same settings path, same result.
Troubleshooting: What If This Doesn’t Work?
The “Private” button is missing or grayed out.
This almost always means Screen Time is already restricting it, possibly set up by someone else.
Open Settings → Screen Time → Content & Privacy Restrictions → Content Restrictions → Web Content, and choose Unrestricted Access if you want Private Browsing available again.
Your iPhone is managed by a school or employer.
A Mobile Device Management (MDM) profile can block Private Browsing at the system level, separate from Screen Time.
Check Settings → General → VPN & Device Management. If a profile is listed there, the restriction is set by an administrator, and you’ll need to contact them directly.
Safari won’t respond at all.
Force quit and relaunch it. On Face ID iPhones, swipe up and hold to open the app switcher, then swipe Safari away before reopening it. If that doesn’t help, restart the device.
Face ID won’t unlock your private tabs.
Try your device passcode as a fallback. If Face ID consistently fails across the whole phone, not just Safari, that points to a separate hardware or settings issue rather than anything specific to Private Browsing.
Key Takeaways
- Tap Tabs → Private → [tab count] or Start Page → Done to exit Private Browsing on iPhone or iPad.
- The More button → New Tab shortcut is the fastest route once you’re already inside Safari.
- Switching off Private Browsing doesn’t close your private tabs — close them manually for real privacy.
- Use Screen Time → Content & Privacy Restrictions → Web Content → Limit Adult Websites to permanently remove the option.
- A missing “Private” button usually means Screen Time or an MDM profile is already restricting it.
Frequently Asked Questions
Use the tab-switcher method (Method 1). It moves you back to your regular tabs without closing anything, including your private ones, which stay accessible until you close them yourself.
Yes. Screen Time’s Content & Privacy Restrictions, set to Limit Adult Websites under Web Content, removes the Private Browsing option from Safari entirely until you turn the restriction back off.
No. Turning it off simply returns you to normal browsing. Any browsing you did while private was never recorded in the first place, so there’s nothing to “recover” from that session once you close those tabs.
Chrome doesn’t use Safari’s lock-and-switch system. Open Chrome, tap the tabs icon, tap the incognito icon at the top, then tap Edit and Close All Tabs, or swipe right to exit Incognito Mode entirely.
Private Browsing only ever hid your activity from other people using your device — not from your internet provider, your Wi-Fi network, or the websites themselves. Turning it off doesn’t change that; it just resumes normal history and cookie saving going forward.
Sources
- Apple Support: Turn Private Browsing on or off on your iPhone
- Apple Support: Turn Private Browsing on or off on your iPad
- Apple Support: How to use Locked Private Browsing in Safari
Related Reading on AppleHeadlines
- How to See History on Safari iOS 26
- Safari History Not Showing on iOS 26? 7 Quick Fixes
- How to Delete Search History on iPhone
- How to Turn Off Find My iPhone: 5 Proven Methods
- iOS 27 Complete Guide: Parental Controls, Siri AI & More
Still seeing private tabs you didn’t open, or history that won’t show up the way it should? Our guide to fixing missing Safari history on iOS 26 walks through the other side of this exact problem.
Disclaimer
This guide reflects Safari’s behavior on iOS 26.5.1 as of June 2026. Apple periodically adjusts menu names and locations in software updates, so steps may shift slightly in future iOS releases. This article is for informational purposes only and isn’t a substitute for Apple’s official support documentation for your specific device and software version.

T’kal is the lead strategist and developer behind Apple Headlines. With a background in digital marketing and web development, he specializes in technical Apple troubleshooting, software news, and hardware rumors. T’kal focuses on delivering high-authority tech content that bridges the gap between Apple enthusiasts and the latest industry innovations.