


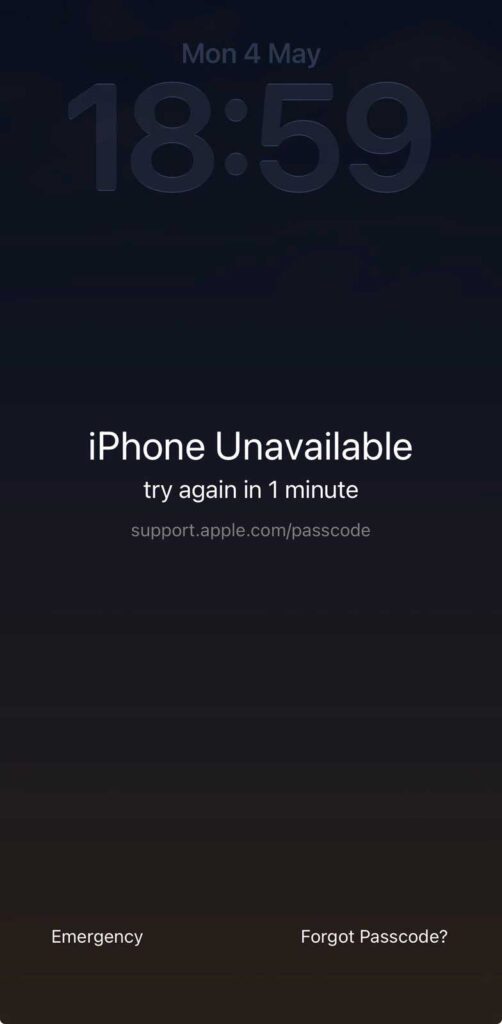
If your iPhone says “Unavailable,” you entered the wrong passcode too many times.
On iOS 15.2 or later, tap “Forgot Passcode?” or “Erase iPhone“ right on the lock screen, sign in with your Apple ID, and restore from a backup.
No computer needed.
If that option isn’t showing, use Recovery Mode with a Mac or PC.
Full steps below.
You glanced at your iPhone, typed in what you thought was your passcode – and now the screen reads “iPhone Unavailable.”
Panic sets in. Your photos, messages, banking apps – everything feels locked away forever.
Take a breath.
You are not alone, and this is fixable.
This guide walks you through every working method for the iphone unavailable fix, including options that save your data before erasing anything.
Quick story on iPhone Unavailable Fix
Why Does Your iPhone Say “Unavailable”?
Before jumping to fixes, it helps to understand what triggered this.
Why does iPhone say unavailable?
Apple’s security system is doing exactly what it was designed to do.
Every time you enter the wrong passcode, iOS adds a delay penalty.
Here’s the exact lockout progression Apple uses:
| Failed Attempts | Result |
|---|---|
| 1–5 | No lock (small delay after 5th) |
| 6 | iPhone disabled for 1 minute |
| 7 | Disabled for 5 minutes |
| 8 | Disabled for 15 minutes |
| 9 | Disabled for 60 minutes |
| 10+ | “iPhone Unavailable” or “Security Lockout” — permanent until reset |
After 10 failed attempts, iOS 15.2 and later shows the “iPhone Unavailable” screen with a countdown timer or an Erase iPhone option. On older iOS versions, you’ll see “iPhone is Disabled.” Same problem, slightly different labels.
Why Would iPhone Say Unavailable Without Me Trying?
This catches many people off guard. Common real-world reasons include:
This is not a glitch – it’s Apple’s anti-theft protection working correctly.
The bad news: you can’t skip it.
The good news: your data isn’t gone yet.
The 3 Key Things to Know Before You Start
Method 1: Fix iPhone Unavailable Directly on the Lock Screen (Fastest — iOS 15.2+)
This is the easiest iphone unavailable fix and requires zero equipment.
Apple added this feature in iOS 15.2 in December 2021. If your iPhone runs iOS 15.2 or later (iPhone 6s and newer can run this), this should be your first attempt.
Step-by-Step: Erase From Lock Screen
Total time: 5–10 minutes if you have an iCloud backup.
⚠️ Important: If you don’t see “Forgot Passcode?” on the lock screen, your iOS version may be below 15.2, or the feature requires the phone to be connected to Wi-Fi or a cellular network to verify your Apple ID.
Method 2: iPhone Unavailable Fix Without Erasing — Wait It Out
If your iPhone says “unavailable — try again in X minutes,” there’s a chance you haven’t hit the 10-attempt limit yet.
This is the only true iphone unavailable fix without erasing your device.
Think of it like a hotel safe that jams after too many wrong attempts. The safe isn’t broken – it’s just making you slow down and think.
The correct combo still works once the lockout lifts.
This method only works if you remember your actual passcode. If you genuinely don’t know it, move to Method 3.
Method 3: iPhone Unavailable Fix With iTunes (or Finder) Using Recovery Mode
This is the classic iphone unavailable fix with itunes method. It works on all iPhone models and all iOS versions. You’ll need a Mac or Windows PC.
What You Need
- A Mac (use Finder) or Windows PC (use iTunes — download from Apple’s website if needed)
- A USB-C or Lightning cable that came with your iPhone
- Your Apple ID and password
Step-by-Step: Recovery Mode Restore
Step 1 — Put your iPhone into Recovery Mode:
The button combination depends on your model:
- iPhone 8, SE (2nd/3rd gen), X, 11, 12, 13, 14, 15, 16 (Face ID models):
- Press and quickly release Volume Up.
- Press and quickly release Volume Down.
- Press and hold the Side button until the recovery mode screen (cable + computer icon) appears.
- iPhone 7 / 7 Plus:
- Press and hold Volume Down + Side button together.
- Keep holding until the recovery screen appears.
- iPhone 6s, SE (1st gen), or older:
- Press and hold Home + Top (or Side) button together.
- Keep holding until the recovery screen appears.
Detailed Recovery Mode Guide

Step 2 — Connect to your computer:
Connect your iPhone via USB while holding the buttons (for older models) or immediately after the recovery screen appears.
Step 3 — Restore in Finder or iTunes:
Total time: 20–45 minutes depending on your internet speed (iOS firmware download is ~6–8 GB).
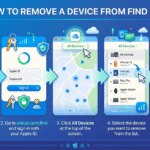
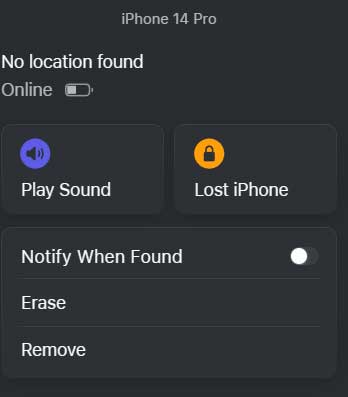
Method 4: Use iCloud’s “Find My” to Erase Remotely
If you can’t reach your iPhone physically — or if you’d rather do this from another device — iCloud’s Find My feature can erase it remotely.
Note: This requires the iPhone to be online (Wi-Fi or cellular). If it’s fully offline, the erase command queues and executes when it reconnects.
Expert Insight: Always Check Your iCloud Backup Date First
Before hitting “Erase,” open a browser and go to icloud.com → Settings → iCloud Backup. Check when your last backup was made.
If it was today or yesterday, you’re in great shape. If it was months ago, you may lose recent photos and messages. In that case, consider whether waiting for the timer (Method 2) is worth trying first.
Real-World Case Study: Sarah’s “Permanently Unavailable” iPhone
Sarah, a nurse in Chicago, handed her iPhone 13 to her 4-year-old nephew for 10 minutes while cooking Thanksgiving dinner. When she got it back, the screen read “iPhone Unavailable.” No timer — just a permanent lock with an Erase option. She’d never set up iCloud backup consistently.
Her last backup was 6 months old. She lost 6 months of photos. The lesson? She now has iCloud Backup set to automatic, and she pays the $2.99/month for 200GB of iCloud storage. After the erase and restore from the old backup, her contacts, apps, and old photos came back. The 6-month gap was gone for good.
Don’t be Sarah. Enable iCloud Backup right now: Settings → [Your Name] → iCloud → iCloud Backup → Back Up Now.
My iPhone Says “Unavailable” Permanently — What Does That Mean?
“My iPhone says unavailable permanently” — this phrase shows up constantly in Apple Support forums. It simply means the 10-attempt limit was reached and no active timer is counting down. The word “permanently” is misleading. It means “locked until you erase it,” not broken forever.
You still have all four methods above available. Nothing has changed about your repair options. Your data is still physically on the device — it just can’t be accessed without the correct passcode or an erase-and-restore.
What If None of These Methods Work? Troubleshooting Deep Dive
Problem: “Forgot Passcode?” Button Isn’t Showing
Problem: iTunes Says “iPhone Is in Recovery Mode” But Won’t Restore
Problem: Apple ID Password Isn’t Accepted After Erase
Problem: iPhone Stuck on Apple Logo After Recovery Mode Restore
Problem: iPhone Says “Unavailable” After Update
iPhone Unavailable Fix by Model: Quick Reference
| iPhone Model | Fastest Fix Method | Recovery Mode Buttons |
|---|---|---|
| iPhone 16, 15, 14, 13, 12, 11, X | Lock screen “Forgot Passcode?” (iOS 15.2+) | Vol Up → Vol Down → Hold Side |
| iPhone SE (3rd gen, 2nd gen) | Lock screen “Forgot Passcode?” (iOS 15.2+) | Vol Up → Vol Down → Hold Side |
| iPhone 8 / 8 Plus | Lock screen or iTunes | Vol Up → Vol Down → Hold Side |
| iPhone 7 / 7 Plus | iTunes Recovery Mode | Hold Vol Down + Side |
| iPhone 6s, SE (1st gen) | iTunes Recovery Mode | Hold Home + Top button |
How to Prevent “iPhone Unavailable” From Happening Again
Once you’re back in, take 5 minutes to protect yourself:
User Also Asks
Only if the timer hasn’t expired and you remember your correct passcode. Once the device is in permanent lockout mode, erasing is required. However, if you have an iCloud or computer backup, your data is restored afterward. There is no method to bypass the passcode itself without erasing.
This usually means too many wrong attempts were entered before you tried the correct one. The lockout is time-based and attempt-based, not a judgment on whether you currently know the right code. Once the timer expires, your correct passcode should work. If it doesn’t, the passcode may have been changed at some point.
The maximum automatic timer is 60 minutes. After 9 failed attempts, the phone locks for 1 hour. After the 10th attempt, it moves to a permanent unavailable state that requires an erase. There is no timer that lasts longer than 60 minutes — if you’re past that, you’ve likely reached the 10-attempt threshold.
No. Even Apple Retail and Apple Support cannot bypass a passcode lockout without erasing the device. Apple’s encryption architecture makes it impossible — even for Apple engineers. This is by design to protect user privacy and prevent theft. They will walk you through the same Recovery Mode process described in this guide.
Absolutely not. It means the security lockout was triggered by too many wrong passcode entries. The hardware is fully functional. All methods in this guide will restore your iPhone to normal working condition. Your data is still physically on the device — it just can’t be read without the passcode or an authorized erase.
Disclaimer: This article is intended for informational purposes only. Methods described involve erasing your device, which results in data loss if no backup exists. Anthropic, AppleHeadlines.com, and the author are not responsible for any data loss that occurs while following these steps. Apple’s software and recovery procedures may change with future iOS updates. Always verify steps against the latest guidance at apple.com/support. If your device was purchased second-hand and you do not have the original Apple ID credentials, contact Apple Support directly before proceeding.
Last updated: May 2026 | Compatible with iOS 18, iOS 17, iOS 16, iOS 15.2+ | Tested on iPhone 16, 15, 14, 13, 12, SE (3rd gen)
Was this guide helpful?
Bookmark AppleHeadlines.com for the latest iPhone tips, iOS update guides, and Apple troubleshooting walkthroughs – updated weekly.

T’kal is the lead strategist and developer behind Apple Headlines. With a background in digital marketing and web development, he specializes in technical Apple troubleshooting, software news, and hardware rumors. T’kal focuses on delivering high-authority tech content that bridges the gap between Apple enthusiasts and the latest industry innovations.
