iPhone recovery mode is a built-in diagnostic state that lets your computer reinstall iOS on a malfunctioning iPhone.
The button sequence differs by model: iPhone 8 and later use Volume Up → Volume Down → hold Side; iPhone 7 uses Side + Volume Down; iPhone 6s and older use Home + Power.
Always try Update before Restore — Update reinstalls iOS without erasing your data.
On Windows, use the Apple Devices app (not old iTunes) for iPhone 16 and iPhone 17.
iPhone 16 and iPhone 17 support wireless restore using a nearby iPhone — no computer needed.
If recovery mode is not working, suspect the USB cable first — it is the most common culprit.
A persistent recovery mode loop after multiple restores often points to a hardware failure.
Choosing Restore erases all data — verify your last backup date before proceeding.
What Is iPhone Recovery Mode — and Why Does It Matter?
Think of your iPhone like a car engine. When everything is running, you never pop the hood. But when the engine seizes, you need direct access to the mechanics underneath. iPhone recovery mode is that hood latch.
It puts your iPhone into a low-level diagnostic state. In this state, your computer — not your iPhone’s busted software — takes control. You can then reinstall iOS, erase a forgotten passcode, or fix a broken update.
Without recovery mode, a bricked iPhone would be a $1,000 paperweight.
When Should You Use iPhone Recovery Mode?
Use iPhone recovery mode when your iPhone is experiencing any of these issues:
Your iPhone is stuck on the Apple logo with no progress bar
Your device is in a boot loop (keeps restarting and never fully turns on)
You forgot your passcode and the device is disabled
A software update failed midway through and left your phone unresponsive
You recently attempted to jailbreak your device and something went wrong
iTunes or Finder shows an error code when trying to restore normally
Expert Insight: Many users try to restore their iPhone directly through iTunes without first entering recovery mode. This almost always fails when iOS is already corrupted. Recovery mode bypasses the damaged software entirely and gives the computer a clean lane to communicate with the device hardware.
What You Need Before You Start
Do not skip this preparation step. Having the right tools ready saves you from getting stuck halfway through.
A working Mac or Windows PC — You cannot complete a full restore using only your iPhone.
A USB cable — USB-C for iPhone 15 and later; Lightning for iPhone 14 and older. Use Apple’s official cable if possible.
iTunes (Windows) or Finder (Mac, macOS Catalina or later) — Make sure your software is updated.
An internet connection — iOS firmware files are several gigabytes.
Time — The download alone can take 10–30 minutes depending on your connection speed.
A Note About Backups
If you enter recovery mode and choose Restore, all data on your iPhone will be permanently erased. There is no undo.
Before proceeding, ask yourself: When did I last back up?
Check iCloud Backup: Go to Settings → [Your Name] → iCloud → iCloud Backup → Last Backup
Check iTunes/Finder backup: Open iTunes or Finder and look under your device’s summary
If your last backup is recent, great. If not, and your iPhone still partially responds, try backing up right now before going further.
How to Put iPhone in Recovery Mode: Step-by-Step Instructions
The exact button combination depends on your iPhone model. Find yours below.
This includes all iPhone SE (2nd and 3rd generation) models. These models use the same sequence.
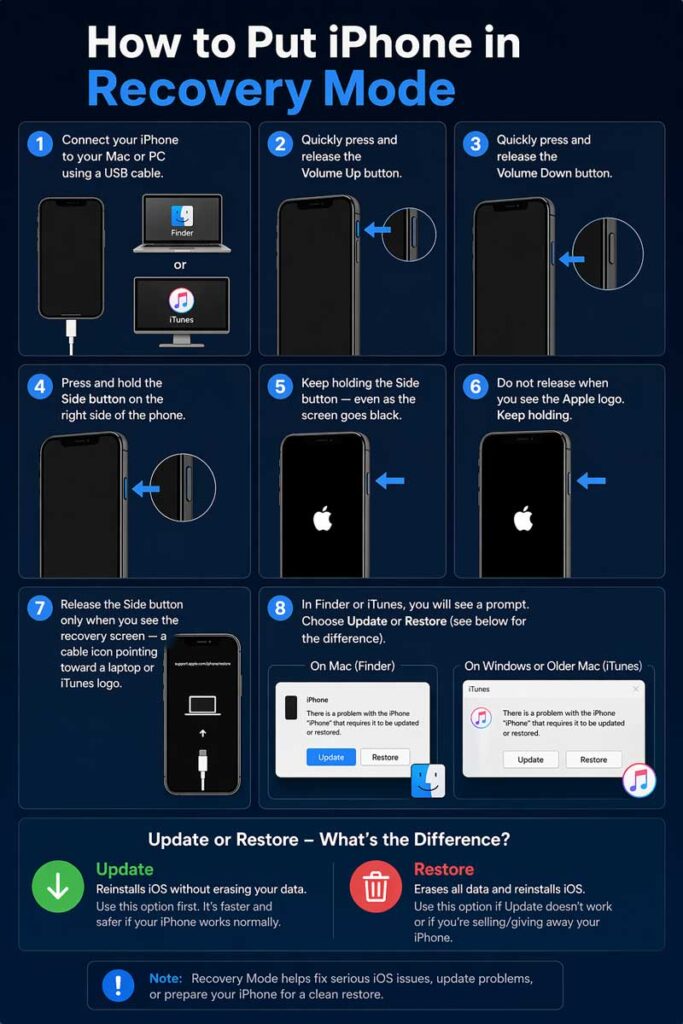
Connect your iPhone to your Mac or PC using a USB cable.
Open Finder (Mac, macOS Catalina or later) or iTunes (Windows or macOS Mojave and earlier).
Quickly press and release the Volume Up button.
Quickly press and release the Volume Down button.
Press and hold the Side button on the right side of the phone.
Keep holding the Side button — even as the screen goes black.
Do not release when you see the Apple logo. Keep holding.
Release the Side button only when you see the recovery screen — a cable icon pointing toward a laptop or iTunes logo.
In Finder or iTunes, you will see a prompt. Choose Update or Restore (see below for the difference).
Pro Tip: The most common mistake is letting go of the Side button when the Apple logo appears. That boots the phone normally. You must hold through the Apple logo until the recovery screen cable icon appears. This usually takes 10–15 seconds of holding.
Step-by-step guide to enter iPhone Recovery Mode using Finder or iTunes
iPhone Recovery Mode: iPhone 7 and iPhone 7 Plus
Connect your iPhone 7 to your Mac or PC.
Open Finder or iTunes.
Press and hold both the Side button and the Volume Down button simultaneously.
Keep holding both buttons — do not let go at the Apple logo.
Release when the recovery mode cable screen appears.
iPhone Recovery Mode: iPhone 6s, 6, SE (1st Gen), and Older
Connect your iPhone to your Mac or PC.
Open Finder or iTunes.
Press and hold both the Home button and the Power (top or side) button simultaneously.
Keep holding through the Apple logo.
Release when the recovery mode cable screen appears.
How to Put iPhone in Recovery Mode Without a Computer
Technically speaking, you cannot complete a full restore without a computer. However, there are two partial workarounds worth knowing.
Method 1: iPhone Recovery Mode Without Computer (Wireless Restore — iPhone 16 and Later)
Apple quietly introduced wireless restore on iPhone 16. If your phone is stuck in recovery mode, another nearby iPhone running iOS 18 or later can help rescue it — no Mac or PC required.
Place the working iPhone near the recovery mode iPhone.
On the working iPhone, tap Continue when the Recovery Options prompt appears.
A verification code will appear on the iPhone in recovery mode.
Enter the code on the working iPhone.
Choose Exit Recovery Mode first. If that fails, tap System Recovery.
This is a genuine game-changer for iPhone recovery mode iPhone 16 and iPhone recovery mode iPhone 17 users who don’t have a computer nearby.
Method 2: Force Restart to Exit Recovery Mode (Without Restoring)
If your iPhone entered recovery mode accidentally and you just want out:
Disconnect the USB cable.
For iPhone 8 and later: Press and release Volume Up, press and release Volume Down, then hold the Side button until the Apple logo appears.
For iPhone 7: Hold Side + Volume Down until the Apple logo appears.
For iPhone 6s and older: Hold Home + Power until the Apple logo appears.
This exits recovery mode without erasing your data or restoring iOS.
Use iPhone Recovery Mode to fix forgotten password and restore your device بسهولة
Update vs. Restore: Which One Should You Choose?
Once your iPhone is detected in recovery mode, Finder or iTunes offers two options. This is the most important decision you’ll make in this process.
Option
What It Does
Erases Data?
Use When…
Update
Reinstalls iOS without touching your files
No
iPhone is frozen or boot-looping but not passcode-locked
Restore
Wipes the iPhone and installs fresh iOS
Yes, everything
Forgotten passcode, severe corruption, or Update fails
Start with Update whenever possible. If it fails — usually with an error code like 4013 or 4005 — then proceed to Restore.
The Night Sarah’s iPhone 15 Refused to Boot
Sarah, a nurse in Phoenix, Arizona, woke up at 5:30 AM for an early shift. Her iPhone 15 had auto-updated to a new iOS version overnight. It never finished. The screen showed the Apple logo — and nothing else.
She didn’t have her MacBook at home. But she did have her husband’s Windows PC. She downloaded the Apple Devices app from the Microsoft Store (Apple’s official replacement for iTunes on Windows 11), plugged in her iPhone with the included USB-C cable, ran the Volume Up → Volume Down → hold Side button sequence, and the recovery screen appeared within 20 seconds.
She chose Update. Fifteen minutes later, her iPhone 15 booted normally — with all her photos and contacts fully intact.
The key detail: she used the Apple Devices app, not an outdated version of iTunes. Old iTunes versions on Windows often fail to detect iPhones in recovery mode in 2025 and 2026.
iPhone Recovery Mode on Windows: What You Need to Know
iPhone recovery mode Windows users often hit an extra hurdle. Apple has phased out iTunes on modern Windows systems in favor of two options:
Apple Devices app — Available free from the Microsoft Store. Required for iPhone 16 and iPhone 17.
iTunes — Still works for older iPhones on Windows 10, but may cause issues on Windows 11.
Steps for iPhone Recovery Mode on Windows 11
Download the Apple Devices app from the Microsoft Store (search “Apple Devices”).
Install and launch the app.
Connect your iPhone via USB.
Enter recovery mode using the button sequence for your model (see above).
The Apple Devices app will detect the iPhone and display the Update/Restore prompt.
If your iPhone is not recognized on Windows, try:
Using a different USB port (preferably USB 3.0)
Updating Windows drivers
Restarting the PC before connecting
What to Do After Recovery Mode: Setting Up Your iPhone
If you chose Restore, your iPhone will now show the Setup Assistant — the same screen new iPhones display out of the box.
Follow the on-screen prompts to select language and region.
Connect to Wi-Fi.
When prompted, choose Restore from iCloud Backup or Restore from Mac or PC to bring your data back.
Sign in with your Apple ID.
Wait for the restore to finish — this can take 20–60 minutes.
If you chose Update and it succeeded, your iPhone should reboot normally with all data intact.
What If iPhone Recovery Mode Is Not Working?
Problem: The Recovery Screen Won’t Appear
Possible causes and fixes:
Wrong cable — Non-Apple cables, especially cheap third-party ones, frequently cause detection failures. Try Apple’s original cable or a certified MFi cable.
USB hub — Connect directly to the computer’s USB port, not through a hub or dock.
Outdated Finder/iTunes/Apple Devices app — Update all software before trying again.
Button timing is off — The button sequence must be done at a specific pace. Too slow and the phone reboots; too fast and it doesn’t register. Practice the motion before connecting.
Problem: iPhone Got Stuck in Recovery Mode Loop
Your iPhone enters recovery mode, Finder detects it, but then it loops back to recovery mode again after the restore attempt.
Fix:
Try a different USB cable and USB port
If the loop persists after two restore attempts, this can indicate a hardware problem specifically a failing logic board or battery. Apple Store diagnostics are the next step.
Problem: Error 4013, 4005, or 9 During Restore
These errors typically mean:
A USB connection issue (try a different cable and port)
Security software is blocking the restore — temporarily disable antivirus
The iOS firmware download is corrupted — delete it and let iTunes/Finder re-download
Problem: How to Put iPhone in Recovery Mode When Disabled
A disabled iPhone (showing “iPhone is Disabled — Connect to iTunes”) is one of the most common reasons people search for recovery mode.
The steps are identical to those above — connect to a computer, enter recovery mode using the button sequence, and choose Restore.
Note that restoring a disabled iPhone always erases the device. You cannot update and keep data when the passcode is locked.
iPhone Recovery Software: Third-Party Options
If the manual method consistently fails, iPhone recovery software tools exist that enter and exit recovery mode with a single click. The most reputable options in 2026 include:
Tenorshare ReiBoot — Enter/exit recovery mode for free; paid tier for iOS repair
Dr.Fone (Wondershare) — Broad feature set; paid for most functions
iMazing — Excellent for backup management alongside recovery features
Important: Only download iPhone recovery software from official developer websites. Fake versions are a common vector for malware. Always verify the download URL matches the developer’s official domain.
Frequently Asked Questions
Will entering iPhone recovery mode erase all my data?
Not automatically. Entering recovery mode alone does nothing to your data. Data is only erased if you choose the Restore option in Finder or iTunes. The Update option reinstalls iOS without wiping your files.
Can I put my iPhone in recovery mode without a computer?
For a full restore, you need a computer. However, iPhone 16 and iPhone 17 support wireless restore using a nearby iPhone running iOS 18 or later. You can also force restart to exit recovery mode without a computer if you don’t need to restore.
How do I know if my iPhone is actually in recovery mode?
The recovery mode screen shows a cable icon pointing toward a computer on a black background. Your iPhone’s normal UI — the lock screen, apps, or Apple logo — will not be visible. Finder or iTunes will display a pop-up saying it has detected an iPhone in recovery mode.
My iPhone is stuck in recovery mode and won’t restore — what now?
First, try a different USB cable and a different USB port on your computer. If that doesn’t work, try the restore from a different computer entirely. If the iPhone continues to loop back into recovery mode after successful restores, this is typically a sign of a hardware issue — the logic board, battery, or connectors may be failing. Schedule an appointment at an Apple Store or Apple Authorized Service Provider.
Does recovery mode work the same on iPhone 17 as on older models?
Yes. The button sequence for iPhone 17 is identical to iPhone 8 and later: press and release Volume Up, press and release Volume Down, then hold the Side button until the recovery screen appears. The only new addition with iPhone 17 is the wireless restore option, which allows recovery using a nearby iPhone instead of a Mac or PC.
For the latest guides on Apple software and hardware, bookmark AppleHeadlines.com and follow us on social media.
Did this guide fix your iPhone? Share it with someone who’s panicking over a frozen Apple logo right now. They’ll thank you for it.
Disclaimer: This article is for informational purposes only. Entering recovery mode and choosing Restore will permanently erase all data from your iPhone if you do not have a current backup. AppleHeadlines.com is not responsible for any data loss resulting from following these instructions. For hardware-related issues, always consult an Apple Authorized Service Provider. Third-party software tools mentioned in this article are independent products not affiliated with Apple Inc.
Virginia J. Alfonso is a seasoned technology writer with a passion for all things digital. With over a decade of experience covering the latest in tech innovation, gadgets, and software, Virginia brings a unique blend of technical expertise and accessible writing to her work. Her articles focus on making complex tech topics easy to understand for readers of all levels.


