


You shot the perfect video — great lighting, great moment — then you hit play and heard it: wind roaring, a stranger’s conversation, or a song that’ll get your post flagged.
Now you need to remove the audio from your iPhone video before you share it.
You don’t need a fancy app or a desktop computer.
Your iPhone already has everything you need.
This guide covers every method available in 2026, from the 5-second Photos app trick to powerful free tools for advanced editing.
Read It Quick
Why Removing Audio from iPhone Videos Matters More Than Ever
Sharing video without thinking about the audio track is one of the most common mistakes iPhone users make. Here’s why it matters:
Whether you’re a casual iPhone user or a social media creator, knowing how to remove sound from video on iPhone is a skill that saves you time and headaches.
Method 1: Remove Audio from iPhone Video Using the Photos App (Fastest and Best Way)
This is the method Apple’s own AI Overview recommends – and for good reason. It takes under 10 seconds and requires zero downloads.
Works on: iOS 14 and later, including iOS 17, iOS 18, and iOS 26
Step-by-Step Instructions
STEP 1: Open the Photos app on your iPhone.
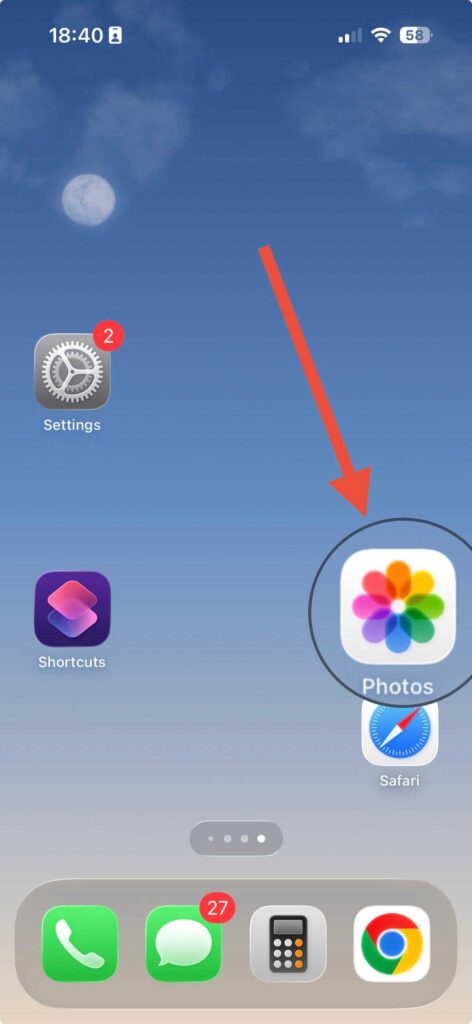
STEP 2: Find the video you want to mute and tap on it.
STEP 3: Tap Edit in the upper-right corner. (On iOS 18 and later, the Edit button is at the bottom of the screen.)
STEP 4: Tap the speaker icon in the top-left corner of the editor.

STEP 5: The icon will show a line through it — that means the audio is muted.
STEP 6:Tap Done to save your changes.
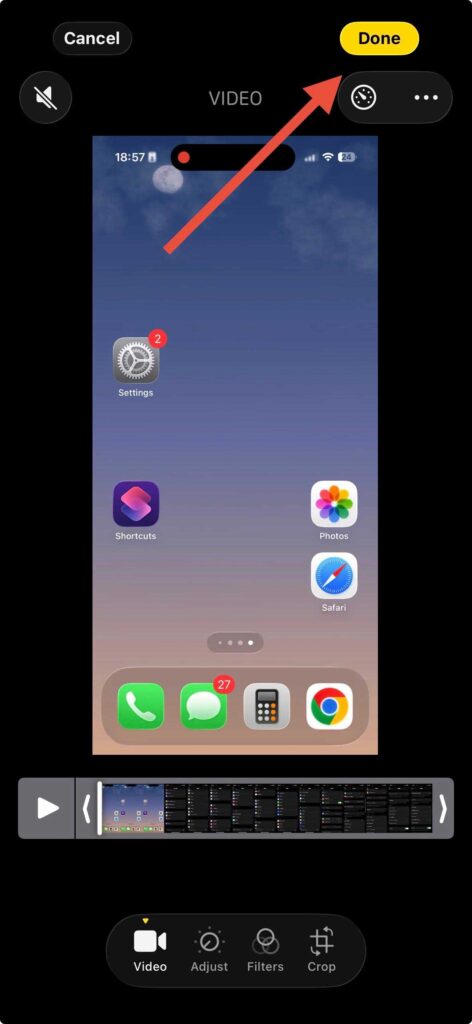
Play the video to confirm the speaker icon is grayed out.
That’s it. Your video is now silent and ready to share.
Important distinction: The Photos app mutes the video — it doesn’t permanently delete the audio track. Think of it like putting a sticky note over a label. The original audio is still underneath, and you can restore it anytime by tapping Edit → Revert → Revert to Original.
Pro Tip
Before muting, duplicate the video first. Long-press the video in Photos and tap Duplicate. Then mute the copy. This keeps your original file untouched without relying on Revert.
Method 2: Remove Audio from Part of a Video Using iMovie (Free & Pre-installed)
The Photos app mutes the entire video. If you only need to remove sound from a specific section — say, 10 seconds of wind noise in the middle — iMovie is your best free option.
iMovie comes pre-installed on most iPhones. If you don’t have it, download it free from the App Store.
Step-by-Step Instructions


What’s the Difference Between iMovie and Photos for This?
Think of the Photos app as a light switch — it’s either on or off for the whole video. iMovie is more like a dimmer with multiple zones. You can have sound in one part, silence in another, and a custom mix in a third. It gives you surgical control over the audio.
Method 3: Remove Audio from Video Free Using Online Tools (No Download Needed)
If you’re on a shared iPhone or don’t want to use storage, browser-based tools let you remove audio from video free without installing anything.
Top Free Online Tools in 2026
| Tool | File Size Limit | Formats Supported | Privacy |
|---|---|---|---|
| Clideo | 500MB | MP4, MOV, HEVC | Files deleted after 24 hours |
| Kapwing | 250MB (free) | MP4, MOV, AVI | Account required |
| Audio Remover | 500MB | MP4, WMV, MOV | Auto-deleted after processing |
How to Use Clideo to Remove Sound from Video iPhone
Privacy note: Always check a site’s data deletion policy before uploading personal videos. Reputable tools like Clideo and Audio Remover delete files within hours.
The Wedding Video Problem
Sarah, a photographer from Austin, TX, shared a short wedding reception clip on Instagram. The DJ had been playing a popular copyrighted song. Within two hours, Instagram muted her post automatically and flagged it for copyright violation.
She came back to the original video, used the Photos app to mute it, re-uploaded with a royalty-free song from Instagram’s music library, and the post went up without issues — gaining over 4,000 views.
The entire fix took less than 3 minutes. No desktop editing software. No third-party app.
Method 4: iPhone Separate Audio from Video Using iMovie’s Detach Feature
This is an advanced technique that most guides skip.
Instead of just muting the audio, you can detach it from the video and work with it as a separate track.
Why This Is Powerful
When you detach audio, you can:
How to Detach Audio in iMovie
Method 5: Remove Audio Using Shortcuts App (Tricky Automation Method)
This is the most underrated method, and almost no guide covers it. Apple’s Shortcuts app lets you create a one-tap automation to mute any video.
How to Build a “Mute Video” Shortcut
Now, whenever you’re in Photos, tap the Share icon on any video, scroll down to your shortcuts, and tap Mute Video. The muted version saves instantly to your Camera Roll.
Troubleshooting: What If It Doesn’t Work?
The Speaker Icon Doesn’t Appear in Photos
- Cause: The video may be a Live Photo or a screenshot video, which don’t support audio editing.
- Fix: Try opening in iMovie instead. Also, make sure the video isn’t stored in iCloud without being downloaded — tap the cloud icon to download it first.
The Muted Video Still Plays Audio After Sharing
- Cause: Some platforms cache the original file. The muted version should play silently on your device.
- Fix: Play the video directly from your Camera Roll to verify it’s muted before uploading.
iMovie Won’t Export the Video
- Cause: Low storage space is the most common culprit.
- Fix: Delete unused apps or files to free up at least 1–2GB of space. Then try exporting again at a lower resolution (720p instead of 4K).
Online Tool Upload Fails
- Cause: HEVC (High Efficiency Video) format from newer iPhones isn’t always supported.
- Fix: Go to Settings → Camera → Formats → Most Compatible. This switches recording to H.264, which works with virtually every tool.
Frequently Asked Questions
Does removing audio from an iPhone video delete it permanently?
No — the Photos app mutes the video. The original audio track stays intact. You can restore it anytime by going to Edit → Revert → Revert to Original. If you want permanent deletion, export the muted video using iMovie or CapCut instead.
Can I remove audio from a video on iPhone for free?
Yes, completely free. The Photos app, iMovie, and Shortcuts are all built-in and free on every iPhone. Third-party options like CapCut and Clideo also have free tiers.
How do I remove audio from just part of a video on iPhone?
Use iMovie. Import your clip, use the Split tool to isolate the noisy section, select it, and drag the volume slider to zero. This mutes only that segment while keeping audio in the rest of the video.
Will removing audio reduce the video file size?
Slightly, yes. Audio data typically represents 5–15% of a video file’s total size. Removing it won’t dramatically shrink the file, but it does help a little — especially for long recordings.
What’s the best way to remove copyrighted music from an iPhone video before posting?
CapCut’s AI Audio Remover can attempt to isolate and remove background music while keeping your voice. Alternatively, mute the entire video in Photos and add royalty-free music from your platform’s music library (Instagram, TikTok, and YouTube all offer built-in royalty-free options).
Disclaimer
The methods described in this article are based on iOS 17, iOS 18, and iOS 26 as of April 2026. Apple may change features or UI elements in future iOS updates. Third-party apps mentioned (iMovie, CapCut, Clideo) are subject to their own terms of service, pricing changes, and privacy policies. Always review a tool’s privacy policy before uploading personal video content. Removing audio that contains copyrighted music may still leave you subject to platform content policies — consult your platform’s guidelines before publishing.
Ready to mute your video right now? Open your Photos app, find that clip, and tap the speaker icon — it takes less time than reading this sentence. If you found this guide helpful, share it with someone who’s been struggling with noisy iPhone videos!Share
Related Posts


T’kal is the lead strategist and developer behind Apple Headlines. With a background in digital marketing and web development, he specializes in technical Apple troubleshooting, software news, and hardware rumors. T’kal focuses on delivering high-authority tech content that bridges the gap between Apple enthusiasts and the latest industry innovations.


