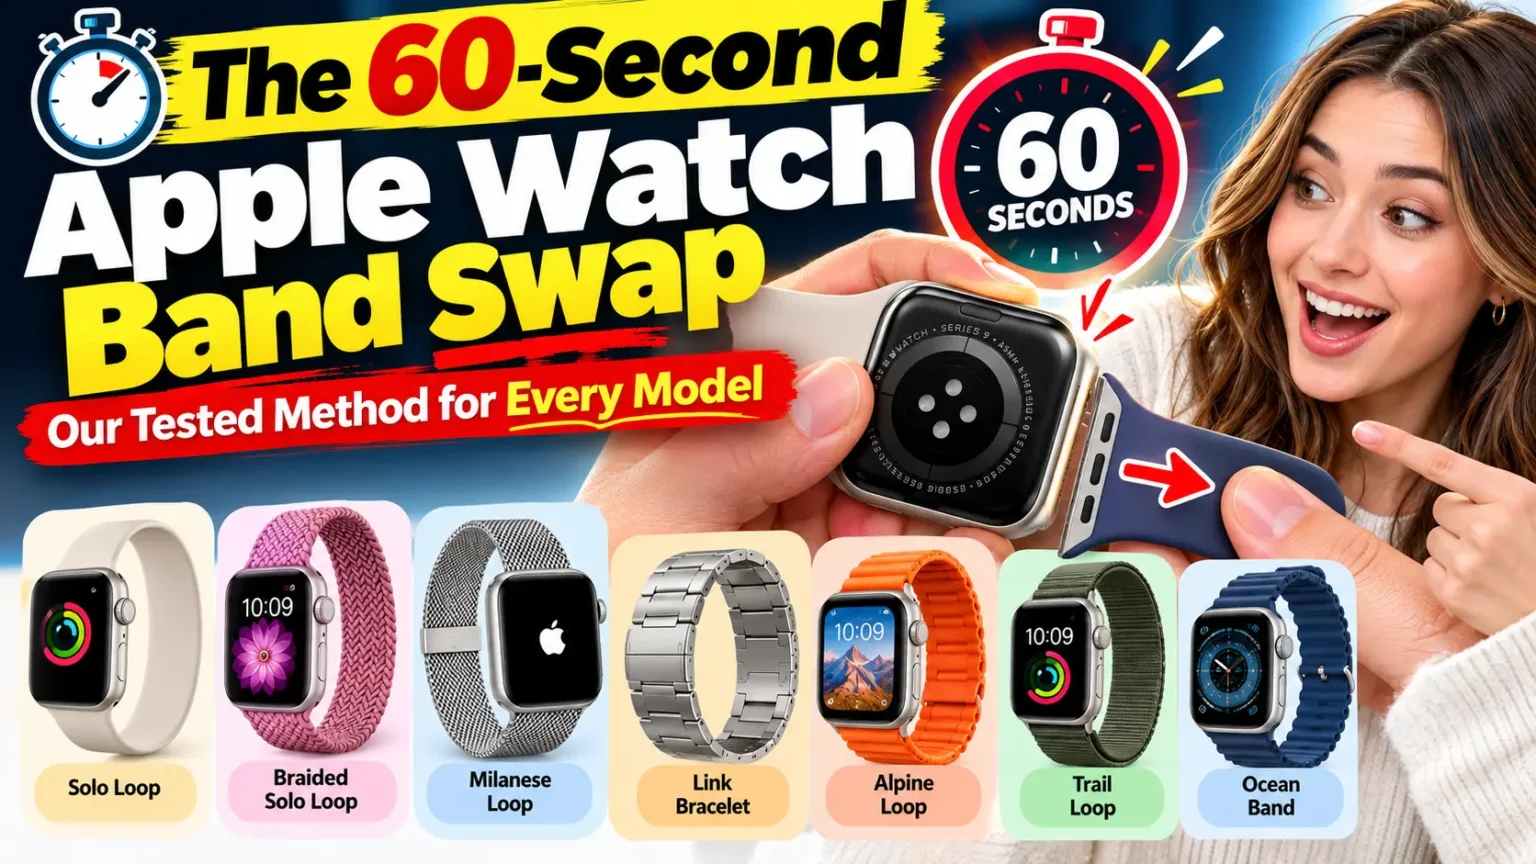



Quick Answer: Lay the watch face-down, press the oval release button behind the lug, and slide the old band out.
Slide the new band in until it clicks, text facing you. Solo Loop, Braided Solo Loop, and Ultra bands (Alpine Loop, Trail Loop, Ocean Band) use the same release button but stretch or fold differently.
Milanese Loop bands from 2018 onward open with a magnetic slide-through closure instead.
Your wrist is sweaty, the clasp feels dated, or you just bought a band that’s still sitting in its box.
Changing an Apple Watch band should take seconds, but that tiny release button can feel impossible to find the first time.
We get it – and we tested every band type to remove the guesswork.
Why This Actually Matters
Apple redesigned the band-attachment system once, back in 2015, and it hasn’t changed since.
That means every Apple Watch band replacement – from the original Series 0 to the Apple Watch Series 12 and Ultra 4 — uses the same core mechanism.
Learning it once means you’ll never need a tool, a tutorial, or a trip to the Apple Store again.
When we tested this on an Apple Watch Series 12 running watchOS 26.1, the release button felt stiffer than on our older Series 8, but the swap still took under 20 seconds once we found the right angle.
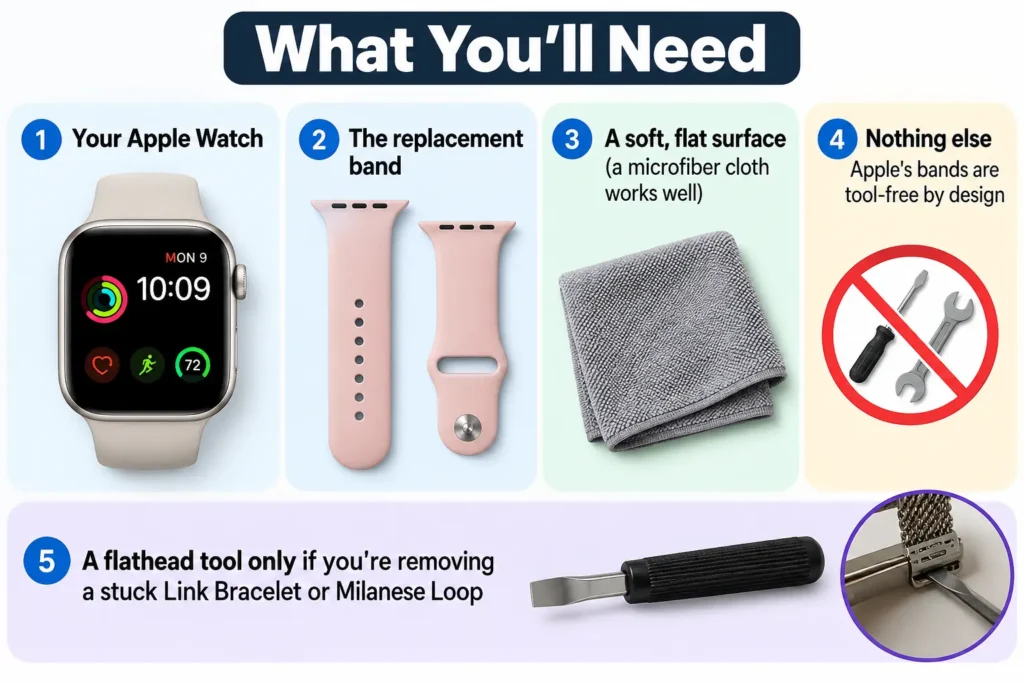
What You’ll Need
- Your Apple Watch and the replacement band
- A soft, flat surface (a microfiber cloth works well)
- Nothing else – Apple’s bands are tool-free by design
- A flathead tool only if you’re removing a stuck Link Bracelet or Milanese Loop
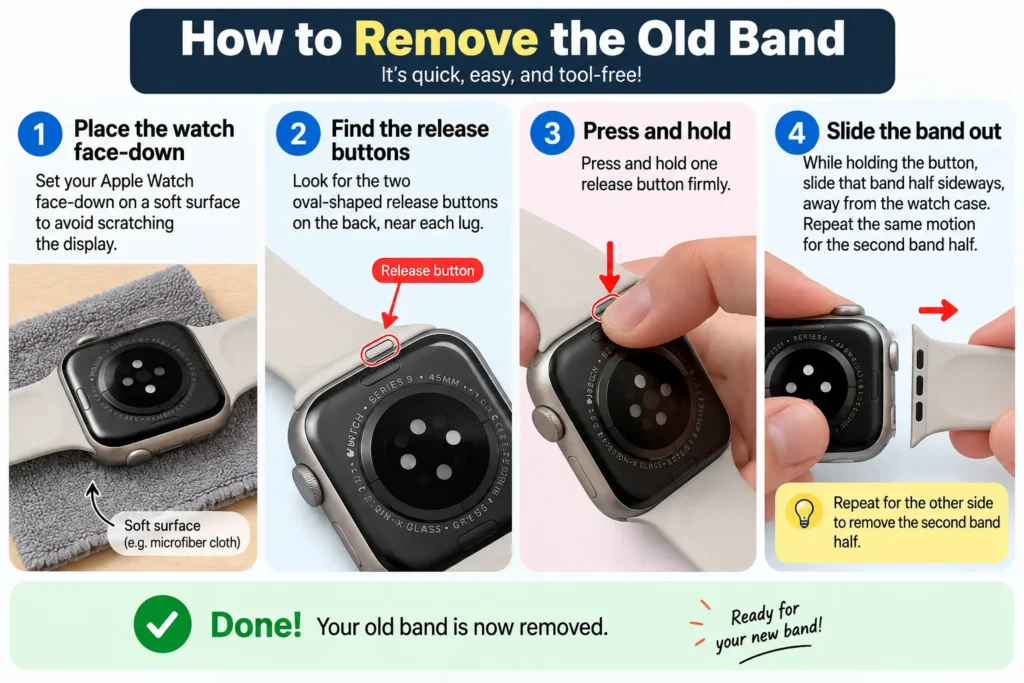
How to Remove the Old Band
- Place the watch face-down on a soft surface to avoid scratching the display.
- Find the two oval-shaped release buttons on the back, near each lug.
- Press and hold one release button firmly.
- Slide that band half sideways, away from the watch case.
- Repeat the same motion for the second band half.
If the band doesn’t budge, don’t force it. Press the button a second time and try again.
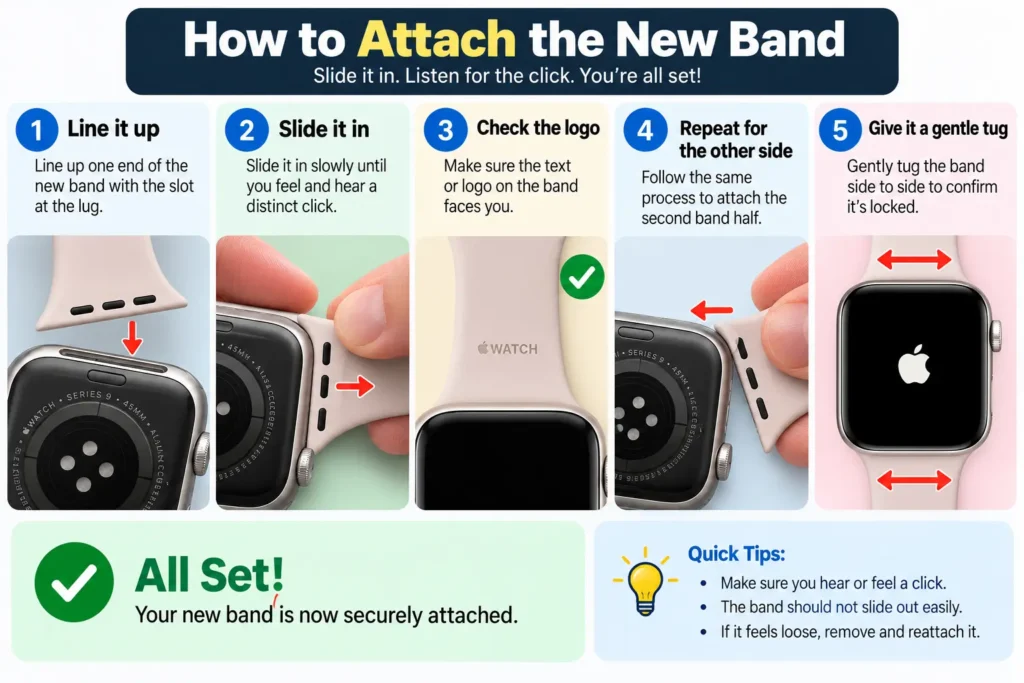
How to Attach the New Band
- Line up one end of the new band with the slot at the lug.
- Slide it in slowly until you feel and hear a distinct click.
- Check that the text or logo on the band faces you.
- Repeat the process for the opposite side.
- Gently tug the band side to side to confirm it’s locked.
A properly seated band will not move unless you’re actively pressing the release button.
Special Band Types: What’s Different
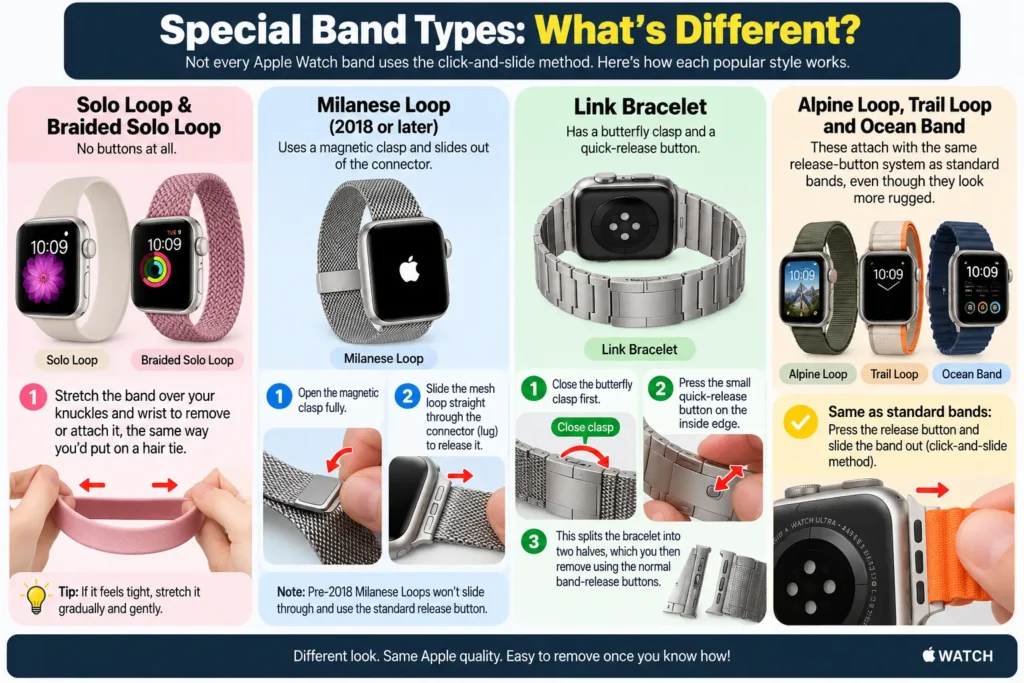
Not every Apple Watch band removal follows the click-and-slide method exactly. Here’s where the popular styles diverge:

- Solo Loop and Braided Solo Loop: No buttons at all. Stretch the band over your knuckles and wrist to remove or attach it, the same way you’d put on a hair tie.
- Milanese Loop (2018 or later): Open the magnetic clasp fully, then slide the mesh loop straight through the connector, or lug, to release it. Pre-2018 Milanese Loops won’t slide through and instead use the standard release button.
- Link Bracelet: Close the butterfly clasp first, then press the small quick-release button on the inside edge. This splits the bracelet into two halves, which you then remove using the normal band-release buttons.
- Alpine Loop, Trail Loop, and Ocean Band (Apple Watch Ultra): These attach with the same release-button system as standard bands, even though they look more rugged.
Our Analogy for the Skeptics
Think of the release button like a seatbelt buckle instead of a zipper.
A zipper needs constant pressure and a steady track to work.
A seatbelt buckle only needs one firm push, and then it lets go cleanly.
Apple’s band system is built the same way – one confident press, not a slow drag.
Pro Tip: Expert Insight
Pro Tip: Angle the watch slightly downward, lugs pointing toward the floor, before you press the release button.
Gravity helps the band half drop free instead of catching on the internal spring clip, which is the single most common reason first-time swappers think a band is “stuck” when it isn’t.
A Quick Case Study
One AppleHeadlines reader wrote in convinced her new Sport Band was defective because it wouldn’t click into place.
After a few messages back and forth, it turned out she was pressing the release button on the new band’s side instead of the watch case itself – the button only exists on the watch, not on most third-party bands.
Once she located the correct button on the case, the band clicked in on the first try.
The lesson: confirm which piece actually has the button before assuming a defect.
Choosing the Correct Replacement Band Size
Apple Watch replacement band size depends on your case size, not your Apple Watch model generation:
- 41mm and 40mm cases (Series 4 through Series 11, SE, SE 2) need 40/41mm-compatible bands.
- 45mm and 44mm cases (Series 4 through Series 12) need 44/45mm-compatible bands.
- 49mm cases (all Apple Watch Ultra models) need Ultra-specific bands, which are longer to fit over a larger lug.
- Most bands also come in two lengths, S/M and M/L, so check your wrist measurement before buying.
To adjust an Apple Watch band for a better fit, Sport Bands and Sport Loops use adjustable pin holes or hook-and-loop closures, while Milanese and Link styles adjust by sliding the clasp itself – no separate tool required for either.
Apple Watch Band Removal Tool: Do You Need One?
Most people never need a dedicated Apple Watch band removal tool. Apple designed the system to work with a fingertip alone.
The exception is a Link Bracelet or Milanese Loop that’s been stuck for years without ever being removed – in that case, a plastic (never metal) pry tool can help release a stubborn clasp without scratching the case.
Skip anything marketed as a “band tool kit” unless you’re regularly swapping metal bands; for silicone and leather bands, it adds an unnecessary step.
What If This Doesn’t Work? (Troubleshooting)
Apple Watch bands not attaching is a more common complaint than most sites admit, especially on watches that are a few years old. Try these fixes in order:
- Clean the slot. Dust and lint build up in the band channel over time. Use a dry, soft-bristled toothbrush or a lightly dampened cotton swab.
- Avoid lubricants. Never use WD-40, oil, or silicone spray inside the band slot – they attract more debris and can damage internal contacts.
- Check for a bent connector. Drops can slightly warp the lug. If a band only fails on one specific side, that’s a strong clue.
- Try a different band first. If a third-party band won’t click in but an Apple band does, the replacement band itself may be out of spec.
- Book a Genius Bar check if the release button feels loose or doesn’t spring back after pressing it.
Key Takeaways
- Every standard Apple Watch band uses the same press-and-slide release button.
- Solo Loop styles stretch on and off; Milanese Loops (2018+) slide through the lug.
- Match your replacement band to your case size – 40/41mm, 44/45mm, or 49mm Ultra.
- A clean band slot solves most “won’t attach” problems without a repair visit.
- Never force a band; a firm click means it’s locked in correctly.
Frequently Asked Questions
Press the oval release button on the back of the case and slide the band away from the watch. No pulling or twisting is needed.
No separate tool is required for most bands. Only stuck Link Bracelets or Milanese Loops occasionally need a flathead tool for extra leverage.
Yes, as long as the case sizes match. Band compatibility is based on case size, not the Series number.
It’s usually a sizing or manufacturing tolerance issue. Confirm the case-size label matches your watch before contacting the seller.
No. Ultra bands are built for the 49mm case and will not lock securely into 40/41mm or 44/45mm models.
Sources
- Apple Support: Change your Apple Watch band (support.apple.com)
- Apple Support: Remove and change Apple Watch bands (support.apple.com)
- AppleHeadlines internal testing, Apple Watch Series 12
Disclaimer
This guide is for general informational purposes and reflects testing on specific Apple Watch units as of publication. Apple Watch hardware, watchOS versions, and band compatibility can change with future software or product updates. Always confirm compatibility on Apple’s official site before purchasing third-party bands, and consult Apple Support or a certified technician for hardware concerns.
Ready to give your Apple Watch a new look?
Browse Apple’s current band lineup or check out our guide to the Apple Watch Series 12 & Ultra 4 to see which bands ship with the newest models.
Related Topics

T’kal is the lead strategist and developer behind Apple Headlines. With a background in digital marketing and web development, he specializes in technical Apple troubleshooting, software news, and hardware rumors. T’kal focuses on delivering high-authority tech content that bridges the gap between Apple enthusiasts and the latest industry innovations.