


You Just Got a New iPhone. Now What?
Switching to a new iPhone is exciting — until you realize all your photos, contacts, apps, and settings are still on your old one.
You don’t want to start from scratch. You want everything to move over, exactly as it was, without losing a single text message or spending half your day doing it.
The good news?
Apple has made how to transfer data from iPhone to iPhone faster and more reliable than ever.
This guide covers all four methods, tells you which one to pick, and fixes the problems other guides skip over.
Why Getting This Right Actually Matters
Most guides just list the steps.
They don’t tell you why each method exists or which one fits your situation. That matters, because choosing the wrong method can mean:
Apple’s ecosystem gives you four distinct paths to transfer data from one iPhone to another.
Each has real trade-offs. Understanding them is the difference between a smooth upgrade and a frustrating afternoon.
This guide is built on Apple’s official documentation, real-world user scenarios, and years of covering Apple products.
Whether you’re moving from an iPhone 12 to an iPhone 17, or an older SE to a Pro, the steps below work.
The 4 Methods at a Glance
Before diving into step-by-step instructions, here’s a quick comparison to help you choose:
| Method | Best For | Time Needed | Requires iCloud? |
|---|---|---|---|
| Quick Start (Wireless) | Most users with both phones available | 20–60 min | No |
| Quick Start (Wired) | Large storage, slow Wi-Fi | 15–45 min | No |
| iCloud Backup & Restore | Old phone unavailable or already erased | 30–90 min | Yes |
| iTunes/Finder Backup | Max privacy, large data, no Wi-Fi | 20–50 min | No |
Method 1: Quick Start (Wireless) — The Recommended Method
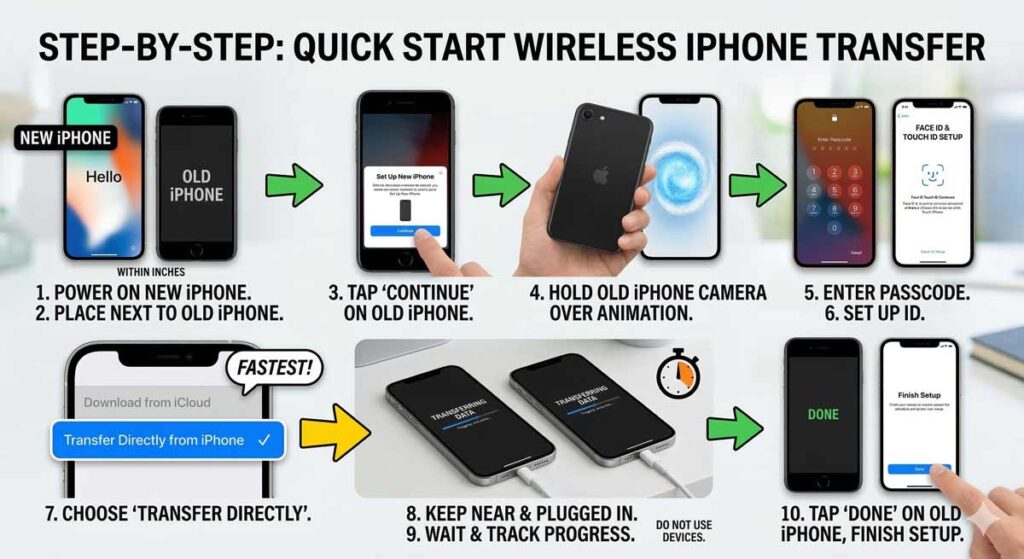
Quick Start is Apple’s flagship transfer tool. It creates a direct, encrypted, device-to-device transfer.
Think of it like cloning your old iPhone directly onto your new one — it’s less like moving boxes and more like making a photocopy of your entire digital life.
What You Need
Step-by-Step: Quick Start Wireless Transfer
Transfer time estimate: 20 GB of data typically takes 20–40 minutes over Wi-Fi. A full 256 GB phone may take 2–3 hours.
Method 2: Quick Start (Wired) — Faster for Large Libraries
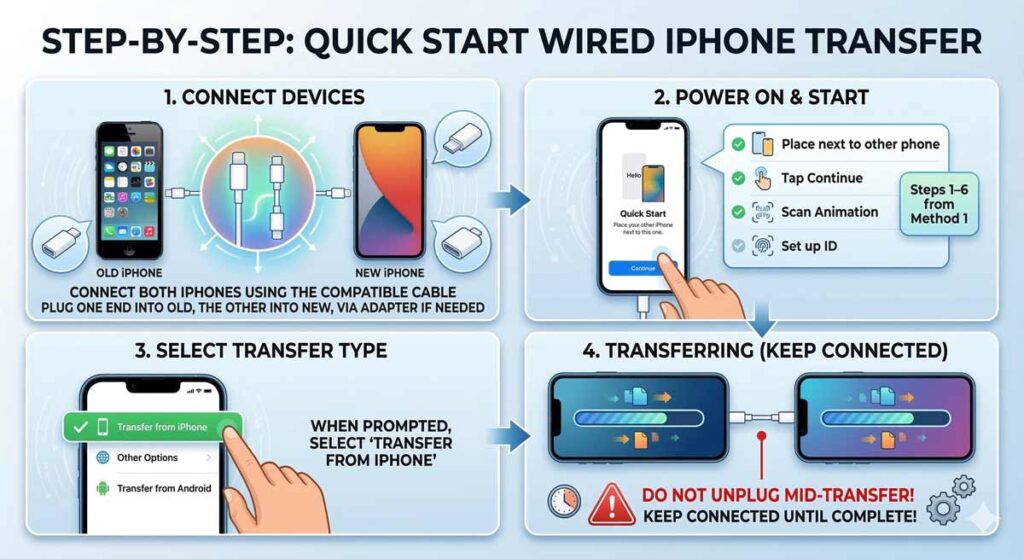
If you have a massive photo library or slow home Wi-Fi, use a Lightning-to-Lightning or USB-C cable (depending on your iPhone models) to connect both phones.
A wired transfer is significantly faster than wireless for data-heavy phones.
What You Need
Step-by-Step: Quick Start Wired Transfer
Pro note: Apple sells a “Lightning to USB 3 Camera Adapter” that can bridge older to newer iPhones for wired transfer. A standard Lightning cable between two older iPhones also works.
Method 3: iCloud Backup and Restore — When Your Old Phone Isn’t Available
This is the go-to method if your old iPhone was lost, stolen, damaged, or already traded in. It’s also useful if you want to restore your new iPhone exactly as it was at a specific backup point.
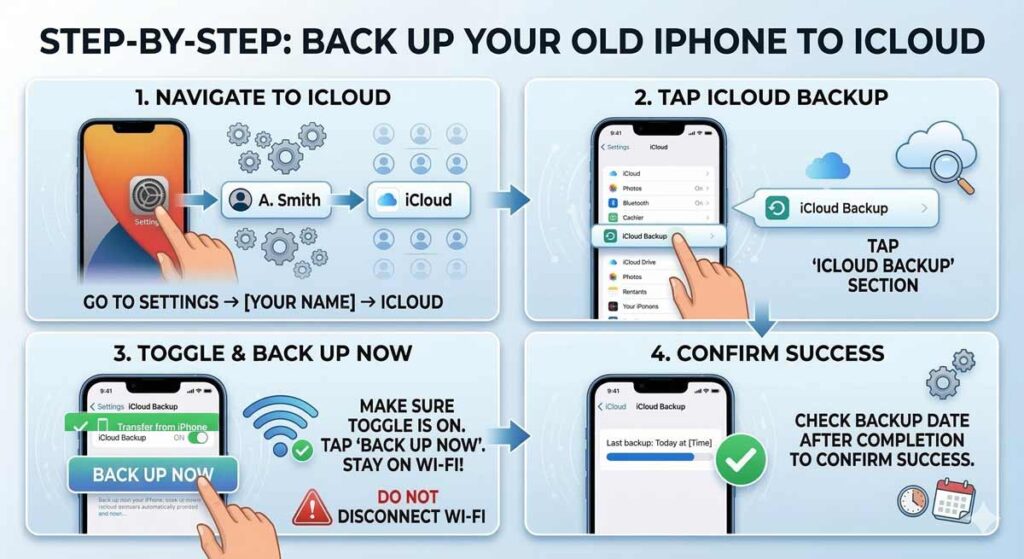
Step-by-Step: Back Up Your Old iPhone to iCloud
Important: Make sure you have enough iCloud storage. A free 5 GB plan fills up fast. You can temporarily upgrade to 50 GB for $0.99/month to complete the backup, then downgrade after.
Step-by-Step: Restore Your New iPhone from iCloud
Method 4: iTunes or Finder Backup — Maximum Control and Privacy
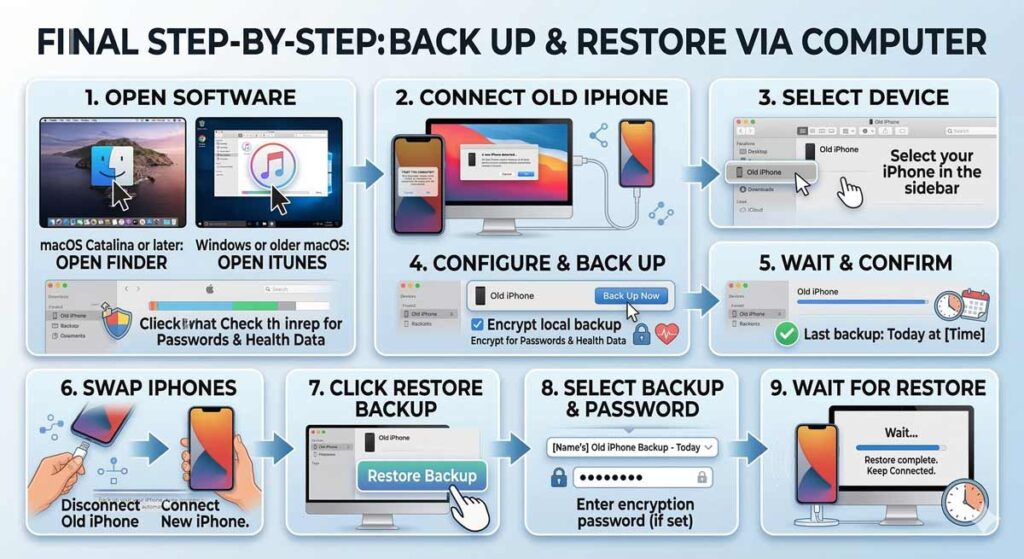
This method transfers data through your Mac or PC. It’s ideal for users who want a full, unencrypted-to-encrypted local backup – including health data and saved passwords — without using iCloud.
Step-by-Step: iTunes/Finder Transfer
Expert Insight: Which Method Actually Transfers Everything?
Here’s something most guides don’t mention: Not all methods transfer all data equally. Here’s what you need to know:
Bottom line: For the most complete transfer, use Quick Start (direct) or iTunes/Finder with encryption turned on.
How to Transfer Photos from iPhone to PC (Bonus Step)
Before you erase your old iPhone, many users want to save a copy of their photos to a Windows PC. Here’s how to do it quickly:
Alternatively, use iCloud for Windows (free from the Microsoft Store) to sync your entire photo library automatically.
How Sarah’s Upgrade Gone Wrong? (and How She Fixed It)
Sarah upgraded from her iPhone 13 to an iPhone 15 Pro last fall.
She started the iCloud restore method, but her old 5 GB free iCloud plan was already full.
The backup failed silently — she didn’t notice the error.
She set up her new iPhone as a fresh device, only to find her text message history and several app data sets were gone.
What she should have done: Either used Quick Start (direct transfer, no iCloud needed) or temporarily upgraded her iCloud plan to 50 GB to complete the backup first.
The fix when it’s too late: If your old iPhone still exists and is intact, plug both into power, enable Bluetooth and Wi-Fi on the old one, and run Quick Start from the new iPhone’s setup screen.
Even after initial setup, you can erase the new iPhone (Settings → General → Transfer or Reset iPhone → Erase All Content) and start fresh with Quick Start.
How to Transfer Data from One iPhone to Another: The Checklist
Run through this checklist before you start any transfer method:
What About Apps That Don’t Transfer Automatically?
When you figure out how to transfer data to a new iPhone, you’ll find most apps move over perfectly. But a few categories need manual attention:
- Banking apps: Most require re-verification. Have your account login and a second device for 2FA ready.
- Google apps (Gmail, Maps, Drive): These restore the app, but you must sign back into your Google account.
- Authenticator apps (Google Authenticator, Authy): Authy transfers automatically. Google Authenticator requires exporting codes manually before the transfer.
- WhatsApp: Use WhatsApp’s built-in “Move to iOS/Android” tool, or transfer via iCloud backup. It does not transfer automatically through Quick Start alone.
What If the Transfer Doesn’t Work?
Even Apple’s best tools can hit a snag. Here are the most common problems and how to fix them:
Quick Start prompt doesn’t appear on old iPhone
Transfer is extremely slow or stalled
iCloud backup says “Not Enough Storage”
New iPhone shows some apps but not their data
Transfer completed but texts are missing
How Do I Transfer from iPhone to iPhone If I Only Have the New Phone?
If your old iPhone is gone or broken, your only options are:
- Restore from iCloud Backup (if one exists) — Method 3 above
- Restore from iTunes/Finder Backup (if you made one on a computer)
- Set up as a new iPhone and re-download apps manually
This is why keeping regular iCloud backups is important — not just for upgrades, but for any unexpected loss.
Topic in Short
Frequently Asked Questions
How long does it take to transfer data from iPhone to iPhone?
Transfer time depends on how much data you have and your method. A typical 64 GB phone using Quick Start over Wi-Fi takes 30–45 minutes. A fully loaded 256 GB phone can take 2–3 hours. A wired connection is typically 30–50% faster than wireless.
Will my apps automatically transfer to the new iPhone?
Yes. All apps installed from the App Store will transfer. They’ll appear on your new iPhone and continue downloading in the background. You may need to re-enter login credentials for apps that require authentication.
Do I need to erase my old iPhone before transferring?
No. Do not erase your old iPhone until you have confirmed the transfer was successful and everything is working on your new one. Once you’ve verified the new phone is complete, go to Settings → General → Transfer or Reset iPhone → Erase All Content and Settings on the old phone.
Can I transfer data if both iPhones are different iOS versions?
Yes, but Apple recommends updating both iPhones to the latest version of iOS before transferring. This ensures compatibility and reduces the chance of errors.
What happens to my SIM card during the transfer?
The data transfer process is separate from SIM card activation. If you’re using a physical SIM, move it from the old iPhone to the new one. If you’re using eSIM, your carrier can transfer it — or the new iPhone may prompt you to transfer it digitally during setup.
Ready to Make the Switch?
You now have everything you need to transfer your iPhone quickly, completely, and confidently. The best time to start is before you open your new iPhone’s box — run that iCloud backup on your old phone first, just in case.
👉 Bookmark this guide for your next upgrade, and share it with anyone who just got a new iPhone.
Have questions about a specific situation? Drop them in the comments on AppleHeadlines.com.
Disclaimer: This article is intended for informational purposes only. Transfer steps and feature availability may vary depending on iOS version, device model, carrier, and regional settings. Always back up your data before performing any transfer. AppleHeadlines.com is not affiliated with Apple Inc. Apple, iPhone, iCloud, Face ID, Touch ID, and iOS are trademarks of Apple Inc., registered in the U.S. and other countries. The information in this article reflects publicly available documentation and real-world testing as of the publication date. For official support, visit support.apple.com.
Related to the Topic


Virginia J. Alfonso is a seasoned technology writer with a passion for all things digital. With over a decade of experience covering the latest in tech innovation, gadgets, and software, Virginia brings a unique blend of technical expertise and accessible writing to her work. Her articles focus on making complex tech topics easy to understand for readers of all levels.


