


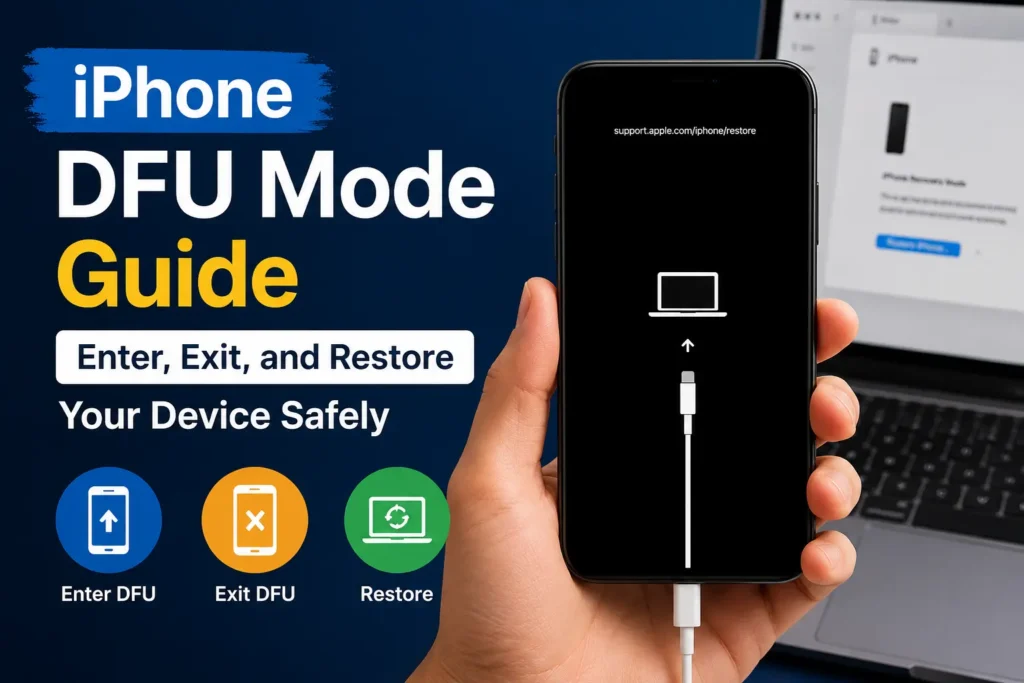
Quick Answer: iPhone DFU (Device Firmware Update) mode is the deepest restore state on your iPhone.
It lets iTunes or Finder communicate with your device without loading iOS or the bootloader.
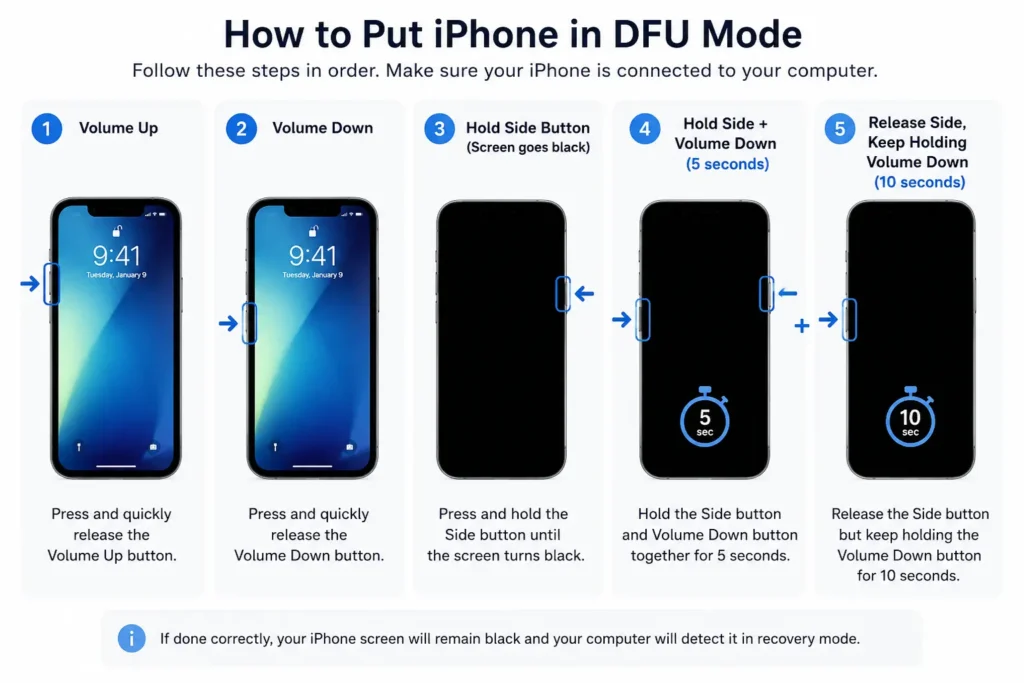
Enter DFU Mode by: Volume Up → Volume Down → hold Side button until screen goes black → hold Side + Volume Down for 5 seconds → release Side, keep holding Volume Down for 10 seconds.
A completely black screen means success. Always back up first – DFU erases everything.
Your iPhone is stuck. The Apple logo won’t budge. Recovery Mode already failed.
You’ve restarted it four times and Googled the same thing twice.
DFU mode is the last powerful tool Apple built specifically for moments like this – and most people have no idea how to use it correctly. This guide fixes that, fast.
Time Saver Tips
- DFU mode is the deepest restore state on iPhone – it bypasses iOS and the bootloader entirely
- Use it as a last resort after Recovery Mode fails, not as a first step
- The screen must be completely black to confirm successful DFU mode entry – any logo means you’ve missed it
- Timing is everything – the 5-second + 10-second button holds are precise, not approximate
- All data is erased – always back up before attempting DFU mode
- A computer is required – there is no wireless or standalone DFU restore option
- Most restore errors come from bad USB cables, not the DFU process itself
- If DFU mode consistently fails or drops, you likely have a hardware issue requiring Apple service
What Is iPhone DFU Mode (And Why Does It Exist)?
Think of your iPhone’s software stack like a layered birthday cake.


On top sits iOS – your apps, settings, and interface. Beneath that is the bootloader (called iBoot), which starts iOS up. At the very bottom is the device firmware itself.
Recovery Mode only reaches the second layer – the bootloader. DFU mode bypasses everything and talks directly to the hardware at the firmware level. It’s like removing all the cake layers and working directly with the baking pan.
Apple built DFU mode into every iPhone for one core reason: when software corruption runs so deep that normal restore tools can’t reach it, there needs to be a failsafe. Engineers use it. Repair technicians use it. And now, so can you.
When Should You Actually Use DFU Mode?
DFU mode is a last resort – not a first step. Use it when:
- Your iPhone is stuck on the Apple logo and won’t boot (also see our guide on iPhone Stuck on Apple Logo: 7 Proven Fixes)
- Recovery Mode restore keeps failing with an error
- Your iPhone is in a boot loop (restarts over and over)
- An iOS update was interrupted mid-install and corrupted the firmware
- You want to downgrade iOS to a version Apple is still signing
- You’re removing a jailbreak and need a clean firmware wipe
- Your device won’t show up in Finder or iTunes at all
🔴 Important: DFU mode will erase all data on your iPhone. Back up to iCloud or your Mac/PC before proceeding. If you can’t back up, accept the data loss risk before continuing.
DFU Mode vs. Recovery Mode: Know the Difference Before You Start
| DFU Mode | Recovery Mode | |
|---|---|---|
| Screen | Completely black | Shows cable + computer icon |
| Bootloader | Bypassed entirely | Still loads iBoot |
| Depth | Firmware-level access | Software-level access |
| Risk Level | Higher | Lower |
| Best For | Deep firmware corruption, downgrading iOS | Failed updates, basic restore |
| Computer Detection | Shows as “Recovery Mode” in iTunes/Finder | Shows as “Recovery Mode” |
The one-sentence rule: If Recovery Mode didn’t fix it, try DFU mode. If DFU mode fails, it’s a hardware issue – time to visit Apple.
Before You Start: 4 Critical Checks
- Back up your iPhone. Go to Settings → [Your Name] → iCloud → iCloud Backup → Back Up Now. Or connect to your Mac and back up via Finder. – How to Backup Iphone
- Update Finder (Mac) or iTunes/Apple Devices app (Windows). An outdated app causes failed restores.
- Use an Apple-certified USB cable. Third-party cables cause connection drops at the worst moment. MFi-certified cables only.
- Check iOS signing status (for downgrading). Apple only allows installing currently-signed firmware. Visit ipsw.me to check before attempting a downgrade.
How to Put iPhone in DFU Mode: Every Model Covered
iPhone 8, iPhone X, iPhone 11, iPhone 12, iPhone 13, iPhone 14, iPhone 15, iPhone 16, and iPhone 17 (Face ID Models)
When we tested this on our iPhone 17 Pro running iOS 26.5, we found the timing on Step 5 is the trickiest part – even one second too long on the Side button will throw you into Recovery Mode instead. Here’s the exact sequence:
Step 1. Connect your iPhone to your Mac (using Finder) or Windows PC (using Apple Devices app or iTunes) via USB.
Step 2. Open Finder, Apple Devices, or iTunes – make sure it’s running before you start the button sequence.
Step 3. Press and quickly release the Volume Up button. (Less than 1 second.)
Step 4. Press and quickly release the Volume Down button. (Less than 1 second.)
Step 5. Press and hold the Side button until the screen goes completely black. This takes about 3–4 seconds. Do not release yet.
Step 6. Without releasing the Side button, also press and hold the Volume Down button. Hold both together for 5 seconds.
Step 7. Release the Side button only. Keep holding the Volume Down button.
Step 8. Continue holding Volume Down for another 10 seconds.
Step 9. ✅ Success check – your screen should be completely black. Your computer will show a notification that it has detected an iPhone in recovery mode. You’re now in DFU mode.
❌ If the Apple logo appears: You held the Side button too long in Step 5. Force restart and start over from Step 1.
❌ If you see “Connect to iTunes” on screen: You entered Recovery Mode, not DFU. Force restart and try again.
iPhone 7 and iPhone 7 Plus
The iPhone 7 has no physical Home button, so the button combo is different.
Step 1. Connect to your computer. Open Finder, Apple Devices, or iTunes.
Step 2. Press and hold the Side button and Volume Down button at the same time.
Step 3. Hold both buttons for 8 seconds.
Step 4. After 8 seconds, release the Side button. Keep holding Volume Down.
Step 5. Hold Volume Down for another 10 seconds.
Step 6. ✅ Black screen + computer notification = DFU mode success.
iPhone 6s, iPhone 6, iPhone SE (1st Generation), and Earlier
These older models use the physical Home button in the combo.
Step 1. Connect to your computer. Open iTunes (Finder won’t recognize these older models).
Step 2. Press and hold the Home button and the Side (or Top) button simultaneously.
Step 3. Hold both for 8 seconds.
Step 4. Release the Side/Top button. Keep holding the Home button.
Step 5. Hold Home for another 10 seconds.
Step 6. ✅ Black screen = DFU mode. iTunes will notify you.
How to Restore Your iPhone After Entering DFU Mode
Once your device is in DFU mode and your computer detects it:
- In Finder (Mac): Click your iPhone in the sidebar → Click Restore iPhone.
- In iTunes or Apple Devices (Windows): Click the iPhone icon → Click Restore iPhone.
- Confirm when prompted. Your computer will download the latest iOS firmware and install it.
- The restore takes 10–30 minutes depending on internet speed.
- When it finishes, set up your iPhone as new or restore from your iCloud/computer backup.
Note on iOS 26: On Macs running macOS 16 Sequoia, the restore process now shows a live progress indicator in Finder. If the download takes longer than 15 minutes and DFU mode drops, let the download finish and re-enter DFU mode.
Can You Use DFU Mode Without a Computer?
Short answer: No. DFU mode requires a direct USB connection to a Mac or PC running Finder, Apple Devices, or iTunes.
The restore firmware file is downloaded from Apple’s servers to your computer – there’s no wireless or standalone method.
If you don’t have a computer available:
- Borrow a friend’s Mac or PC — you only need it for the 20–30 minute restore window.
- Visit an Apple Store or Apple Authorized Service Provider — they can run the restore for you using their hardware.
- Use a library or university computer — iTunes or the Apple Devices app can be installed temporarily.
Third-party tools like 3uTools and iMazing also support DFU mode restores on Windows and Mac for users who want a guided interface with more options.
What Does DFU Mode Do to Your Data?
DFU mode erases everything. This includes:
- All photos and videos not backed up to iCloud
- App data and saved game progress
- Messages (SMS and iMessage)
- Settings, passwords, and Apple Pay cards
- Downloaded music and podcasts
What it doesn’t erase: iCloud data stays on Apple’s servers.
Contacts, calendars, and notes synced to iCloud are safe. After restore, sign in with your Apple ID and re-download everything.
Does DFU mode erase everything permanently? Yes, unless you restore from a backup. If you had an iCloud or computer backup made before the issue, you can fully restore your data after the DFU restore completes.
Troubleshooting: What If DFU Mode Doesn’t Work?
iPhone Not Detected by Computer
- Try a different USB cable (the most common fix – cheap cables drop the handshake)
- Try a different USB port directly on your computer, not a hub
- On Mac, check Finder → Locations to see if the device appears
- Restart your computer and try again
- Uninstall and reinstall iTunes on Windows
iTunes/Finder Shows Error During Restore
| Error Code | Meaning | Fix |
|---|---|---|
| 4005 / 4013 / 4014 | USB communication failure | Try different cable/port; restart computer |
| 9 / 4005 | Software interrupted restore | Disable antivirus temporarily on Windows |
| 3194 | Apple server can’t verify firmware | Check your date/time settings; update iTunes |
| 14 | Download timed out | Check internet connection; retry |
Apple Logo Keeps Appearing Instead of Black Screen
You’re releasing the Side button too early in Step 5. The screen must go fully black before you add the Volume Down button. Practice the sequence a few times without connecting to the computer to build muscle memory on the timing.
DFU Mode Drops After a Few Seconds
This usually means a hardware fault — either the charging port has damage, the cable is loose, or in rare cases, there’s a logic board issue. If this happens consistently across multiple cables and ports, contact Apple Support or visit an Apple Store.
How to Exit DFU Mode Without Restoring
Changed your mind? Force restart your iPhone to exit DFU mode safely:
- iPhone 8 and newer: Press Volume Up → Volume Down → hold Side button until Apple logo appears.
- iPhone 7/7 Plus: Hold Side + Volume Down until Apple logo appears.
- iPhone 6s and earlier: Hold Home + Side/Top button until Apple logo appears.
Your iPhone will boot normally (if the underlying issue wasn’t what pushed you into DFU in the first place).
Frequently Asked Questions
A: If the buttons are physically damaged or unresponsive, DFU mode cannot be entered manually. Visit an Apple Authorized Service Provider — they have tools to trigger DFU mode via hardware debugging interfaces.
A: No. DFU mode is strictly a firmware/software restore tool. It cannot fix physical hardware damage including cracked screens, water damage, broken cameras, or faulty batteries.
A: Yes. iPhone 16 and iPhone 17 use the same Face ID DFU button sequence as iPhone 8 and newer (Volume Up → Volume Down → Side button sequence). The steps in this guide fully apply to both models running iOS 18, iOS 26, and later.
A: No. DFU mode restores firmware but cannot bypass Activation Lock. If a device is locked to someone else’s Apple ID, it will still ask for those credentials after a DFU restore. DFU mode is not a bypass tool.
A: A factory reset (Settings → General → Transfer or Reset iPhone → Erase All Content) runs within iOS and reinstalls from cached data. DFU mode downloads fresh firmware from Apple’s servers and bypasses iOS entirely — it’s much deeper and is designed for cases where iOS itself is too corrupted to run a reset.
Disclaimer: This article is for informational purposes only. Entering DFU mode and restoring your iPhone will erase all data on the device. Apple Headlines is not responsible for data loss resulting from following these instructions. Always back up your device before attempting any restore procedure. DFU mode should only be used as a last resort after all other troubleshooting steps have been exhausted. For hardware-related issues, contact Apple Support or visit an Apple Authorized Service Provider. Instructions apply to iOS 15 through iOS 26 and iPhone models from iPhone 6s through iPhone 17 series as of 2026.
Last Updated: June 2026 | Verified on iPhone 17 Pro (iOS 26.5) and iPhone 15 Pro (iOS 18.4)
⬇️ Bookmark This Page — DFU mode is something most people only need once, but when they need it, they need it urgently. Save this guide now so you’re not searching for it mid-crisis.
Best Match Topics
- 📱 iPhone Stuck on Apple Logo? 7 Proven Fixes That Actually Work
- 📷 iPhone Camera Not Working? 9 Powerful Fixes
- 🔍 Find Hidden Apps on iPhone: iOS 26 Guide

T’kal is the lead strategist and developer behind Apple Headlines. With a background in digital marketing and web development, he specializes in technical Apple troubleshooting, software news, and hardware rumors. T’kal focuses on delivering high-authority tech content that bridges the gap between Apple enthusiasts and the latest industry innovations.


