


You’re about to sell your iPhone, trade it in, give it to a family member – or maybe it’s just acting up and you need a clean slate.
Either way, you need to know how to erase iPhone and wipe data completely.
Doing it wrong means your photos, passwords, and banking apps could end up in a stranger’s hands.
Doing it right takes less than 10 minutes.
This guide covers every method, every model, and every edge case – including what to do when the standard steps fail.
Quick Info on Erase and Wipe iPhone
Why Erasing Your iPhone Correctly Matters More Than You Think
Most people assume hitting “delete” on their photos is enough. It isn’t.
Think of your iPhone’s storage like a whiteboard. When you delete a file normally, you’re not erasing the writing — you’re just removing the label that says it’s there.
The data stays on the board until something new gets written over it.


A factory reset, done correctly, is the equivalent of scrubbing the whiteboard clean and applying a fresh coat of white paint.
According to Apple’s own security documentation, the “Erase All Content and Settings” function on modern iPhones with the Secure Enclave (iPhone 5s and later) does something even more powerful: it destroys the encryption keys that protect your data. Without those keys, the remaining data on the flash storage is permanently unreadable – even to professional data recovery tools.
This is why knowing how to securely wipe iPhone is not just a convenience tip. It’s essential data hygiene.
Before You Erase: The 3 Things You Must Do First
Skipping these steps is the most common mistake people make. Do them in this exact order.
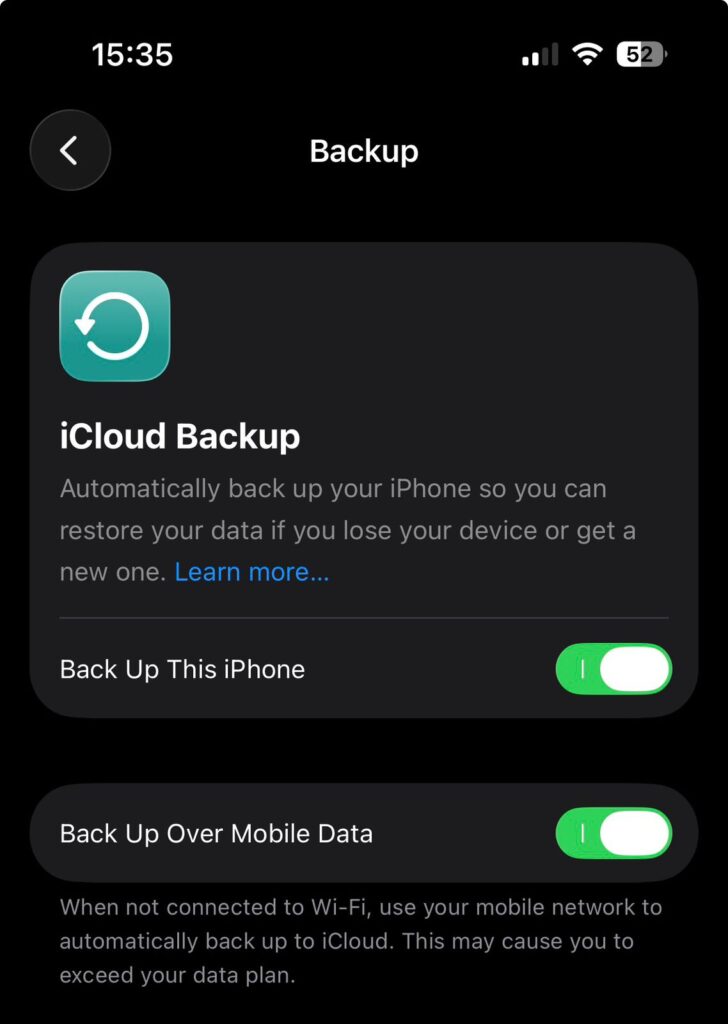
Step 1: Back Up Everything You Want to Keep
A factory reset is permanent and irreversible. Once you tap that final confirm button, your data is gone. So back up first.
Option A — iCloud Backup (easiest):
Option B — Mac Backup via Finder (macOS Catalina or later):
Option C — Windows Backup via iTunes:
Pro Tip: If you’re backing up to iCloud and have a lot of data, this can take 20–40 minutes on a slow connection. Plug your iPhone into power and leave the screen on to prevent it from pausing.
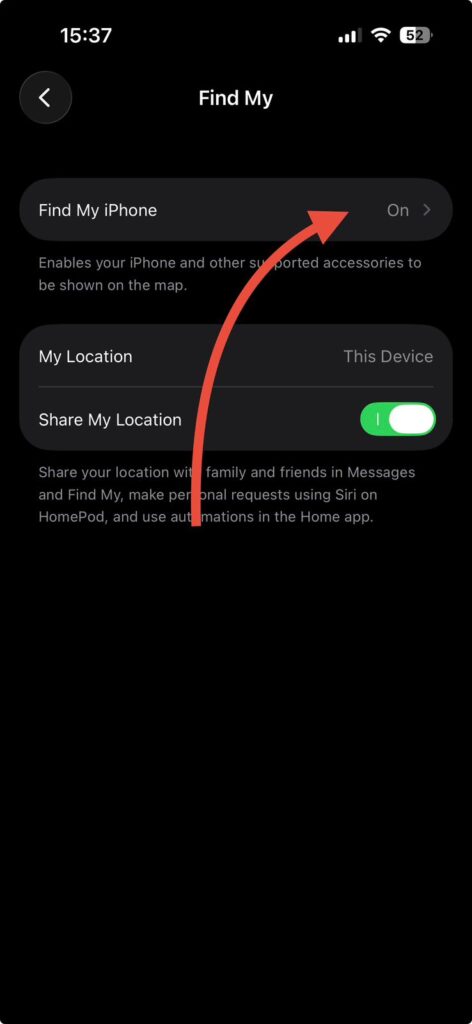
Step 2: Sign Out of iCloud and Turn Off Find My
This step is critical if you’re wiping iPhone before selling or giving it away.
If you skip it, the next owner will hit Activation Lock — a screen that demands your Apple ID and password.
The device becomes a very expensive paperweight.
Step 3: Unpair Any Accessories
5 Ways to Completely Erase iPhone and Wipe Data
Different situations call for different methods. Here’s a breakdown of all five.
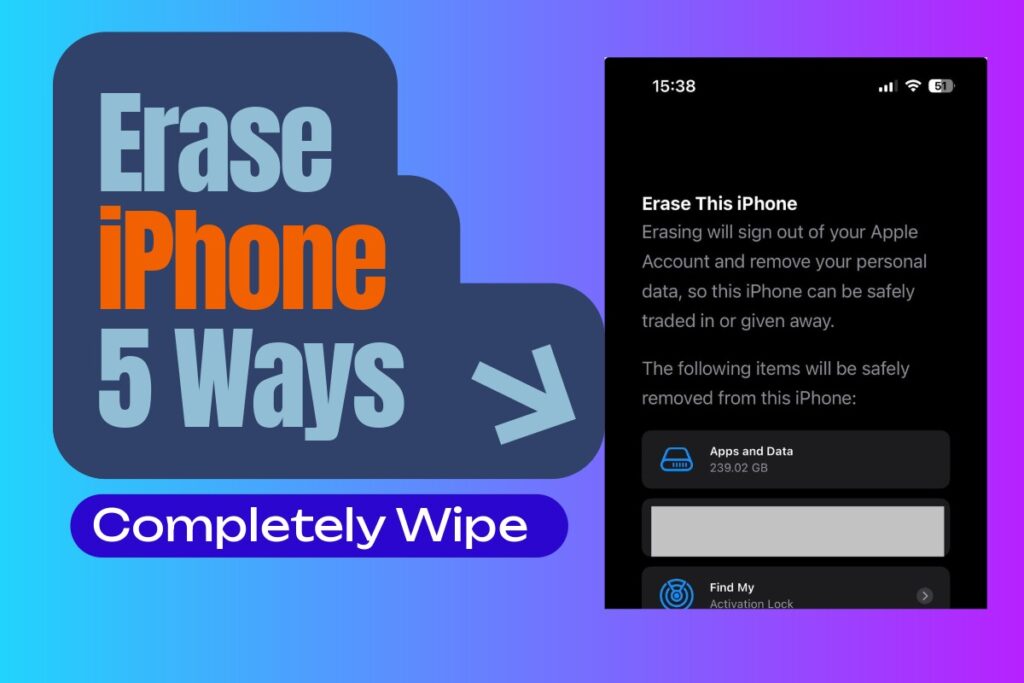
Method 1: Erase iPhone Through Settings (The Standard Way)
Best for: Normal erasure when you have access to your unlocked iPhone.
This is the most straightforward way to factory reset iPhone. Works on all models running iOS 15 through iOS 18 and the current iOS 26 beta.
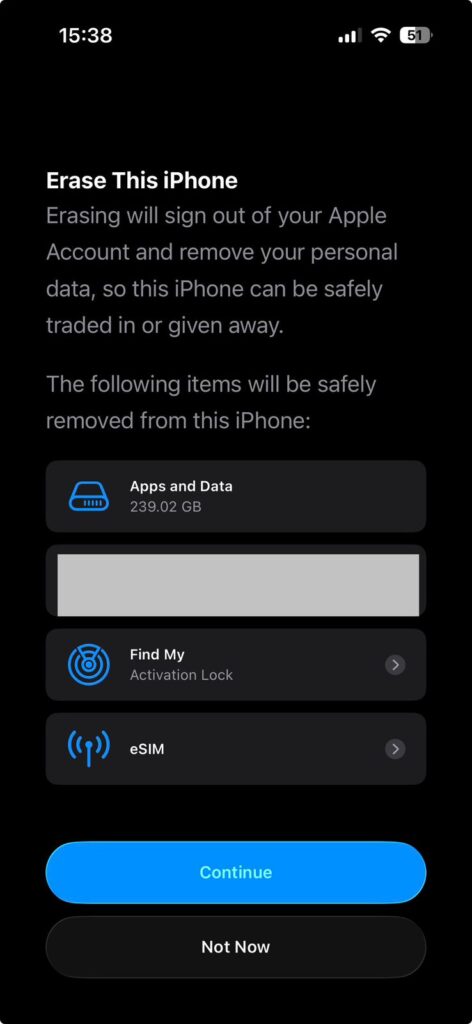
Your iPhone will restart and show the “Hello” screen — meaning it’s been fully wiped and is ready for a new user.
Expert Insight: On iPhone 15, 15 Pro, 16, and 16 Pro running the A17 or A18 chip, the erase process is noticeably faster — often under 8 minutes. The Secure Enclave crypto-wipe is nearly instant; the extra time is iOS reinstalling a clean system state.
Method 2: Erase iPhone Using a Mac (Finder)
Best for: iPhones that are frozen, unresponsive, or stuck in a boot loop. Also useful if the passcode is forgotten.
This method puts your iPhone into Recovery Mode, which forces a full software reinstall — essentially a deep clean that removes everything and installs the latest version of iOS.
What you need: A Mac running macOS Catalina (10.15) or later, plus a USB-C or Lightning cable.
Note: Even after this erase, if Find My was enabled beforehand, Activation Lock will still activate. You’ll need to enter the original Apple ID credentials to finish setup.
Method 3: Erase iPhone Using iTunes on Windows
Best for: Windows PC users who need to perform a full wipe, especially on a passcode-locked device.
2026 Update: On Windows 11, Apple has replaced iTunes with the Apple Devices app, available in the Microsoft Store. The interface is cleaner, and the process is identical to what’s described above.
Method 4: Erase iPhone Remotely via iCloud (Find My)
Best for: Lost or stolen iPhones, or situations where you don’t have physical access to the device.
This is the nuclear option — you can trigger a complete remote wipe from any web browser in the world.
The erase command sends to your iPhone the moment it connects to cellular or Wi-Fi. If the phone is currently offline, it will erase the second it gets a signal.
Important: After a remote erase, the device is still linked to your iCloud account through Activation Lock. To fully prepare it for a new owner, you must also remove it from your Apple ID:
- Go back to iCloud.com > Find My.
- Select the device.
- Click Remove This Device.
Method 5: Erase iPhone Without a Passcode (Emergency Reset)
Best for: Locked out of your iPhone with no way to enter the passcode.
If you’ve forgotten your passcode and can’t get into your iPhone, the only way to recover access is to completely erase the device. This is Recovery Mode (described in Method 2 and 3), but here are a few other scenarios:
If you’ve entered the wrong passcode 10 times: iOS will display an “Erase iPhone” option directly on the lock screen — but only if this was turned on in Settings > Face ID & Passcode > Erase Data beforehand. If it wasn’t enabled in advance, this option won’t appear.
If you know your Apple ID but forgot the passcode:
If you don’t know either the passcode or the Apple ID: Unfortunately, there is no legitimate workaround. This is by design — Apple’s Activation Lock exists specifically to prevent thieves from resetting stolen iPhones. If this is a device you legally own, contact Apple Support with proof of purchase.
The $900 Mistake
A reader named Marcus from Austin, Texas shared this story: He sold his iPhone 14 Pro on Facebook Marketplace for $650.
He deleted his photos, texted his contacts goodbye, and handed it over. Three days later, the buyer called him.
The new owner had opened the App Store and was greeted with Marcus’s Apple ID login prompt — and his saved passwords autofilled on Safari when visiting his bank’s website.
Marcus had skipped Step 2. He never signed out of iCloud or turned off Find My. The buyer was honest enough to call. Not everyone is.
The fix took 30 seconds: Marcus logged into iCloud.com, went to Find My, selected his old device, and chose “Remove This Device.” Problem solved — but it should never have happened.
How to Reset iPhone Without Losing Data (Soft Reset Options)
Not every problem requires a full wipe. Here’s a guide to how to reset iPhone without losing data for common issues:
Reset All Settings
Resets every setting — Wi-Fi passwords, display brightness, notification preferences — without touching your photos, apps, or messages.
- Go to Settings > General > Transfer or Reset iPhone > Reset > Reset All Settings.
Reset Network Settings
Fixes Wi-Fi, Bluetooth, and cellular connection problems.
- Go to Settings > General > Transfer or Reset iPhone > Reset > Reset Network Settings.
Reset Keyboard Dictionary
Clears autocorrect learned words.
- Go to Settings > General > Transfer or Reset iPhone > Reset > Reset Keyboard Dictionary.
Use these options first if you’re troubleshooting a software glitch. They’re reversible. A factory reset is not.
What If the Erase Doesn’t Work?
“Erase All Content and Settings” is grayed out
This usually means Screen Time restrictions are turned on. Go to Settings > Screen Time > Content & Privacy Restrictions and disable them, or enter the Screen Time passcode.
iPhone is stuck on the Apple logo during erase
Force restart your iPhone:
- iPhone 8 and later: Quickly press Volume Up → Volume Down → then hold the Side button until the Apple logo appears and disappears.
- iPhone 7: Hold Volume Down + Side button simultaneously for 10 seconds.
- iPhone 6s: Hold Home + Sleep/Wake together for 10 seconds.
If it’s still stuck, proceed with Recovery Mode (Method 2 or 3).
“Activation Lock” screen appears after erase
This means Find My was enabled and wasn’t turned off before the erase. You must enter the original Apple ID and password to proceed. If you don’t remember the password, use iforgot.apple.com to reset it. If the device isn’t yours, Apple Support is the only legitimate path forward.
Erase via iCloud never completes
The iPhone may be offline or powered off. The erase will trigger automatically the next time the device connects to the internet. You can check the status at iCloud.com > Find My — if it shows “Erase Pending,” it’s queued and will execute on the next connection.
Recovery Mode not working
Make sure you’re using an Apple-certified cable, not a cheap third-party one. Damaged or uncertified cables frequently cause Recovery Mode connection failures.
FAQ
A: No. Erasing your iPhone only affects the software and data on the device. Your carrier plan continues independently. If you delete your eSIM during the process, you’ll need to re-download it from your carrier — but the account and number stay active.
A: On modern iPhones (iPhone 12 and later), a standard erase takes 5–12 minutes. Older models (iPhone 8, X, XR) may take up to 20 minutes. Recovery Mode erases via Finder or iTunes take longer — typically 15–30 minutes — because they also re-download and install the full iOS firmware.
A: There’s no need to use a third-party app to erase an iPhone. Apple’s built-in Erase All Content and Settings uses hardware-level encryption destruction, which is more secure than anything a third-party app can offer. Stick to the official methods.
A: On iPhone 5s and later (all models with the Secure Enclave chip), the answer is effectively no. The factory reset destroys the encryption keys that protect your data. The remaining scrambled data on the flash storage cannot be decrypted even with professional forensic tools. This is why Apple’s method is considered the gold standard for secure data erasure.
A: Yes — you can erase the device using Recovery Mode (Method 2 or 3), which bypasses the passcode entirely. However, Activation Lock will still be triggered after the erase, requiring you to sign in with your Apple ID to finish setup. Visit iforgot.apple.com to reset your Apple ID password before you begin.
Ready to Wipe Your iPhone?
Follow Method 1 for the fastest, simplest erase. Use Method 2 or 3 if you’re locked out or your device is frozen.
And always — always — complete all three pre-erase steps first. Your data (and the next owner’s sanity) will thank you.
If you found this guide helpful, bookmark it before you erase — you won’t be able to pull it back up on that device once it’s wiped.
Have a question about a specific iPhone model or iOS version? Drop it in the comments and our team will respond.
Disclaimer: This article is intended for informational purposes only. The methods described reflect Apple’s official processes as of 2026. AppleHeadlines.com is not responsible for any data loss resulting from following these instructions. Always verify that your backup has completed successfully before proceeding with any erase operation. If your device was obtained secondhand and you are experiencing Activation Lock, contact Apple Support with valid proof of purchase. Attempting to bypass Activation Lock on a device you do not legally own may violate federal law under the Computer Fraud and Abuse Act (CFAA).

Ruth writes in-depth guides about Apple products, focusing on practical solutions for everyday users. Her articles cover device setup, hidden features, troubleshooting, and the latest updates for iOS, watchOS, and other Apple platforms.
He regularly researches Apple updates and tests features on devices like the iPhone and Apple Watch to ensure readers receive accurate and helpful information.


