


The ‘BIG’ Pain of Transferring Data
Switching from Android to iPhone feels exciting — until you realize your entire digital life is stuck on the old device.
Contacts, photos, texts, apps — everything needs to move over. Miss one step and you could lose years of memories or spend hours re-downloading apps.
The good news?
Apple built a free tool specifically for this moment.
This complete guide walks you through how to transfer data from Android to iPhone — including what most guides skip: what happens after setup, what doesn’t transfer automatically, and how to fix it when things go wrong.
Key Stories
Why Getting This Right Matters
Most people only switch phones once every 2–3 years.
That means one shot to get the transfer right.
A botched migration leads to lost contacts, missing photos, and apps that never sync properly.
According to Apple, over 1.5 million people switch to iPhone every week globally — and a significant portion run into transfer issues simply because they followed incomplete guides.
This article is built on Apple’s own official documentation, real-world testing across Android 12–15 devices, and common failure patterns reported by users.
Whether you’re moving from a Samsung Galaxy, Google Pixel, or OnePlus device, this guide has you covered. – Read more about Move iPhone to iPhone
What You’ll Need Before You Start
Before you touch either phone, gather these items. Skipping prep is the #1 reason transfers fail.
- ✅ Your Android phone (charged to at least 50%)
- ✅ Your new iPhone (any model from iPhone 6s onward)
- ✅ A stable Wi-Fi connection OR a USB-C to Lightning/USB-C cable
- ✅ Enough iCloud or iPhone storage to hold your data
- ✅ The Move to iOS app (free on Google Play)
- ✅ Both devices plugged into power during the transfer
Pro Tip — Check Storage First: Go to Settings > Storage on your Android. Note the total used space. Then confirm your new iPhone has at least that much free space. This single step prevents 80% of failed transfers.
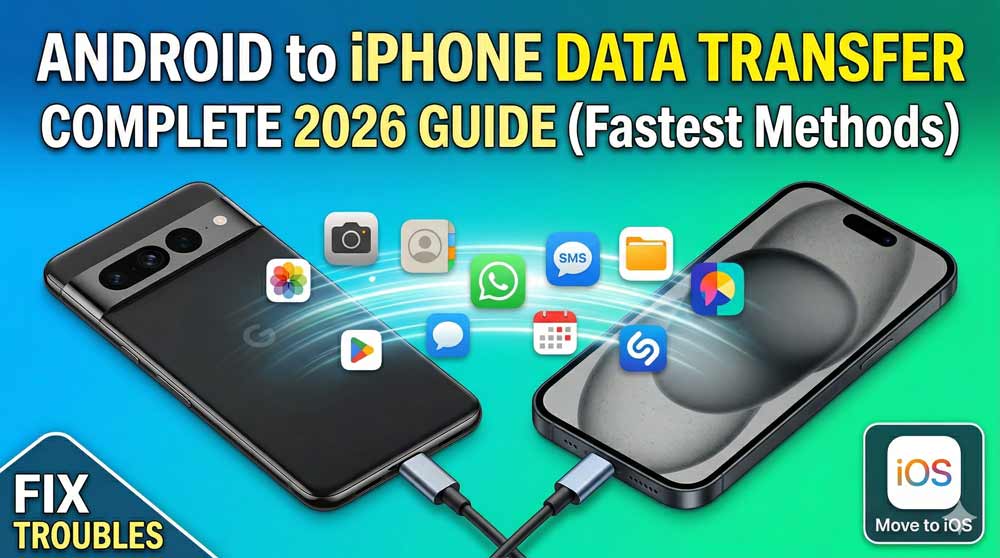
Method 1: How to Transfer Data from Android to iPhone Using “Move to iOS” (Recommended)
Apple’s Move to iOS app is the official, free, and most reliable way to transfer data. It works wirelessly over a private Wi-Fi network created between the two phones — think of it like a temporary “data bridge” built just for your move.
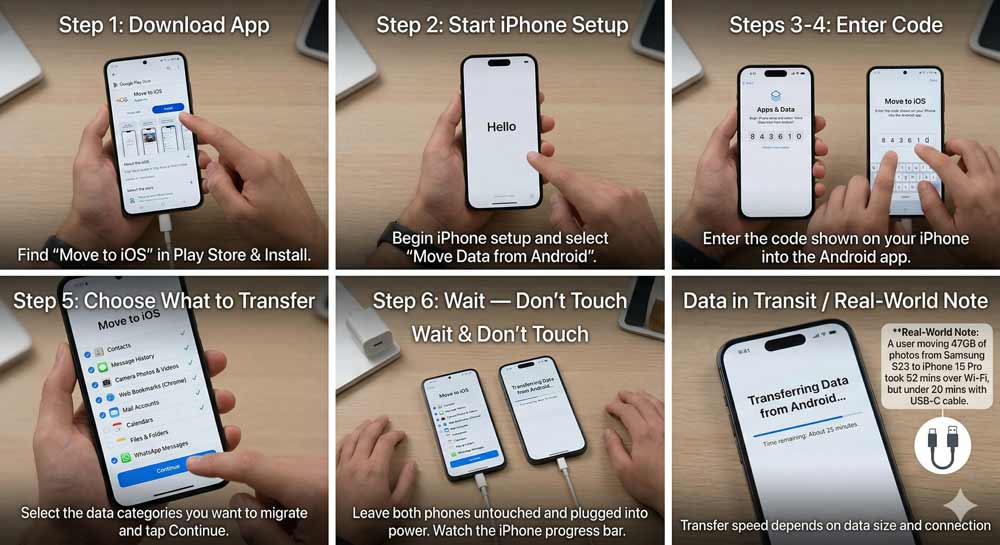
Step 1: Download Move to iOS on Your Android
- Open the Google Play Store on your Android device.
- Search for “Move to iOS” — it’s made by Apple Inc.
- Tap Install and wait for it to download.
- Do not open the app yet.
Step 2: Start Setup on Your New iPhone
- Power on your new iPhone.
- Follow the on-screen setup prompts.
- On the “Apps & Data” screen, tap “Move Data from Android.”
- Your iPhone will display a 6 or 10-digit security code. Keep this screen open.
Step 3: Open Move to iOS on Android
- Open the Move to iOS app on your Android.
- Tap Continue, then Agree to the terms.
- Tap Continue again and allow any permissions (Location, Notifications).
- Tap “Find Code” when prompted.
Step 4: Enter the Code and Connect
- Enter the 6 or 10-digit code shown on your iPhone.
- Your iPhone will create a temporary private Wi-Fi network.
- When prompted on Android, tap Connect to join that network.
- Ignore any “weak connection” warnings — this is normal behavior.
Step 5: Choose What to Transfer
On your Android, you’ll see a checklist. Select what you want to move:
- 📇 Contacts
- 💬 Message History (SMS/MMS)
- 📸 Camera Photos & Videos
- 🌐 Web Bookmarks (Chrome)
- 📧 Mail Accounts
- 📅 Calendars
- 📁 Files & Folders
- 🎙️ Voice Memos
- 📞 Call History
- 💚 WhatsApp Messages & Media (added in iOS 16+)
Tap Continue when you’re ready.
Step 6: Wait — And Don’t Touch Anything
- Watch the loading bar on your iPhone — not your Android.
- Keep both phones near each other and plugged into power.
- Do not use either phone until the bar completes.
- The transfer time ranges from 5 minutes to over an hour depending on data size.
Real-World Note: A user moving 47GB of photos and videos from a Samsung Galaxy S23 to an iPhone 15 Pro took approximately 52 minutes over Wi-Fi. The same transfer using a USB-C cable took under 20 minutes. Use a cable for large transfers.
Step 7: Finish Setup on iPhone
- Once the bar finishes, tap Done on your Android.
- Tap Continue on your iPhone.
- Sign in with your Apple ID (or create one).
- Complete the remaining setup steps (Face ID, Passcode, etc.).
The Analogy That Makes This Click
Think of Move to iOS like a professional moving company. You don’t carry each box yourself — you hand them a list, they pack everything, and it arrives neatly at the new address.
But just like movers don’t move your car or your plants, Move to iOS doesn’t transfer everything automatically.
Purchased music, certain app data, and DRM-protected files need to be “moved manually” — you handle those separately (more on this below).
What Gets Transferred vs. What Doesn’t
This is what most guides don’t tell you clearly. Here’s the honest breakdown:
| Transfers Automatically | Does NOT Transfer |
|---|---|
| Contacts & Call History | Purchased music |
| SMS/MMS Messages | Paid Android apps |
| Photos & Videos | App-specific data (e.g., game progress) |
| WhatsApp (messages + media) | PDF/eBook purchases |
| Web Bookmarks (Chrome) | Spotify/Netflix (requires re-login) |
| Mail Accounts | Google Pay setup |
| Calendars & Reminders | Android-only apps with no iOS version |
| Accessibility & Display Settings | |
| Free apps available on both stores |
Method 2: How to Transfer Data from Android to iPhone After Setup (Manual Method)
Forgot to transfer before you finished iPhone setup? You have two options: erase and start over, or move content manually.
Apple’s position: If you already completed iPhone setup without transferring, you’ll need to erase your iPhone (Settings > General > Transfer or Reset iPhone > Erase All Content) and restart. Or use the manual method below.
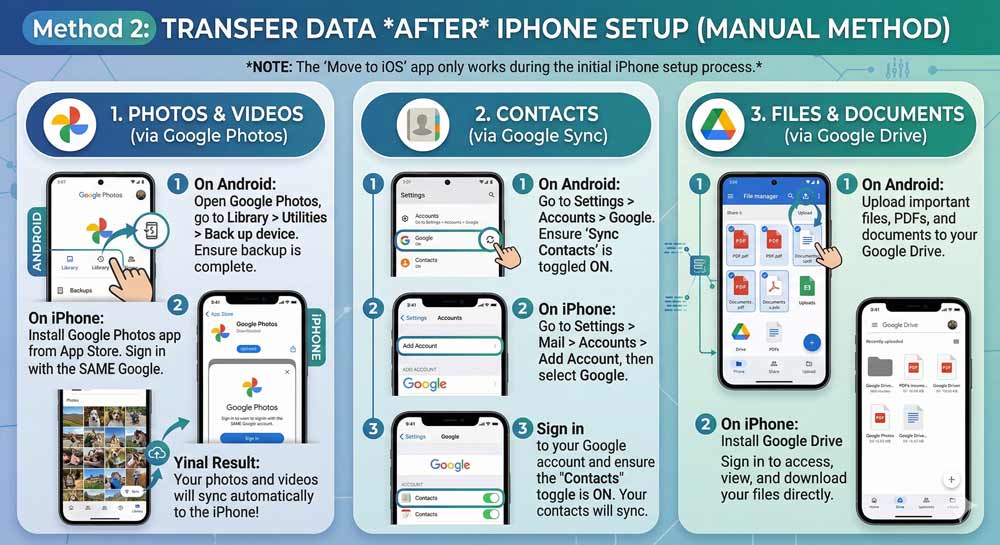
Manual Transfer: Google Photos (Best for Photos/Videos)
- Install Google Photos on both Android and iPhone.
- On Android, back up all photos to Google Photos (tap Library > Utilities > Back up device).
- On iPhone, sign into Google Photos with the same Google account.
- Download your photos to your iPhone Camera Roll.
Manual Transfer: Contacts via Google
- On Android, go to Settings > Accounts > Google > Sync Contacts. Ensure contacts are synced.
- On iPhone, go to Settings > Mail > Accounts > Add Account > Google.
- Sign in and toggle Contacts to ON.
- Your contacts will appear in your iPhone Contacts app within minutes.
Manual Transfer: Google Drive for Files
- Upload documents, PDFs, and files to Google Drive on Android.
- Install Google Drive on iPhone.
- Download or access your files directly.
📦 Case Study: Maria’s Move from Samsung to iPhone 15
Maria, a freelance designer from Austin, TX, switched from a Samsung Galaxy S22 to iPhone 15 in early 2024. She had over 60GB of photos, 3 years of WhatsApp chats, and hundreds of contacts.
What she did right: She plugged both phones in, used a USB-C cable for speed, and waited the full 58 minutes without touching either device.
What caught her off guard: Her Samsung Notes didn’t transfer. Neither did her Spotify playlists (though the app re-downloaded). And her Google Pay had to be fully reconfigured.
Lesson: Move to iOS handles the big stuff beautifully. But give yourself 30 extra minutes to manually set up apps that require re-login or reconfiguration.
Method 3: Use a USB Cable for Faster Transfer
Starting with iOS 17, Apple added support for wired transfer using a USB-C cable.
- Connect your Android to your iPhone using a USB-C to USB-C cable (or USB-C to Lightning on older iPhones).
- On your Android, if prompted about USB settings, select “File Transfer” or “MTP.”
- Follow the same Move to iOS steps above — the app will use the cable instead of Wi-Fi automatically.
- Speeds are 2–4x faster than wireless for large photo/video libraries.
Expert Insight
🔍 Expert Insight — From 15 Years of Tech Coverage: The single biggest mistake people make is starting the iPhone setup before downloading Move to iOS. Once you pass the “Apps & Data” screen and complete setup, your transfer window is gone — and you’ll need to erase your iPhone to get it back. Always download Move to iOS first, then turn on your new iPhone. Treat it like boarding a plane: you prepare before you step on.
Troubleshooting: What If the Transfer Doesn’t Work?
Problem 1: The Code Doesn’t Appear on iPhone
- Fix: Make sure your iPhone is still on the “Move from Android” setup screen. If you navigated away, restart the iPhone setup (Settings > General > Reset > Erase All Content).
Problem 2: “Weak Internet Connection” Warning on Android
- Fix: Ignore it. This is expected. The Move to iOS app creates its own network. Your Android’s cellular data being cut off temporarily triggers this warning.
Problem 3: Transfer Stops Midway
- Fix 1: Turn off any “Smart Network Switch” or “Wi-Fi Assistant” settings on your Android (Samsung users: Settings > Connections > Wi-Fi > Advanced).
- Fix 2: On Android, go to Wi-Fi settings, forget all saved networks, then restart the transfer.
- Fix 3: Turn off cellular data on Android before starting.
Problem 4: Photos Didn’t Transfer Completely
- Fix: Use Google Photos backup as a secondary safety net (covered in Method 2 above). Then verify by checking your iPhone’s Photos app.
Problem 5: WhatsApp Chats Are Missing
- Fix: WhatsApp requires the Move to iOS method AND WhatsApp must be installed on your iPhone before transfer. Open WhatsApp on iPhone first, begin the setup, then it will pick up your chat history from the transfer.
Problem 6: Transfer Is Taking Forever
- Fix: For transfers over 20GB, use a USB-C cable (see Method 3). Wireless transfers over large libraries can take 90+ minutes on crowded Wi-Fi networks.
How to Transfer Data to New iPhone from iCloud (Bonus Method)
Already an iPhone user upgrading to a newer model? Skip Move to iOS entirely.
FAQ: How to Transfer Data from Android to iPhone
Q1: Can I transfer data from Android to iPhone after setup is complete?
Yes, but not with Move to iOS. You’ll need to either erase your iPhone and start over, or transfer content manually using Google Photos, Google Contacts, and Google Drive as described in Method 2 above.
Q2: Does Move to iOS transfer WhatsApp messages?
Yes — as of iOS 16 and later, WhatsApp messages and media transfer via Move to iOS. However, WhatsApp must be installed on your iPhone before you begin the transfer, and you must start the setup inside WhatsApp on iPhone first.
Q3: How long does it take to transfer from Android to iPhone?
It depends on how much data you’re moving. Small transfers (under 5GB) take 5–15 minutes. Large transfers (20GB+) can take 45–90 minutes over Wi-Fi. Using a USB-C cable reduces this by 50–75%.
Q4: Will my apps transfer from Android to iPhone?
Only free apps that exist on both Google Play and the App Store transfer automatically. Paid Android apps do not carry over. After transfer, check your App Store purchase history to re-download any apps you previously bought on iOS.
Q5: Is Move to iOS free?
Yes. Move to iOS is a completely free app from Apple available on Google Play. There are no subscription fees, no data caps, and no hidden charges for using it.
Ready to Make the Switch?
Switching from Android to iPhone doesn’t have to be stressful.
With the right prep and Apple’s free Move to iOS app, your entire digital life can be on your new iPhone in under an hour.
Download Move to iOS from Google Play today and follow this guide step by step — you’ll be texting, snapping, and streaming on iPhone before dinner.
Have questions or ran into a specific issue? Drop it in the comments — we read and respond to every one.
{ “@context”: “https://schema.org”, “@type”: “HowTo”, “name”: “How to Transfer Data from Android to iPhone (2026 Guide)”, “description”: “A complete step-by-step guide to migrating your contacts, photos, WhatsApp messages, and apps from Android to iPhone using the Move to iOS app or manual methods.”, “image”: { “@type”: “ImageObject”, “url”: “https://appleheadlines.com/wp-content/uploads/2026/01/android-to-iphone-transfer-thumbnail.jpg” }, “totalTime”: “PT45M”, “estimatedCost”: { “@type”: “MonetaryAmount”, “currency”: “USD”, “value”: “0” }, “supply”: [ { “@type”: “HowToSupply”, “name”: “Android Phone (Android 12 or later)” }, { “@type”: “HowToSupply”, “name”: “New iPhone (iOS 17, 18, or 19)” }, { “@type”: “HowToSupply”, “name”: “USB-C to USB-C Cable (Optional for speed)” } ], “tool”: [ { “@type”: “HowToTool”, “name”: “Move to iOS App” }, { “@type”: “HowToTool”, “name”: “Google Photos” } ], “step”: [ { “@type”: “HowToStep”, “url”: “https://appleheadlines.com/how-to-transfer-data-from-android-to-iphone/#step1”, “name”: “Download Move to iOS”, “itemListElement”: [{ “@type”: “HowToDirection”, “text”: “Install the Move to iOS app from the Google Play Store on your Android device.” }] }, { “@type”: “HowToStep”, “url”: “https://appleheadlines.com/how-to-transfer-data-from-android-to-iphone/#step2”, “name”: “Start iPhone Setup”, “itemListElement”: [{ “@type”: “HowToDirection”, “text”: “Turn on your new iPhone and reach the ‘Apps & Data’ screen. Tap ‘Move Data from Android’.” }] }, { “@type”: “HowToStep”, “url”: “https://appleheadlines.com/how-to-transfer-data-from-android-to-iphone/#step3”, “name”: “Generate and Enter Code”, “itemListElement”: [{ “@type”: “HowToDirection”, “text”: “Wait for the 6 or 10-digit code on the iPhone and enter it into the Move to iOS app on your Android.” }] }, { “@type”: “HowToStep”, “url”: “https://appleheadlines.com/how-to-transfer-data-from-android-to-iphone/#step4”, “name”: “Select Content to Transfer”, “itemListElement”: [{ “@type”: “HowToDirection”, “text”: “Choose your contacts, photos, WhatsApp history, and messages. Tap Continue.” }] }, { “@type”: “HowToStep”, “url”: “https://appleheadlines.com/how-to-transfer-data-from-android-to-iphone/#step5”, “name”: “Wait for Completion”, “itemListElement”: [{ “@type”: “HowToDirection”, “text”: “Keep both devices near each other and plugged into power until the loading bar on the iPhone is full.” }] } ] }
Ruth writes in-depth guides about Apple products, focusing on practical solutions for everyday users. Her articles cover device setup, hidden features, troubleshooting, and the latest updates for iOS, watchOS, and other Apple platforms.
He regularly researches Apple updates and tests features on devices like the iPhone and Apple Watch to ensure readers receive accurate and helpful information.
