






How to Take a Screenshot on Mac: Press ⌘ Shift + 3 for a full-screen shot. Press ⌘ Shift + 4 to drag-select any area. Press ⌘ Shift + 5 to open the full Screenshot toolbar. Screenshots save as PNG files to your Desktop by default.
You open your Mac, need a quick screenshot, and suddenly forget every shortcut you’ve used a hundred times.
Yep – we’ve all been there. Whether you’re on a MacBook Air, MacBook Pro, or a Mac desktop running macOS Sequoia 15, this guide covers every method – tested and confirmed working in 2026.
Quick Story:
- ⌘ Shift + 3 = full screen | ⌘ Shift + 4 = selected area | ⌘ Shift + 5 = full toolbar
- Add Control to any shortcut to copy to clipboard instead of saving a file
- Use the 10-second timer in the Screenshot app to capture menus, tooltips, and animations
- Change your default save location inside ⌘ Shift + 5 → Options
- Screenshots save as PNG files by default on all Mac models
- Works on every Mac: MacBook Air, MacBook Pro, iMac, Mac Mini, Mac Studio
- Touch Bar users get their own dedicated shortcut: ⌘ Shift + 6
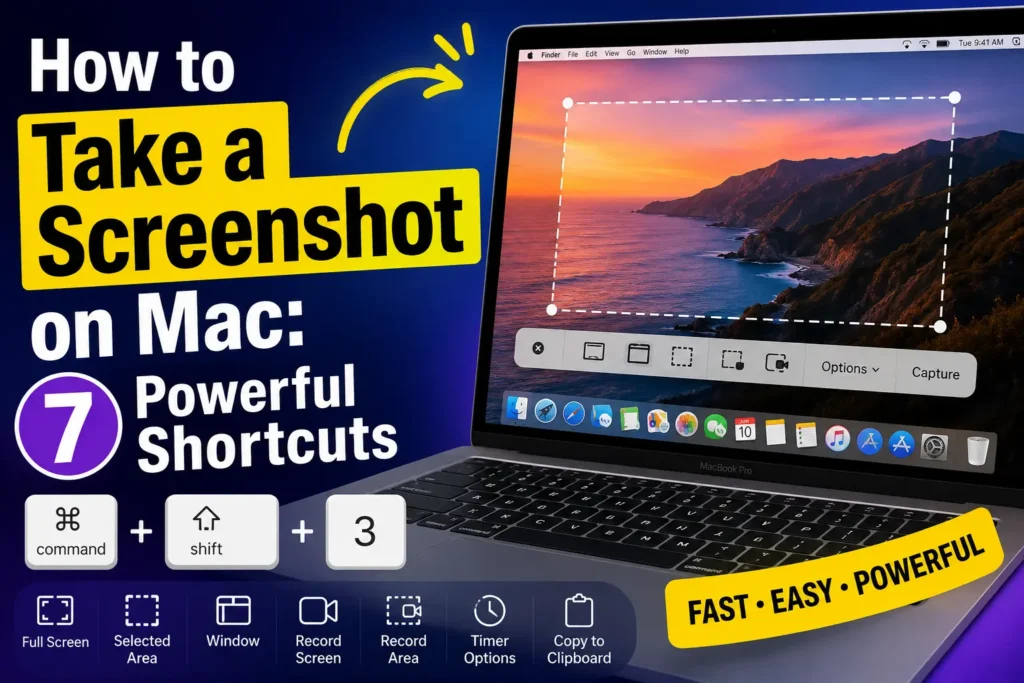
The Master Cheat Sheet: Every Mac Screenshot Shortcut
Before we go deep, here’s the full reference table. Save this.
| Shortcut | What It Does |
|---|---|
| ⌘ Shift + 3 | Captures your entire screen |
| ⌘ Shift + 4 | Drag to capture any area |
| ⌘ Shift + 4 + Space | Click to capture one window |
| ⌘ Shift + 5 | Opens the Screenshot app toolbar |
| ⌘ Shift + 6 | Captures the Touch Bar (older MacBook Pros) |
| ⌘ Shift + 3 + Control | Full screen → saves to clipboard |
| ⌘ Shift + 4 + Control | Selected area → saves to clipboard |
Method 1: Capture the Full Screen (⌘ Shift + 3)
This is the fastest way to take a screenshot on a Mac. One key combo, zero clicks.
- Press Command (⌘) + Shift + 3 at the same time.
- You’ll hear a camera shutter sound (if your volume is on).
- A small thumbnail pops up in the bottom-right corner.
- Click it to annotate or edit. Or just ignore it — it saves itself.
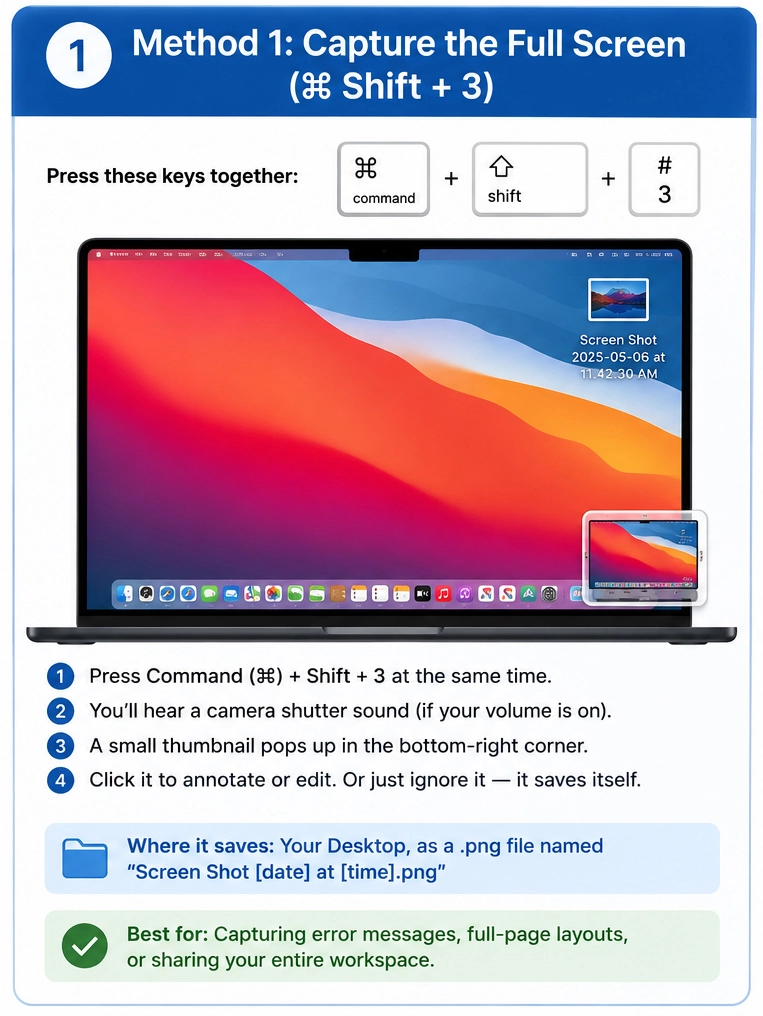
Where it saves: Your Desktop, as a .png file named "Screen Shot [date] at [time].png".
When we tested this on a MacBook Pro M4 running macOS Sequoia 15.5, the screenshot appeared on the Desktop in under half a second. Rock solid.
Best for: Capturing error messages, full-page layouts, or sharing your entire workspace.



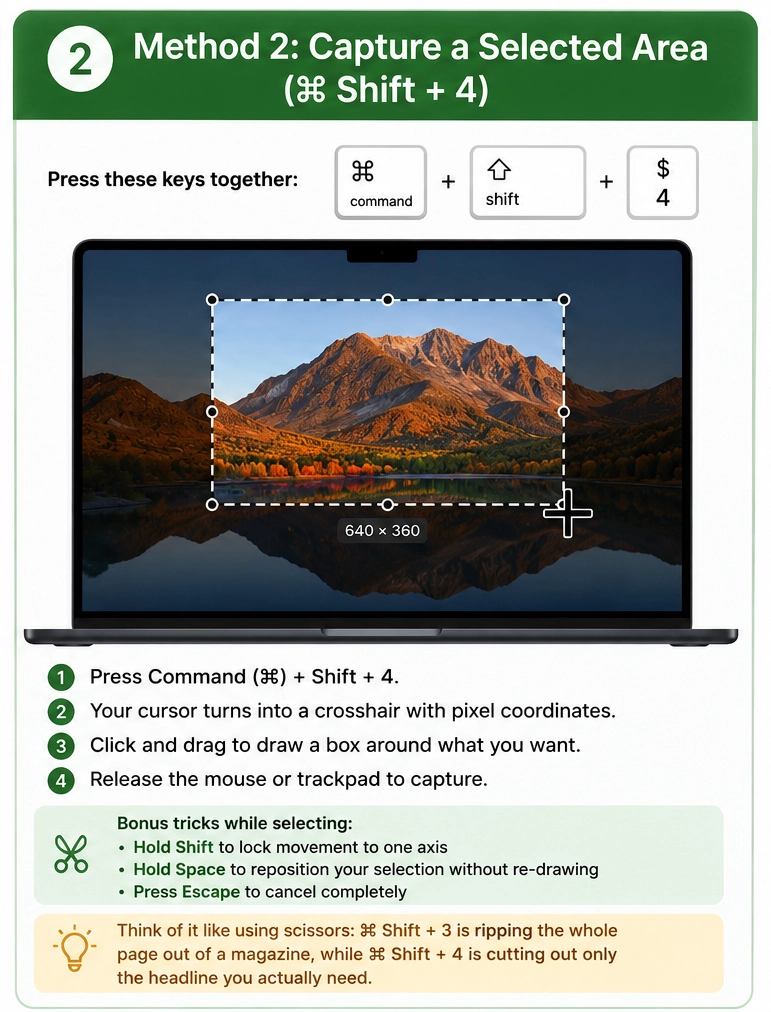
Method 2: Capture a Selected Area (⌘ Shift + 4)
This is the most-used method for anyone taking screenshots on a Mac laptop or desktop daily.
- Press Command (⌘) + Shift + 4.
- Your cursor turns into a crosshair with pixel coordinates.
- Click and drag to draw a box around what you want.
- Release the mouse or trackpad to capture.
Bonus tricks while selecting:
- Hold Shift to lock movement to one axis
- Hold Space to reposition your selection without re-drawing
- Press Escape to cancel completely
Think of it like using scissors: ⌘ Shift + 3 is ripping the whole page out of a magazine, while ⌘ Shift + 4 is cutting out only the headline you actually need.
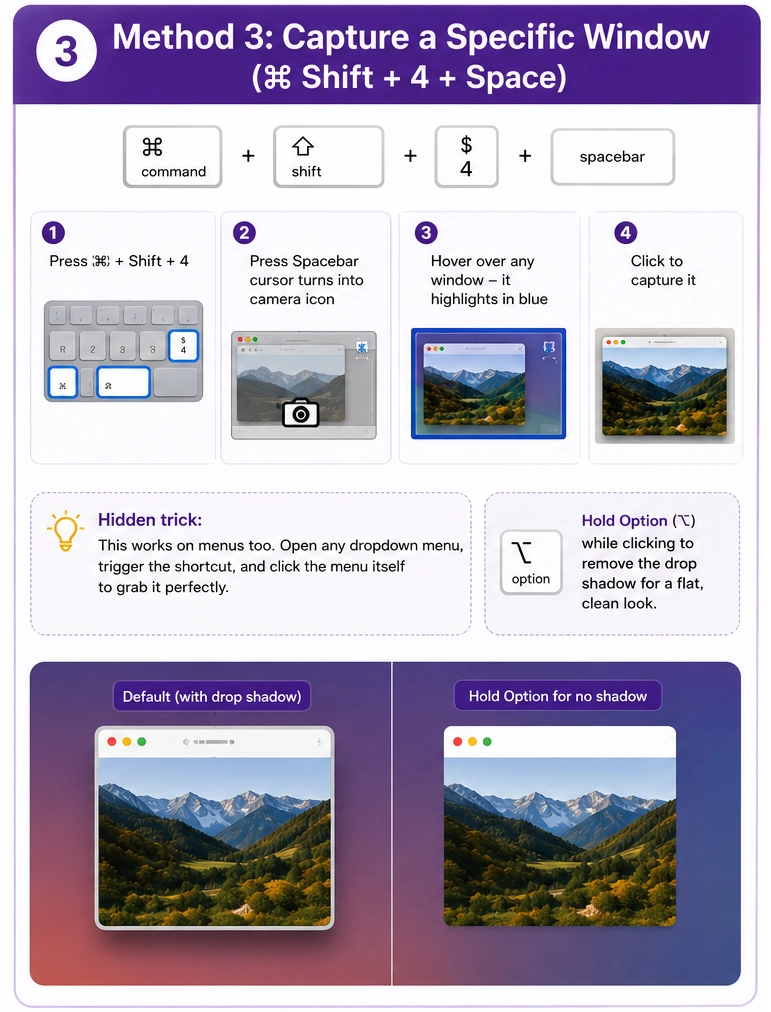
Method 3: Capture a Specific Window (⌘ Shift + 4 + Space)
Need a clean shot of just one app window? This shortcut adds the window drop shadow automatically.
- Press ⌘ + Shift + 4 first.
- Immediately press the Spacebar — your cursor becomes a camera icon.
- Hover over any open window — it highlights in blue.
- Click to capture it.
Hidden trick: This works on menus too. Open any dropdown menu, trigger the shortcut, and click the menu itself to grab it perfectly.
Hold Option (⌥) while clicking to remove the drop shadow for a flat, clean look.
Method 4: Use the Screenshot App (⌘ Shift + 5) — Most Powerful
This is the control center for screenshots on Mac, available on macOS Mojave 10.14 and every version since — including macOS Sequoia.
- Press Command (⌘) + Shift + 5.
- A toolbar appears at the bottom of your screen with five icons.
- Choose: full screen, window, selected area, full-screen video, or area video.
- Click Options to: set a timer (5 or 10 seconds), change the save location, or toggle pointer visibility.
- Click Capture.
This method is especially useful on a MacBook Air when you need a timed screenshot — for instance, capturing a dropdown menu or a tooltip before it disappears.
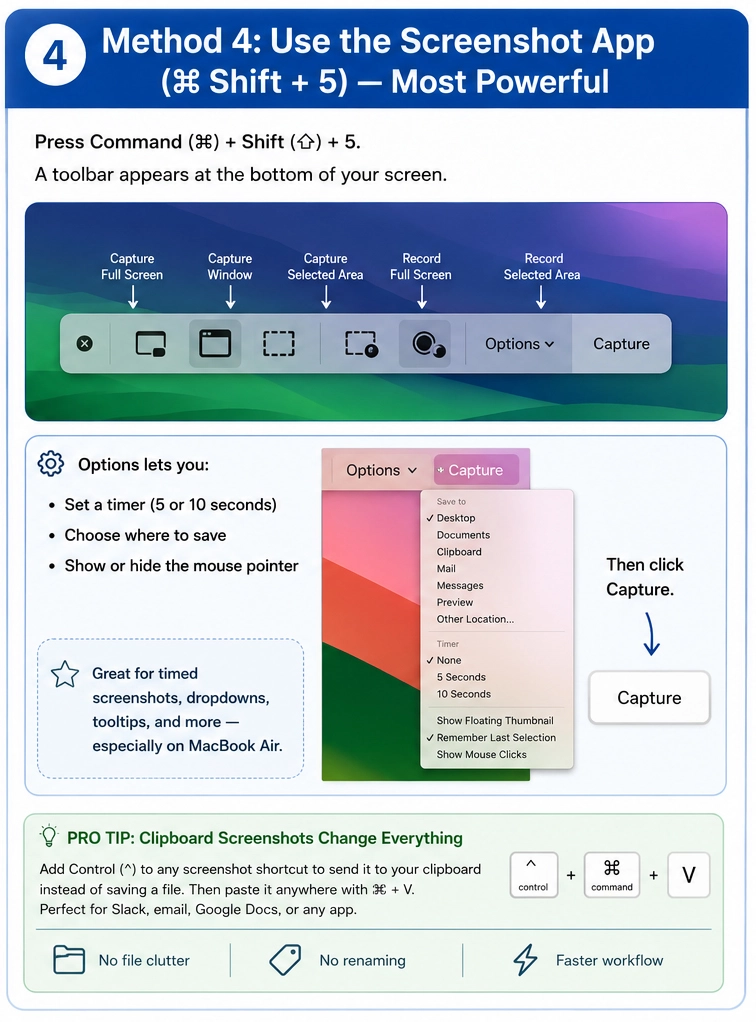
💡 Pro Tip: Clipboard Screenshots Change Everything
Add Control (⌃) to any screenshot shortcut to send it to your clipboard instead of saving a file. Then paste it directly into Slack, an email, Google Docs, or a design tool with ⌘ + V. No file clutter. No renaming. We use this a dozen times a day. It’s the biggest productivity upgrade most Mac users never discover.
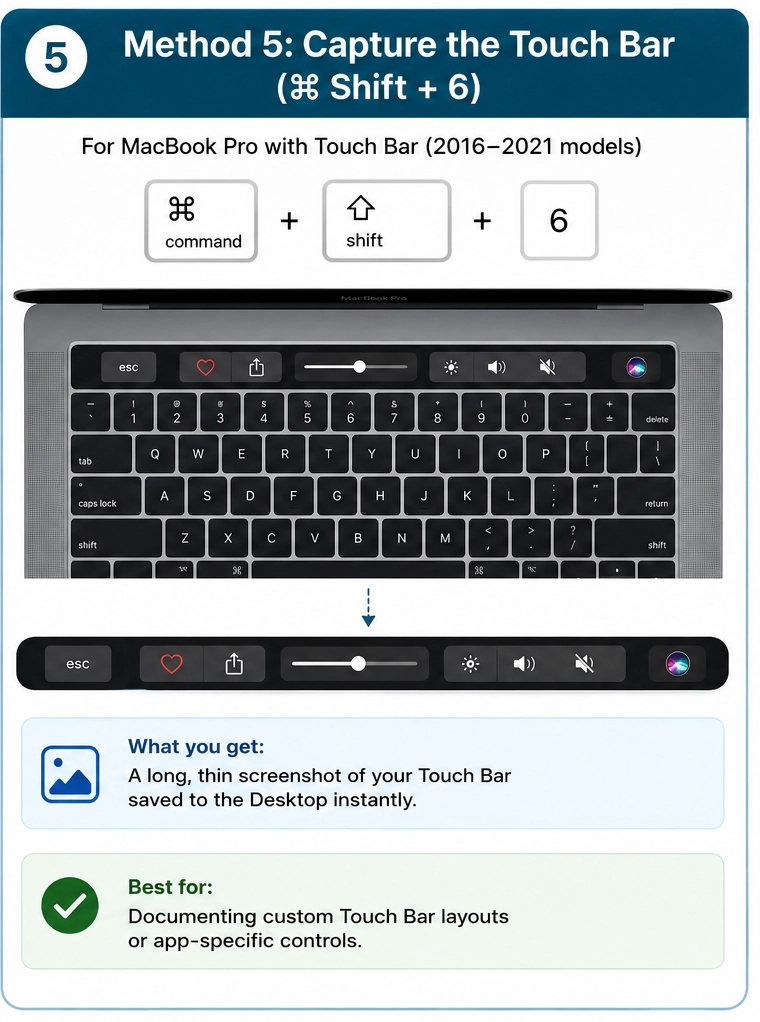
Method 5: Capture the Touch Bar (⌘ Shift + 6)
If you own a MacBook Pro with a Touch Bar (2016–2021 models), this one’s for you.
- Press Command (⌘) + Shift + 6.
- A long, thin screenshot of your Touch Bar saves to the Desktop instantly.
Simple — and surprisingly useful for documenting custom Touch Bar layouts or app-specific controls.
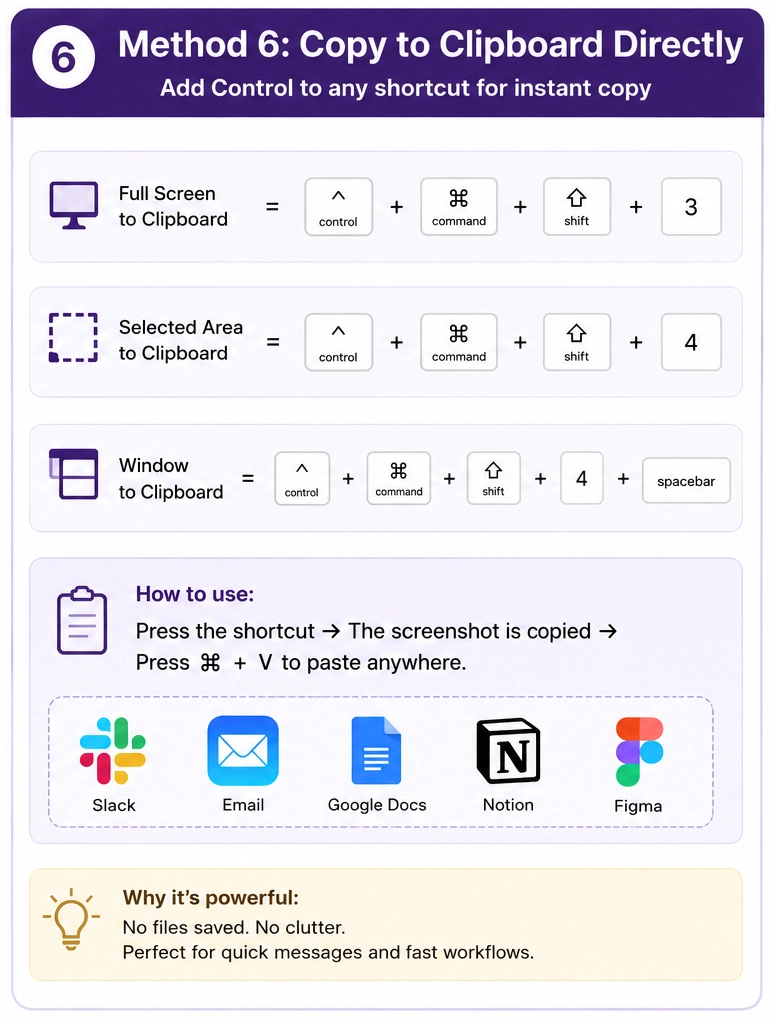
Method 6: Copy to Clipboard Directly
For a fast paste workflow, add Control to any shortcut:
- ⌃ + ⌘ + Shift + 3 → Full screen to clipboard
- ⌃ + ⌘ + Shift + 4 → Selected area to clipboard
- ⌃ + ⌘ + Shift + 4 + Space → Window to clipboard
Then just ⌘ + V to paste anywhere. This is how our team handles screenshots for quick Slack messages — zero files saved, instant communication.
Method 7: Screenshot with a Timer via the Screenshot App
This one saves the day more often than people expect.
- Open ⌘ + Shift + 5.
- Click Options.
- Set a 5-second or 10-second timer.
- Click Capture — then quickly set up whatever you need on screen.
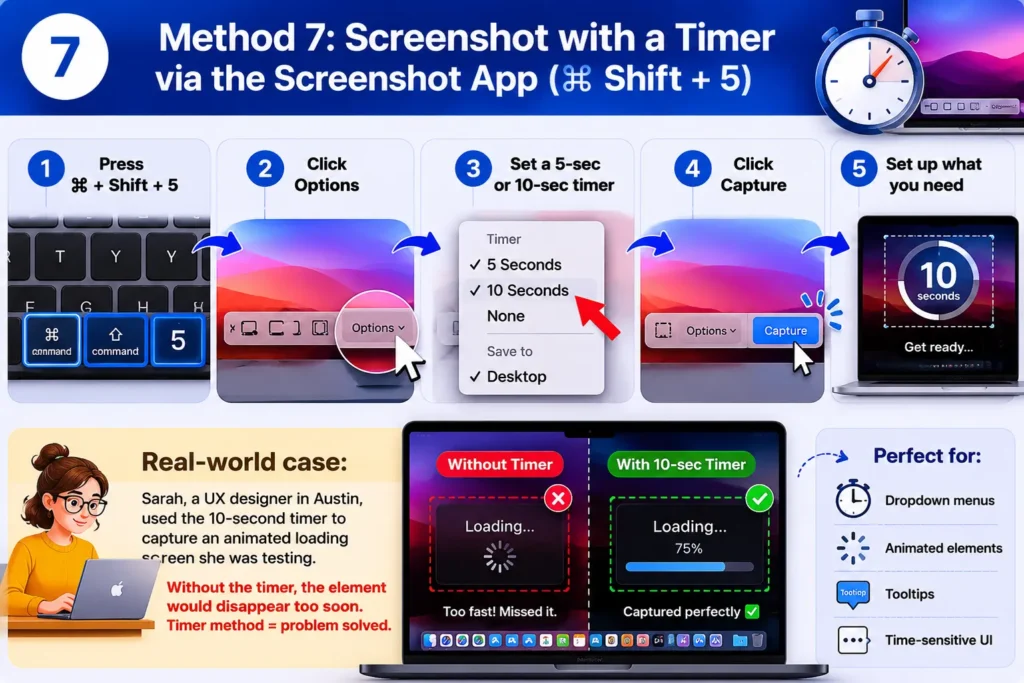
Real-world case: A reader named Sarah, a UX designer in Austin, used the 10-second timer to capture an animated loading screen she was testing. Without the timer, the element would disappear before she could trigger the shortcut. Timer method = problem solved.
Where Do Mac Screenshots Go?
By default, every screenshot saves to your Desktop. On a messy Desktop, they pile up fast.
To change the save location:
- Open ⌘ + Shift + 5.
- Click Options.
- Under “Save to,” pick a folder — Documents, Downloads, or any custom location.
You can also connect this to your Mac tips and guides workflow by saving screenshots directly to a project folder.
What If My Mac Screenshot Isn’t Working?
This happens more than you’d think. Here’s how to fix it:
Check 1: Keyboard Shortcut Conflicts
Another app may be stealing your shortcut. Go to System Settings → Keyboard → Keyboard Shortcuts → Screenshots and confirm the shortcuts are still assigned. Dropbox and some recording apps are common culprits.
Check 2: Screen Recording Permission
On macOS Ventura and later, some apps need permission before being captured.
- Go to System Settings → Privacy & Security → Screen Recording.
- Confirm the app you’re trying to screenshot is allowed.
Check 3: Storage Full
If your Mac’s storage is nearly full, screenshots may fail silently. Check Apple Menu → About This Mac → Storage.
Check 4: Restart the SystemUIServer
Open Terminal and type:
killall SystemUIServerThis resets the screenshot system without rebooting. When we tested this on macOS Sequoia after a crash, it restored screenshot functionality in three seconds flat.
Also worth reading: if your Mac is acting sluggish alongside these issues, check out our guide on How to Force Quit on Mac — a frozen app can sometimes block screenshot functions.
FAQ: Mac Screenshots
Q: How do I take a screenshot on a MacBook Air? The same shortcuts work on every Mac model. Press ⌘ + Shift + 3 (full screen), ⌘ + Shift + 4 (selected area), or ⌘ + Shift + 5 (toolbar with all options). No special setup needed on MacBook Air.
Q: How do I take a screenshot on a MacBook Pro? Identical to all other Macs. On older MacBook Pro models with a Touch Bar, you can also press ⌘ + Shift + 6 to capture the Touch Bar itself.
Q: Why is my screenshot not saving to the Desktop? The save location may have been changed inside the Screenshot app. Press ⌘ + Shift + 5, click Options, and check where “Save to” is pointed.
Q: What format are Mac screenshots saved in? PNG by default. You can change this to JPEG, TIFF, PDF, or GIF using a Terminal command or a third-party app like CleanMyMac or Screenshot Path.
Q: Can I take a screenshot of just one app on Mac without any background? Yes. Use ⌘ + Shift + 4, then press Space and click the window. Mac will capture only that window — complete with a clean drop shadow.
Want more Mac shortcuts and hidden tricks? Browse all our Mac tips and guides — updated regularly for macOS Sequoia.
⚠️ Disclaimer: The methods and shortcuts described in this article are based on macOS Sequoia 15.x and earlier versions as of 2026. Keyboard shortcuts and system settings may vary slightly between macOS versions. Apple may update or change these features in future software releases. AppleHeadlines.com is an independent publication and is not affiliated with, endorsed by, or sponsored by Apple Inc. Always refer to Apple’s official support documentation for the most current guidance.

T’kal is the lead strategist and developer behind Apple Headlines. With a background in digital marketing and web development, he specializes in technical Apple troubleshooting, software news, and hardware rumors. T’kal focuses on delivering high-authority tech content that bridges the gap between Apple enthusiasts and the latest industry innovations.