


Apple’s iOS updates often bring fresh visual features to enhance user experience.
Liquid Glass is one such design element that creates fluid, dynamic animations across your device.
While some users love this aesthetic touch, others find it distracting or battery-draining.
If you’re wondering how to turn off liquid glass on your iPhone or iPad, you’ve come to the right place.
This comprehensive guide walks you through everything you need to know about disabling this feature and reclaiming your preferred interface style.
Short Story on Disable Liquid glass
How to Turn Off Liquid Glass: Step-by-Step Instructions
Apple doesn’t provide a single “turn off liquid glass” toggle.
You can disable the underlying animations that create this effect.
Method 1: Adjust Liquid Glass Settings
Apple includes a dedicated Liquid Glass toggle in your device settings. This controls transparency throughout the system.


Here’s the step-by-step process:
1.>> Open the Settings app on your device
2.>> Scroll down and tap Display & Brightness
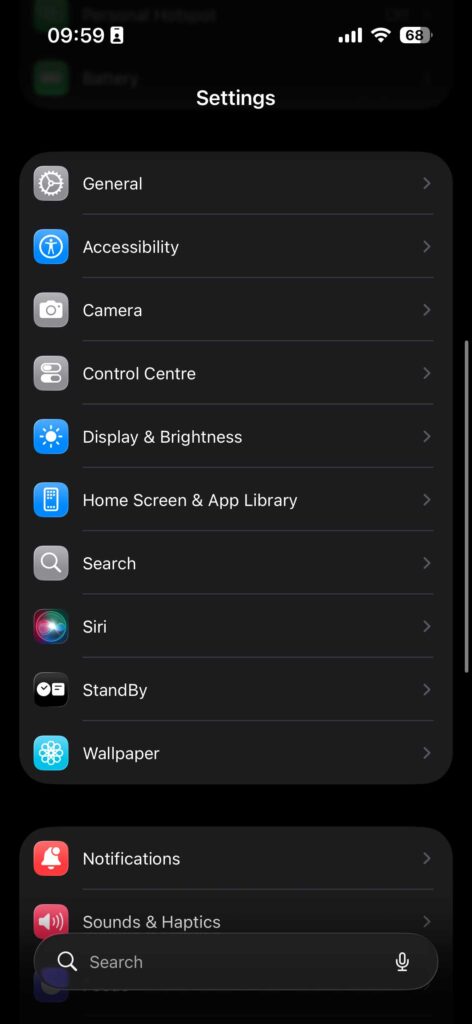
3. Tap on Liquid Glass

Choose “Tinted” instead of Clear
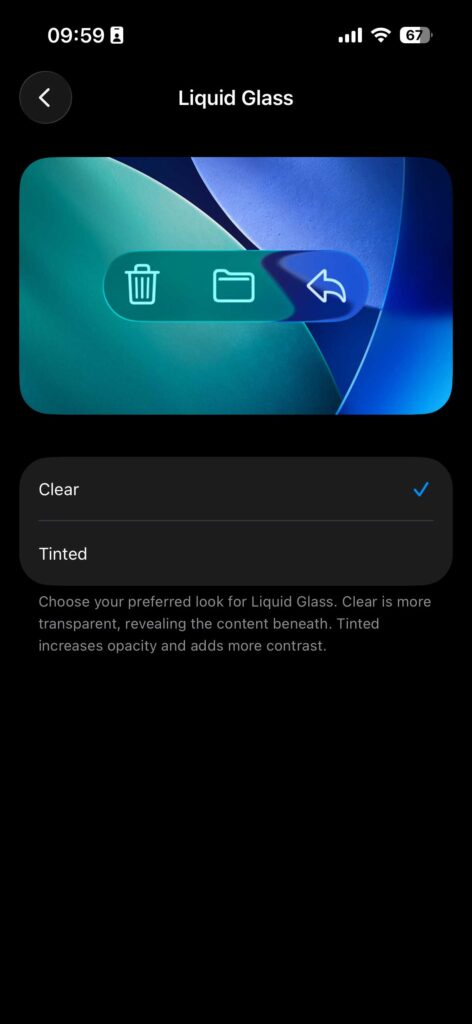
As Apple explains: “Clear is more transparent, revealing the content beneath. Tinted increases opacity and adds more contrast.”
Important note: This won’t completely return your iPhone to iOS 18’s appearance. Backgrounds in pop-up windows become less transparent but aren’t fully opaque. However, you’ll notice significantly improved contrast and reduced glass effects.
Combining Both Methods for Maximum Effect
For the most dramatic change, use both methods together:
- Change icon style to Default
- Switch Liquid Glass to Tinted
This combination delivers the closest experience to pre-Liquid Glass iOS versions. Your interface gains maximum opacity and contrast across all elements.
Method 2: Change Icon Style (Fastest Method)
This approach removes the glassy appearance from your Home Screen icons.
Follow these simple steps:
1. Long-press on the Home Screen until icons start to jiggle
2. Tap “Edit” in the top-left corner
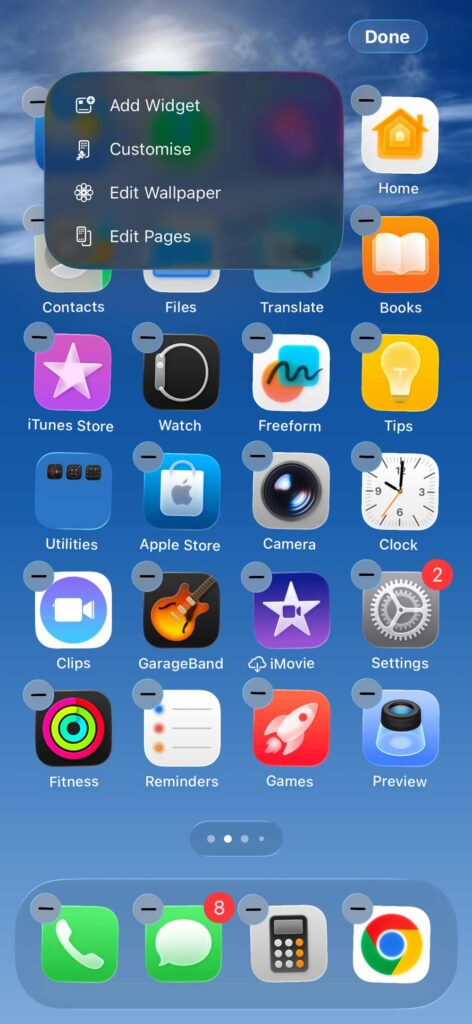
3. Select “Customize”
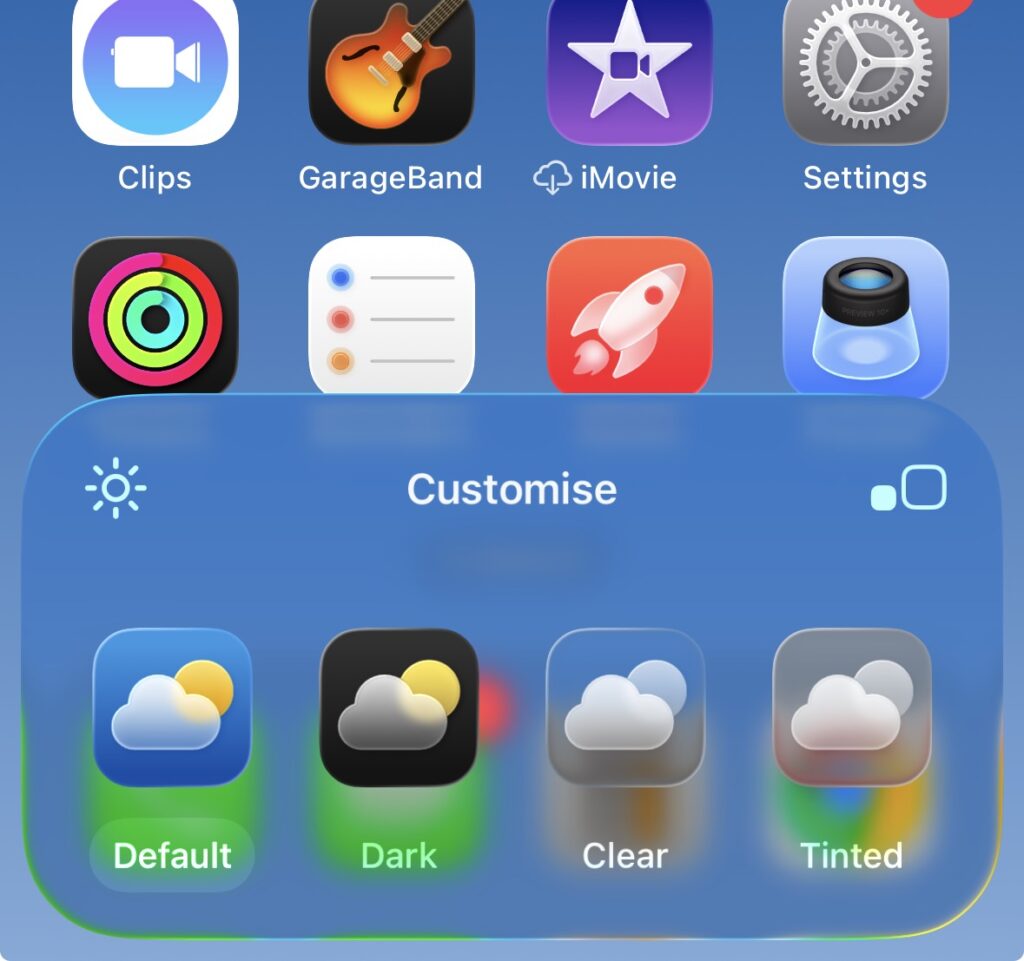
4. Choose “Default” instead of Clear or Tinted
5. Tap the checkmark in the top-right to apply
Your icons immediately return to their traditional, solid appearance. The transparent glass effect disappears completely. This method takes less than 30 seconds to complete.
What this changes:
- App icons become solid and opaque
- Colors appear more vibrant and defined
- Wallpaper no longer shows through icons
- Home Screen looks more like classic iOS
Method 3: Reduce Motion Settings
This approach minimizes all animated transitions system-wide.
Follow these steps:
1. Open the Settings app on your device
2. Scroll down and tap Accessibility
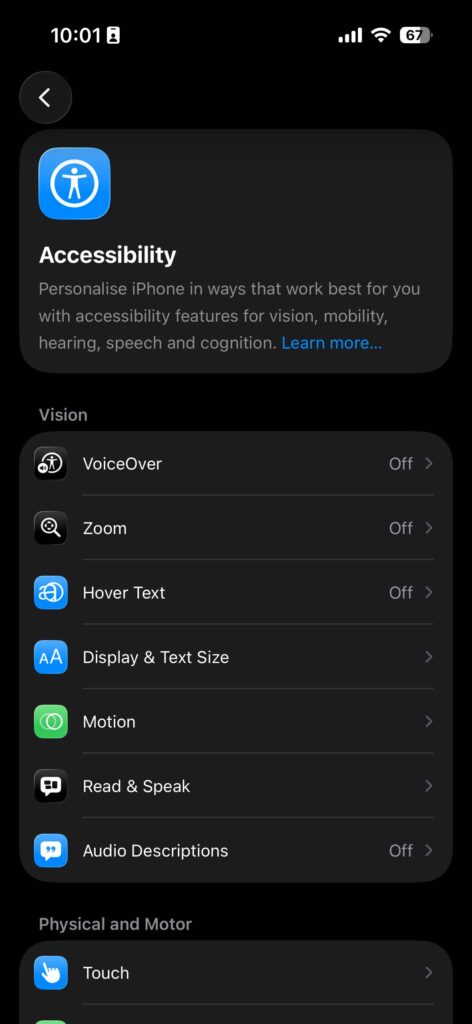
3. Select Motion from the menu
4. Toggle on Reduce Motion
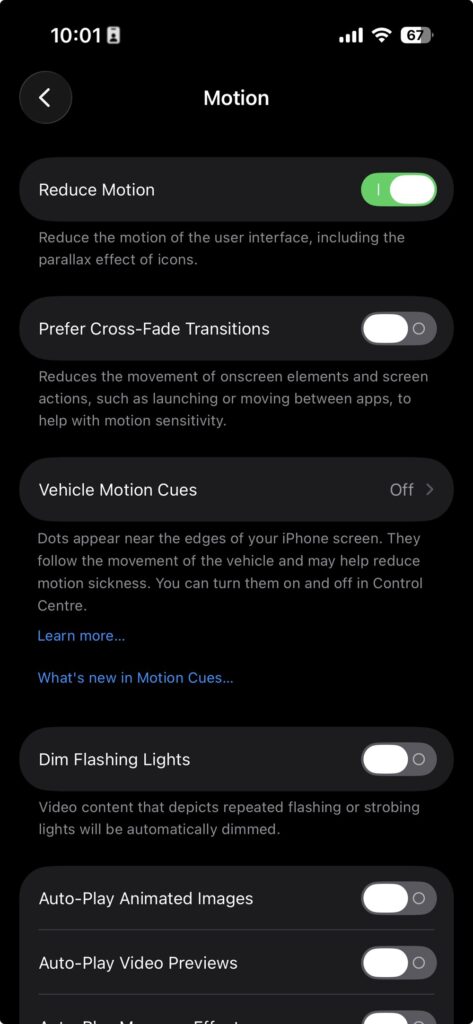
Your iPhone or iPad will immediately apply the changes. Animations will be replaced with simple fade effects. This significantly reduces the liquid glass appearance throughout iOS.
Additional benefits of Reduce Motion:
- Faster app launching and closing
- Improved performance on older devices
- Extended battery life during typical use
- Reduced eye strain for sensitive users
Method 3: Reduce Transparency
Transparency effects contribute heavily to the liquid glass aesthetic. Disabling them creates a more solid, opaque interface.
Here’s how to adjust transparency:
- Navigate to Settings
- Tap Accessibility
- Choose Display & Text Size
- Enable Reduce Transparency
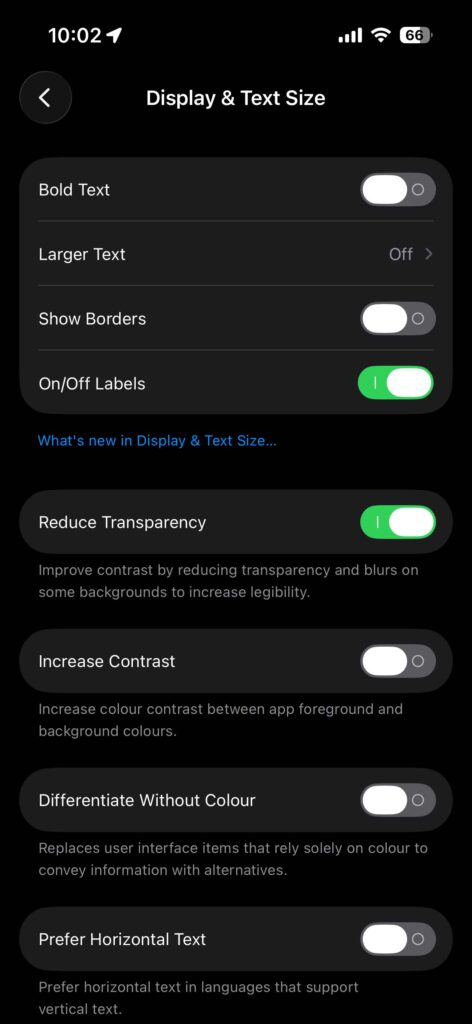
This setting removes blurred backgrounds and glass-like overlays.
Control Center, notifications, and folders will appear more solid.
The combination of reduced motion and transparency delivers the most dramatic change.
Method 4: Adjust Animation Speed (Advanced)
Tech-savvy users can modify animation speeds through developer settings. This doesn’t completely remove liquid glass but makes effects less noticeable.
Note: This requires enabling Developer Mode, which involves additional steps and risks. Most users should stick with Methods 1,2 and 3 for safety and simplicity.
What Changes After Disabling Liquid Glass?
Understanding the visual differences helps you decide if these adjustments suit your needs.
Visual Transformations You’ll Notice
- App icons appear solid with vibrant colors
- Home Screen looks more like iOS 17 and earlier
- Pop-up windows show less background content
- System interfaces gain improved contrast
- Text becomes easier to read against backgrounds
- Overall appearance feels more traditional
What Is Liquid Glass on iOS Devices?
Liquid Glass represents Apple’s innovative approach to interface design. It creates flowing, glass-like visual effects throughout your iOS system. These effects appear when you swipe between apps, open notifications, or navigate menus.
The feature aims to make interactions feel more natural and fluid. Think of it like water flowing across your screen instead of rigid, static movements.
Key characteristics of Liquid Glass include:
- Smooth transition animations between screens
- Semi-transparent overlays with blur effects
- Dynamic reflections that respond to device movement
- Enhanced depth perception in the user interface
Apple introduced variations of this design philosophy across recent iOS versions. The liquid glass effect adds visual polish but requires additional processing power. This can impact battery life on older devices.
Why Users Want to Disable Liquid Glass
Not everyone appreciates the liquid glass aesthetic. Several valid reasons exist for wanting to turn off this feature.
Performance Concerns
Older iPhone and iPad models may struggle with intensive animations. The liquid glass effect requires continuous GPU rendering. This can cause noticeable lag when opening apps or switching between tasks.
Users with iPhone 11 or earlier models often report smoother performance after disabling animated effects.
Battery Life Impact
Visual effects consume more power than standard interfaces. Every animation requires your processor to work harder. This directly translates to faster battery drain throughout the day.
If you need your device to last longer between charges, reducing animations helps significantly.
Accessibility and Motion Sensitivity
Some people experience discomfort from excessive screen motion. Liquid glass effects can trigger dizziness or headaches in motion-sensitive individuals. Apple recognizes this concern and provides accessibility options to address it.
Personal Preference
Sometimes you simply prefer a cleaner, more minimalist interface. The liquid glass look might feel too busy or distracting for your workflow. Your device should match your personal style and needs.
Performance Improvements
Most users experience noticeable speed increases. Apps open faster because your device skips animation rendering. Older iPhones benefit most from these optimizations.
You might see 15-20% better battery life with both settings enabled. The exact improvement varies based on your usage patterns and device model.
Trade-Offs to Consider
Some users miss the visual polish of liquid glass effects. The interface becomes more utilitarian and less visually impressive. Additionally, certain app developers design interfaces expecting animations to be active.
Screen recording and screenshots work identically regardless of these settings. You won’t lose any core functionality by disabling liquid glass.
Troubleshooting Common Issues
Settings Not Taking Effect
If changes don’t appear immediately, try these solutions:
- Restart your iPhone or iPad completely
- Update to the latest iOS version available
- Check that both Reduce Motion and Reduce Transparency are enabled
- Reset all settings (Settings > General > Transfer or Reset iPhone > Reset > Reset All Settings)
Specific Apps Still Show Animations
Third-party apps may include their own animation systems. These don’t always respect iOS accessibility settings. Contact the app developer if specific apps ignore your preferences.
Battery Life Not Improving
Disabling animations helps but isn’t a miracle solution. Check for other battery-draining factors:
- Background app refresh settings
- Location services running constantly
- Screen brightness set too high
- Outdated apps requiring updates
Alternative Customization Options
Beyond turning off liquid glass, iOS offers other ways to personalize your experience.
Dark Mode
Dark Mode reduces screen brightness and can complement your minimalist setup. It also helps with eye strain during evening use.
Enable Dark Mode: Settings > Display & Brightness > Dark
Dynamic Wallpapers
Static wallpapers consume less resources than dynamic or live wallpapers. Choose a simple, solid-color background for maximum performance.
Widget Customization
Fewer home screen widgets mean less background processing. Keep only the widgets you actively use daily.
Frequently Asked Questions
Q1: Will turning off liquid glass void my iPhone warranty?
No, adjusting accessibility settings is completely safe and Apple-approved. These are built-in options designed for user customization. Your warranty remains intact regardless of these changes.
Q2: Can I turn off liquid glass for specific apps only?
Unfortunately, iOS applies these settings system-wide. You cannot selectively disable animations for individual apps. The settings affect your entire device uniformly.
Q3: Does disabling liquid glass affect Face ID or camera performance?
Not at all. Face ID, cameras, and all hardware functions work identically. These settings only change visual interface elements, not core device capabilities.
Q4: Will I need to reapply these settings after iOS updates?
Your accessibility preferences typically persist through updates. However, major iOS versions sometimes reset certain settings. Check your configuration after significant updates to ensure preferences remain active.
Q5: Can I create a shortcut to toggle liquid glass on and off quickly?
Yes, you can use the Shortcuts app to create accessibility toggles. This allows quick switching between standard and reduced animation modes without navigating through settings menus.
Disclaimer
This guide provides information based on current iOS features and settings. Apple frequently updates iOS with new features and design changes.
Some steps or menu locations may vary depending on your specific iOS version. Always back up your device before making significant changes.
The performance improvements mentioned represent typical user experiences but may vary based on device model, age, and usage patterns.
This article is for informational purposes only and does not constitute official Apple support guidance. For device-specific issues, contact Apple Support or visit an Apple Store for professional assistance.
Ready to optimize your iPhone or iPad experience?
Start by accessing your Accessibility settings today and discover how much smoother your device can run. Share this guide with fellow Apple users who might benefit from a cleaner, faster iOS interface. Your perfect device setup is just a few taps away!

T’kal is the lead strategist and developer behind Apple Headlines. With a background in digital marketing and web development, he specializes in technical Apple troubleshooting, software news, and hardware rumors. T’kal focuses on delivering high-authority tech content that bridges the gap between Apple enthusiasts and the latest industry innovations.


