


Screen recording on an iPhone is a powerful feature many users miss.
You can capture an app tutorial, gameplay, social media stories, or save important video calls.
Apple built Screen Recording into iOS, so you don’t need a third-party app.
Many users ask the same thing: How do I turn on Screen Recording on my iPhone?
This guide explains everything you must know. Step-by-step instructions, easy fixes, and tips included.
Whether you use an iPhone, iPad, or iPod touch—this guide helps you master the feature in minutes.
Short Story
- Screen Recording is built into iPhone, iPad, and iPod touch
- Add it to Control Center before using
- Microphone recording must be enabled manually
- Videos save directly to Photos
- Some apps block recording for privacy
What Is Screen Recording on iPhone and How Does It Work?
Screen Recording captures everything happening on your screen.
It can record:

- Apps and menus
- Streaming content (based on copyright rules)
- Gameplay and tutorials
- Video calls and voiceovers
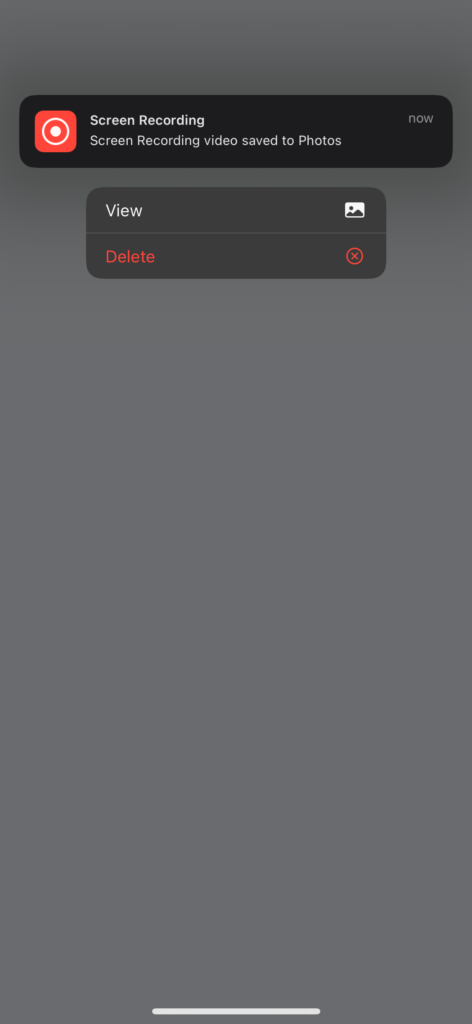
Your video saves directly to Photos. From there, you can edit, trim, or share it.
How to Enable Screen Recording on Your iPhone
Many users ask: Why can’t I find my Screen Recording on my iPhone?
Because it first needs to be added to the Control Center.
Step-by-Step: Add Screen Recording to Control Center
- Open Settings
- Tap Control Center
- Scroll to Screen Recording
- Tap the green + icon to add it
You’re done!
You’ll now see a small circle icon when you swipe the Control Center.
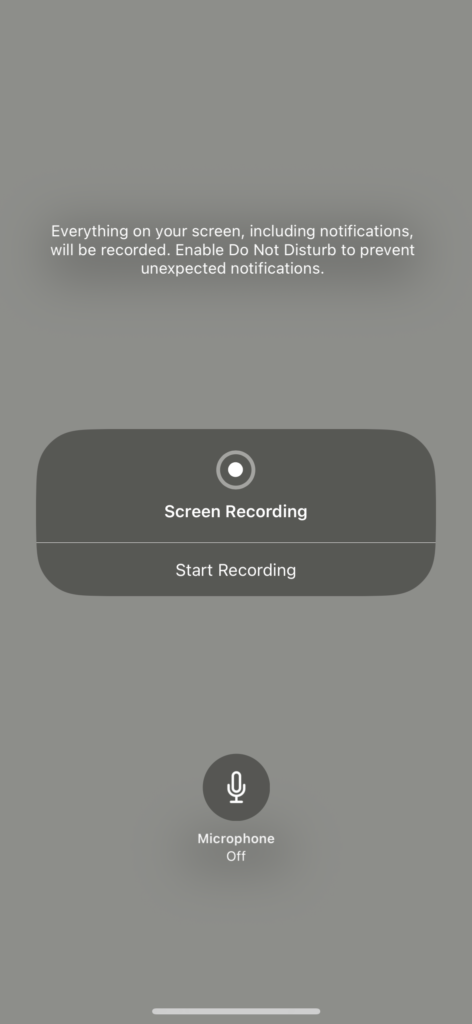
How to Start Screen Recording on iPhone
Once Screen Recording is in Control Center:
Record Your Screen
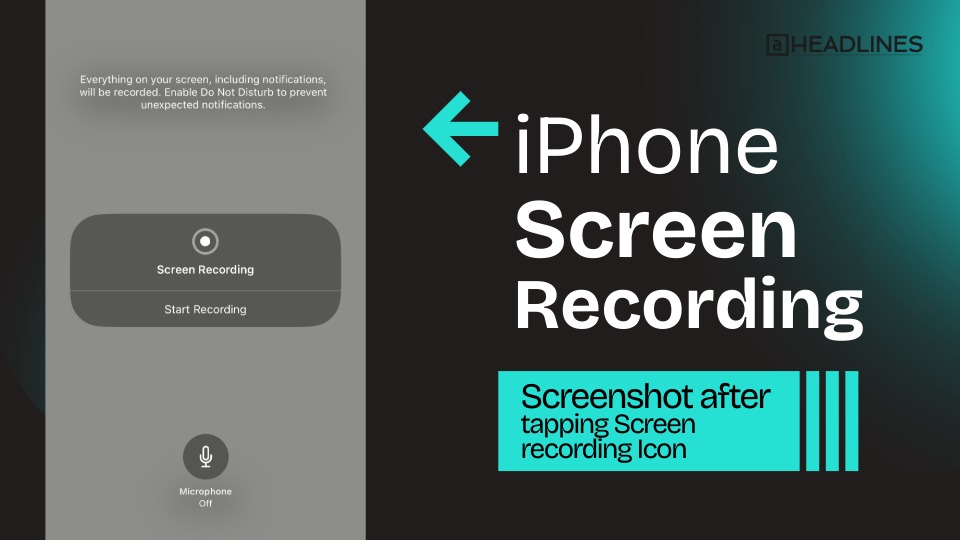
- Swipe down from the top-right corner (Face ID iPhones)
or swipe up from bottom (Home button models) - Tap Screen Recording icon (circle in a circle)
- You’ll see a 3-second countdown
- The icon turns red = Recording is active
To stop recording:
- Tap the red icon in Control Center
OR - Tap the red status bar at the top → Stop
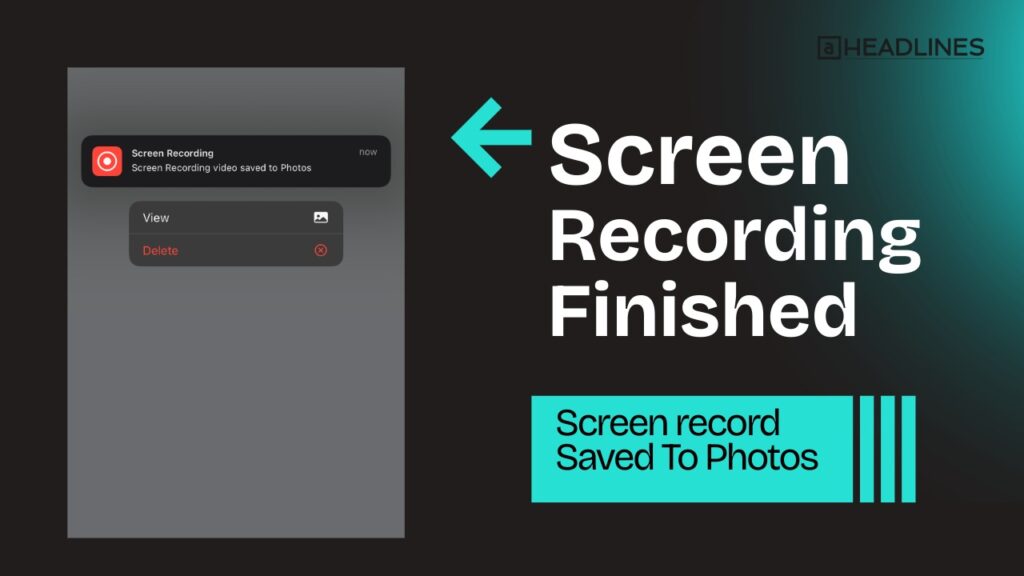
Your recording saves in the Photos app.
Tip: Keep your phone in Do Not Disturb mode to block notifications from appearing in the video.
How to Record Screen With Audio (Microphone)
Screen Recording captures system audio by default.
But to add your voice narration:
- Open Control Center
- Press and hold the Screen Recording icon
- Tap the Microphone icon (turn it on)
- Tap Start Recording
Great for tutorials or explaining steps in a video.
Where Do My Screen Recordings Go?
Many users ask: How do I access my screen recorder?
All recorded videos are in:
📍 Photos → Albums → Screen Recordings
From there you can:
- Trim clips
- Add filters
- Crop the video
- Share to social media
How to Screen Record on iPad or iPod Touch
The process is exactly the same:
- Settings → Control Center
- Add Screen Recording
- Control Center → Tap Record
So whether you own an:
- iPad
- iPad Mini
- iPad Pro
- iPod touch
You can record with one tap.
Why Can’t I Find Screen Recording on My iPhone?
Here are the most common reasons:
| Issue | Fix |
|---|---|
| Not added to Control Center | Add via Settings → Control Center |
| Restrictions enabled | Check Screen Time settings |
| Outdated iOS version | Update iOS to latest version |
| Low storage | Free up space |
| App blocks screen recording (banking/copyright) | Recording won’t work in certain apps |
Screen recording might show a warning like:
“Screen capture not allowed”
This is due to content protection rules.
How to Fix Screen Recording Not Working
Try these quick solutions:
✔ Restart your iPhone
✔ Update to latest iOS version
✔ Disable Low Power Mode
✔ Turn off Screen Time restrictions
✔ Reset all settings (if nothing helps)
Screen Time Fix:
- Settings → Screen Time
- Tap Content & Privacy Restrictions
- Turn Content Restrictions → Allow Screen Recording
Pro Tips for Better Screen Recording
Remove Background Noise
Record in a quiet room
Use AirPods or built-in mic
Clean Up Notifications
- Turn on Focus / Do Not Disturb
- Disable banners
Highest Quality Options
Record in landscape mode for YouTube
Keep brightness high
What You Can & Can’t Record
| Allowed | Not Allowed |
|---|---|
| Apps & games | DRM-protected videos (Netflix, Prime Video) |
| Messages | Some banking apps |
| Menus & tutorials | Copyright blocking screens |
Apps that block recording will show a black screen in the final video.
Best Uses of Screen Recording on iPhone
- Teach someone how to use an app
- Capture bugs and send to tech support
- Save funny social media stories
- Record gameplay highlights
- Make TikTok or YouTube content
One iPhone feature with endless possibilities.
Answers about Screen Recording on iPhone
Q1: How do I turn on Screen Recording on my iPhone?
Add it from Settings → Control Center → Screen Recording.
Q2: How do I access my screen recorder?
It appears in the Control Center after you add it.
Q3: Why can’t I find my screen recording in Photos?
Recording may have failed due to low storage or blocked app.
Q4: Does screen recording capture phone calls?
Audio from calls is often blocked due to privacy.
Q5: Can I record with sound?
Yes. Long-press the record icon and enable the Microphone.
Disclaimer
This guide is for educational purposes only.
Do not record protected or copyrighted content without permission.
Respect privacy and legal rules when using Screen Recording.

Virginia J. Alfonso is a seasoned technology writer with a passion for all things digital. With over a decade of experience covering the latest in tech innovation, gadgets, and software, Virginia brings a unique blend of technical expertise and accessible writing to her work. Her articles focus on making complex tech topics easy to understand for readers of all levels.


